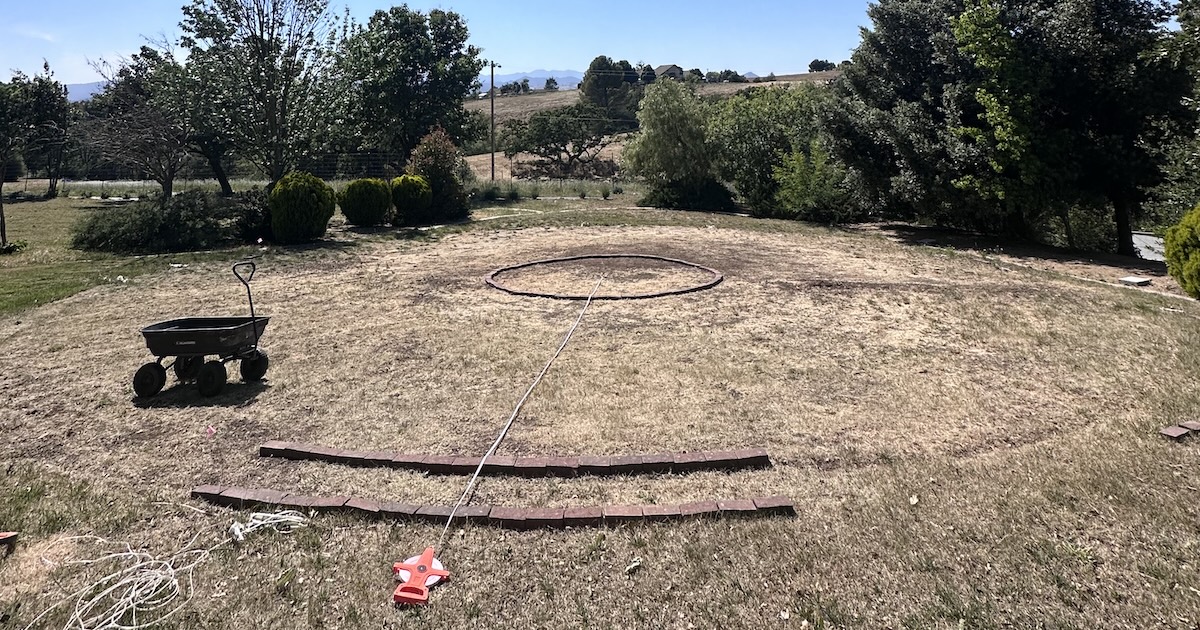
We are building an 11 circuit, Chartres-style labyrinth.
We needed a labyrinth calculator to get the dimensions right, so we built one. Here it is.
A weblog by Christopher Carfi, since 2004.
We are building an 11 circuit, Chartres-style labyrinth.
We needed a labyrinth calculator to get the dimensions right, so we built one. Here it is.

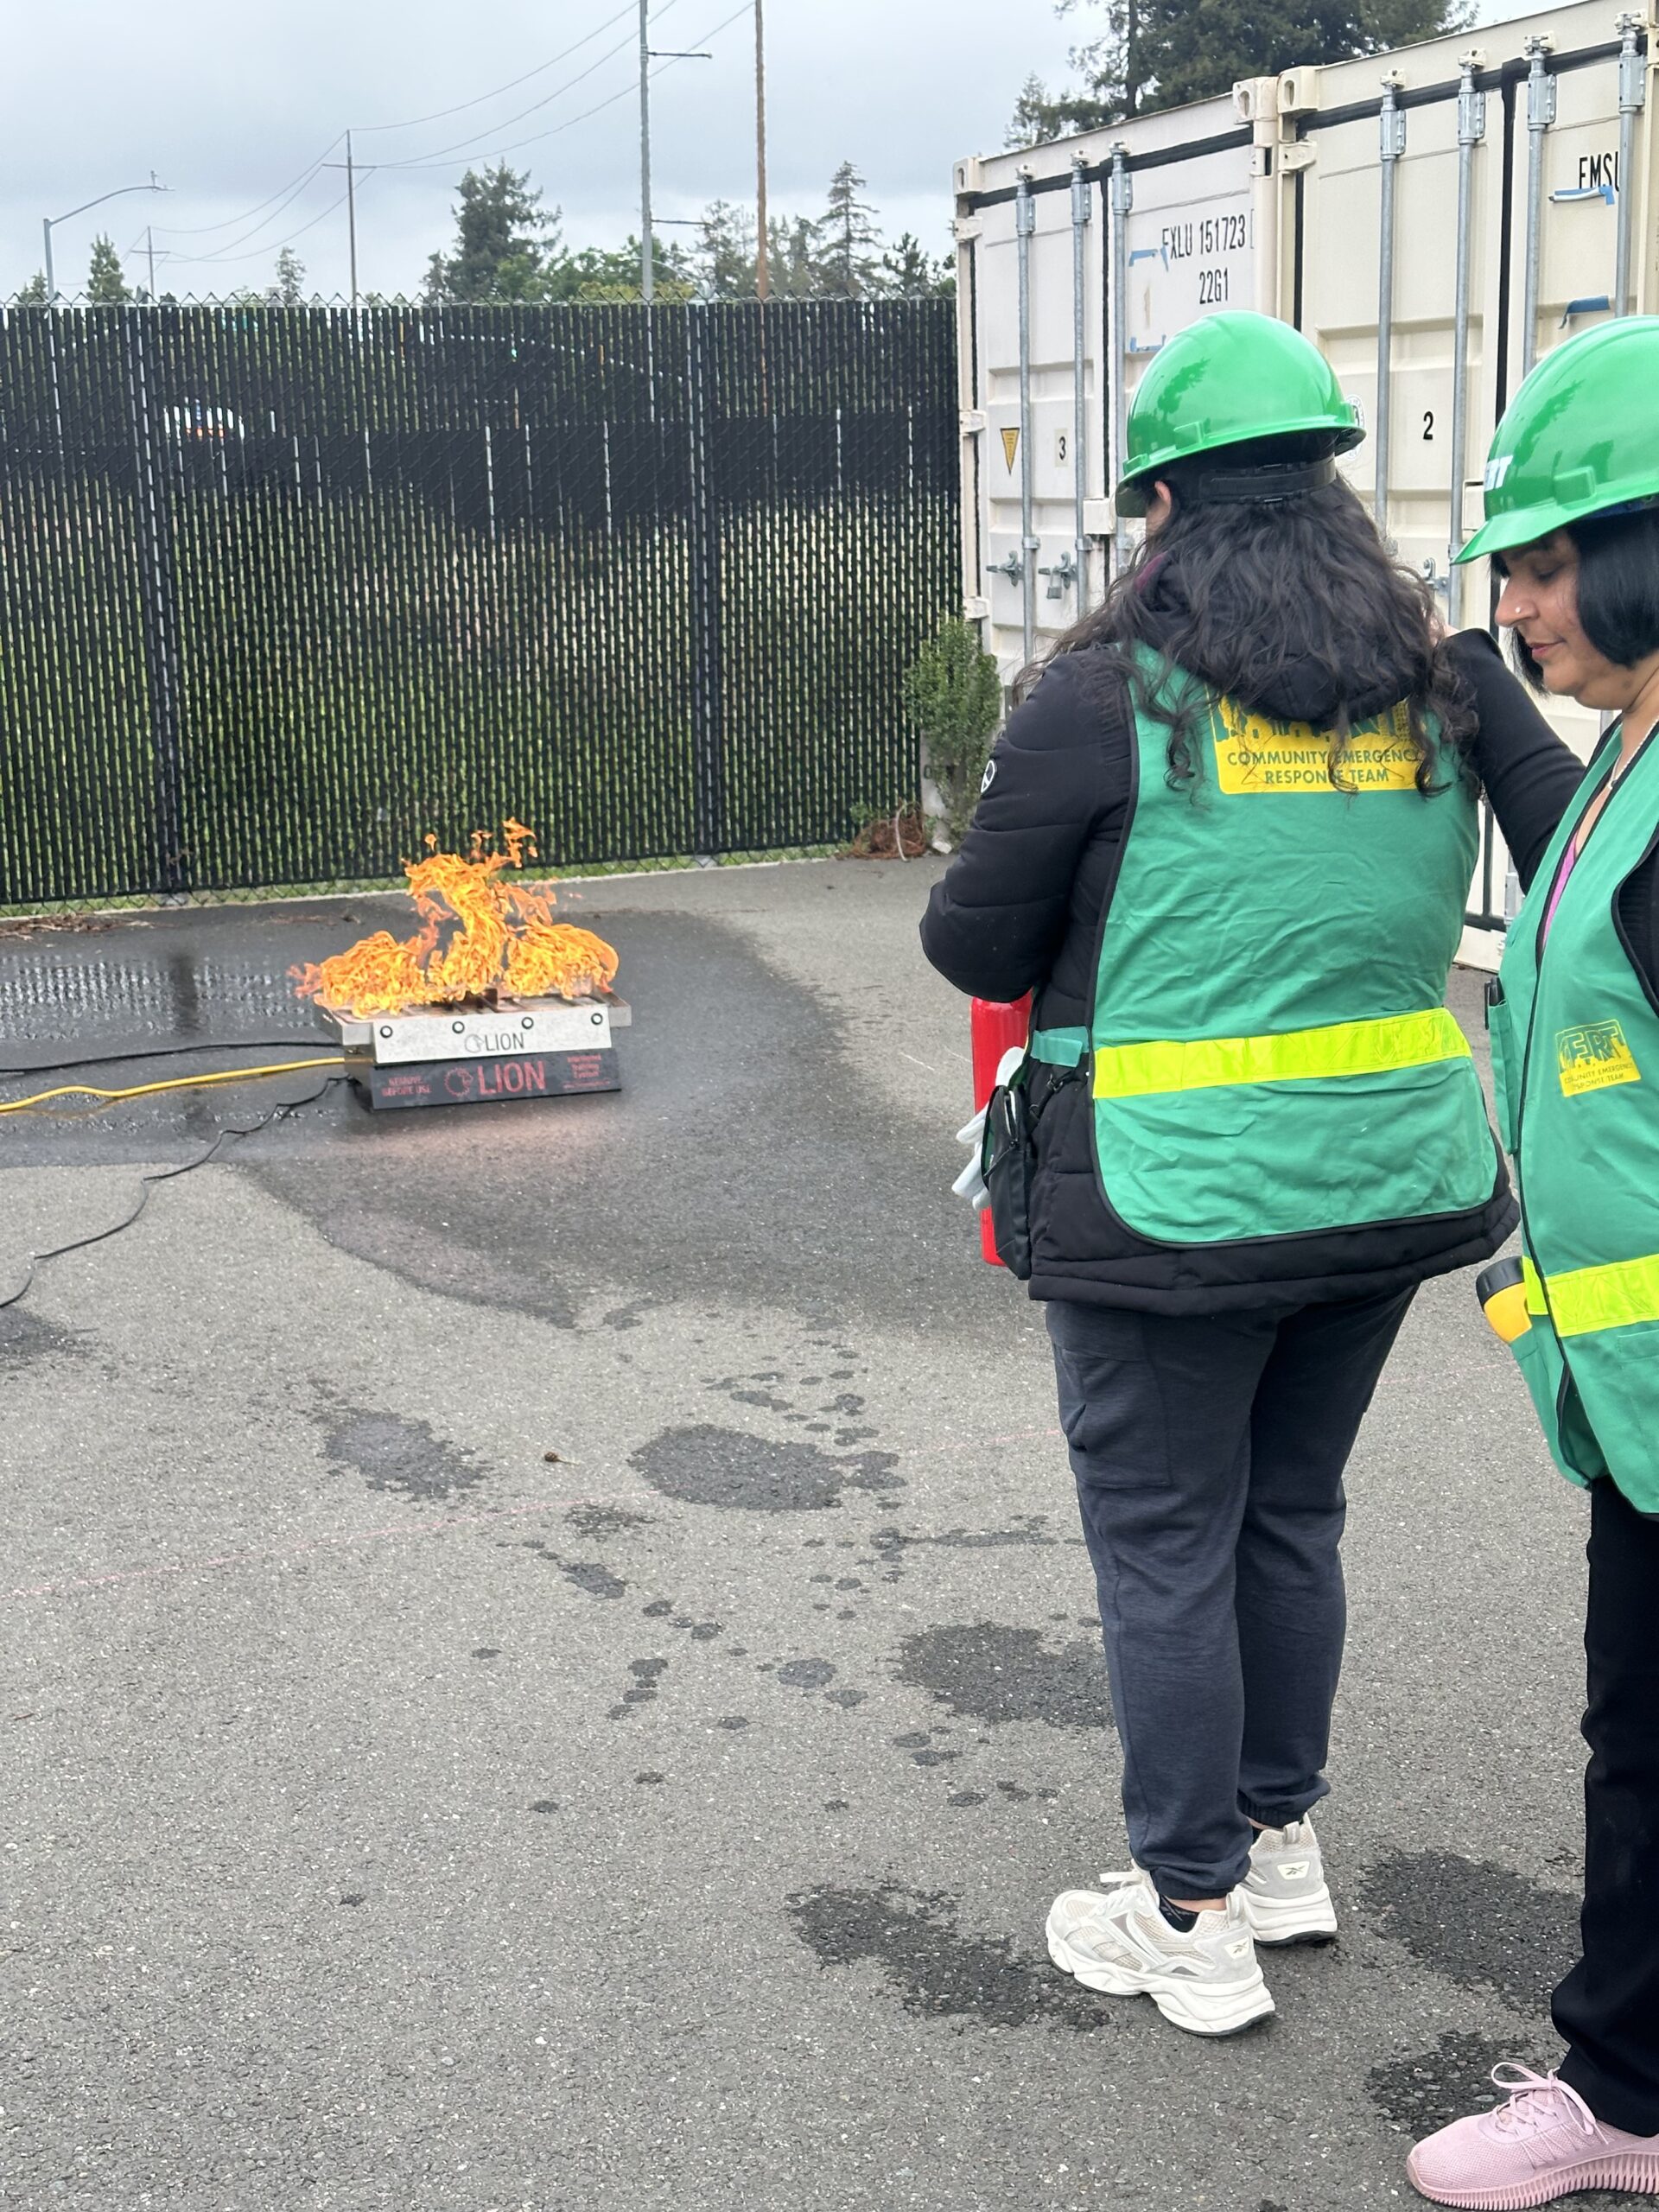
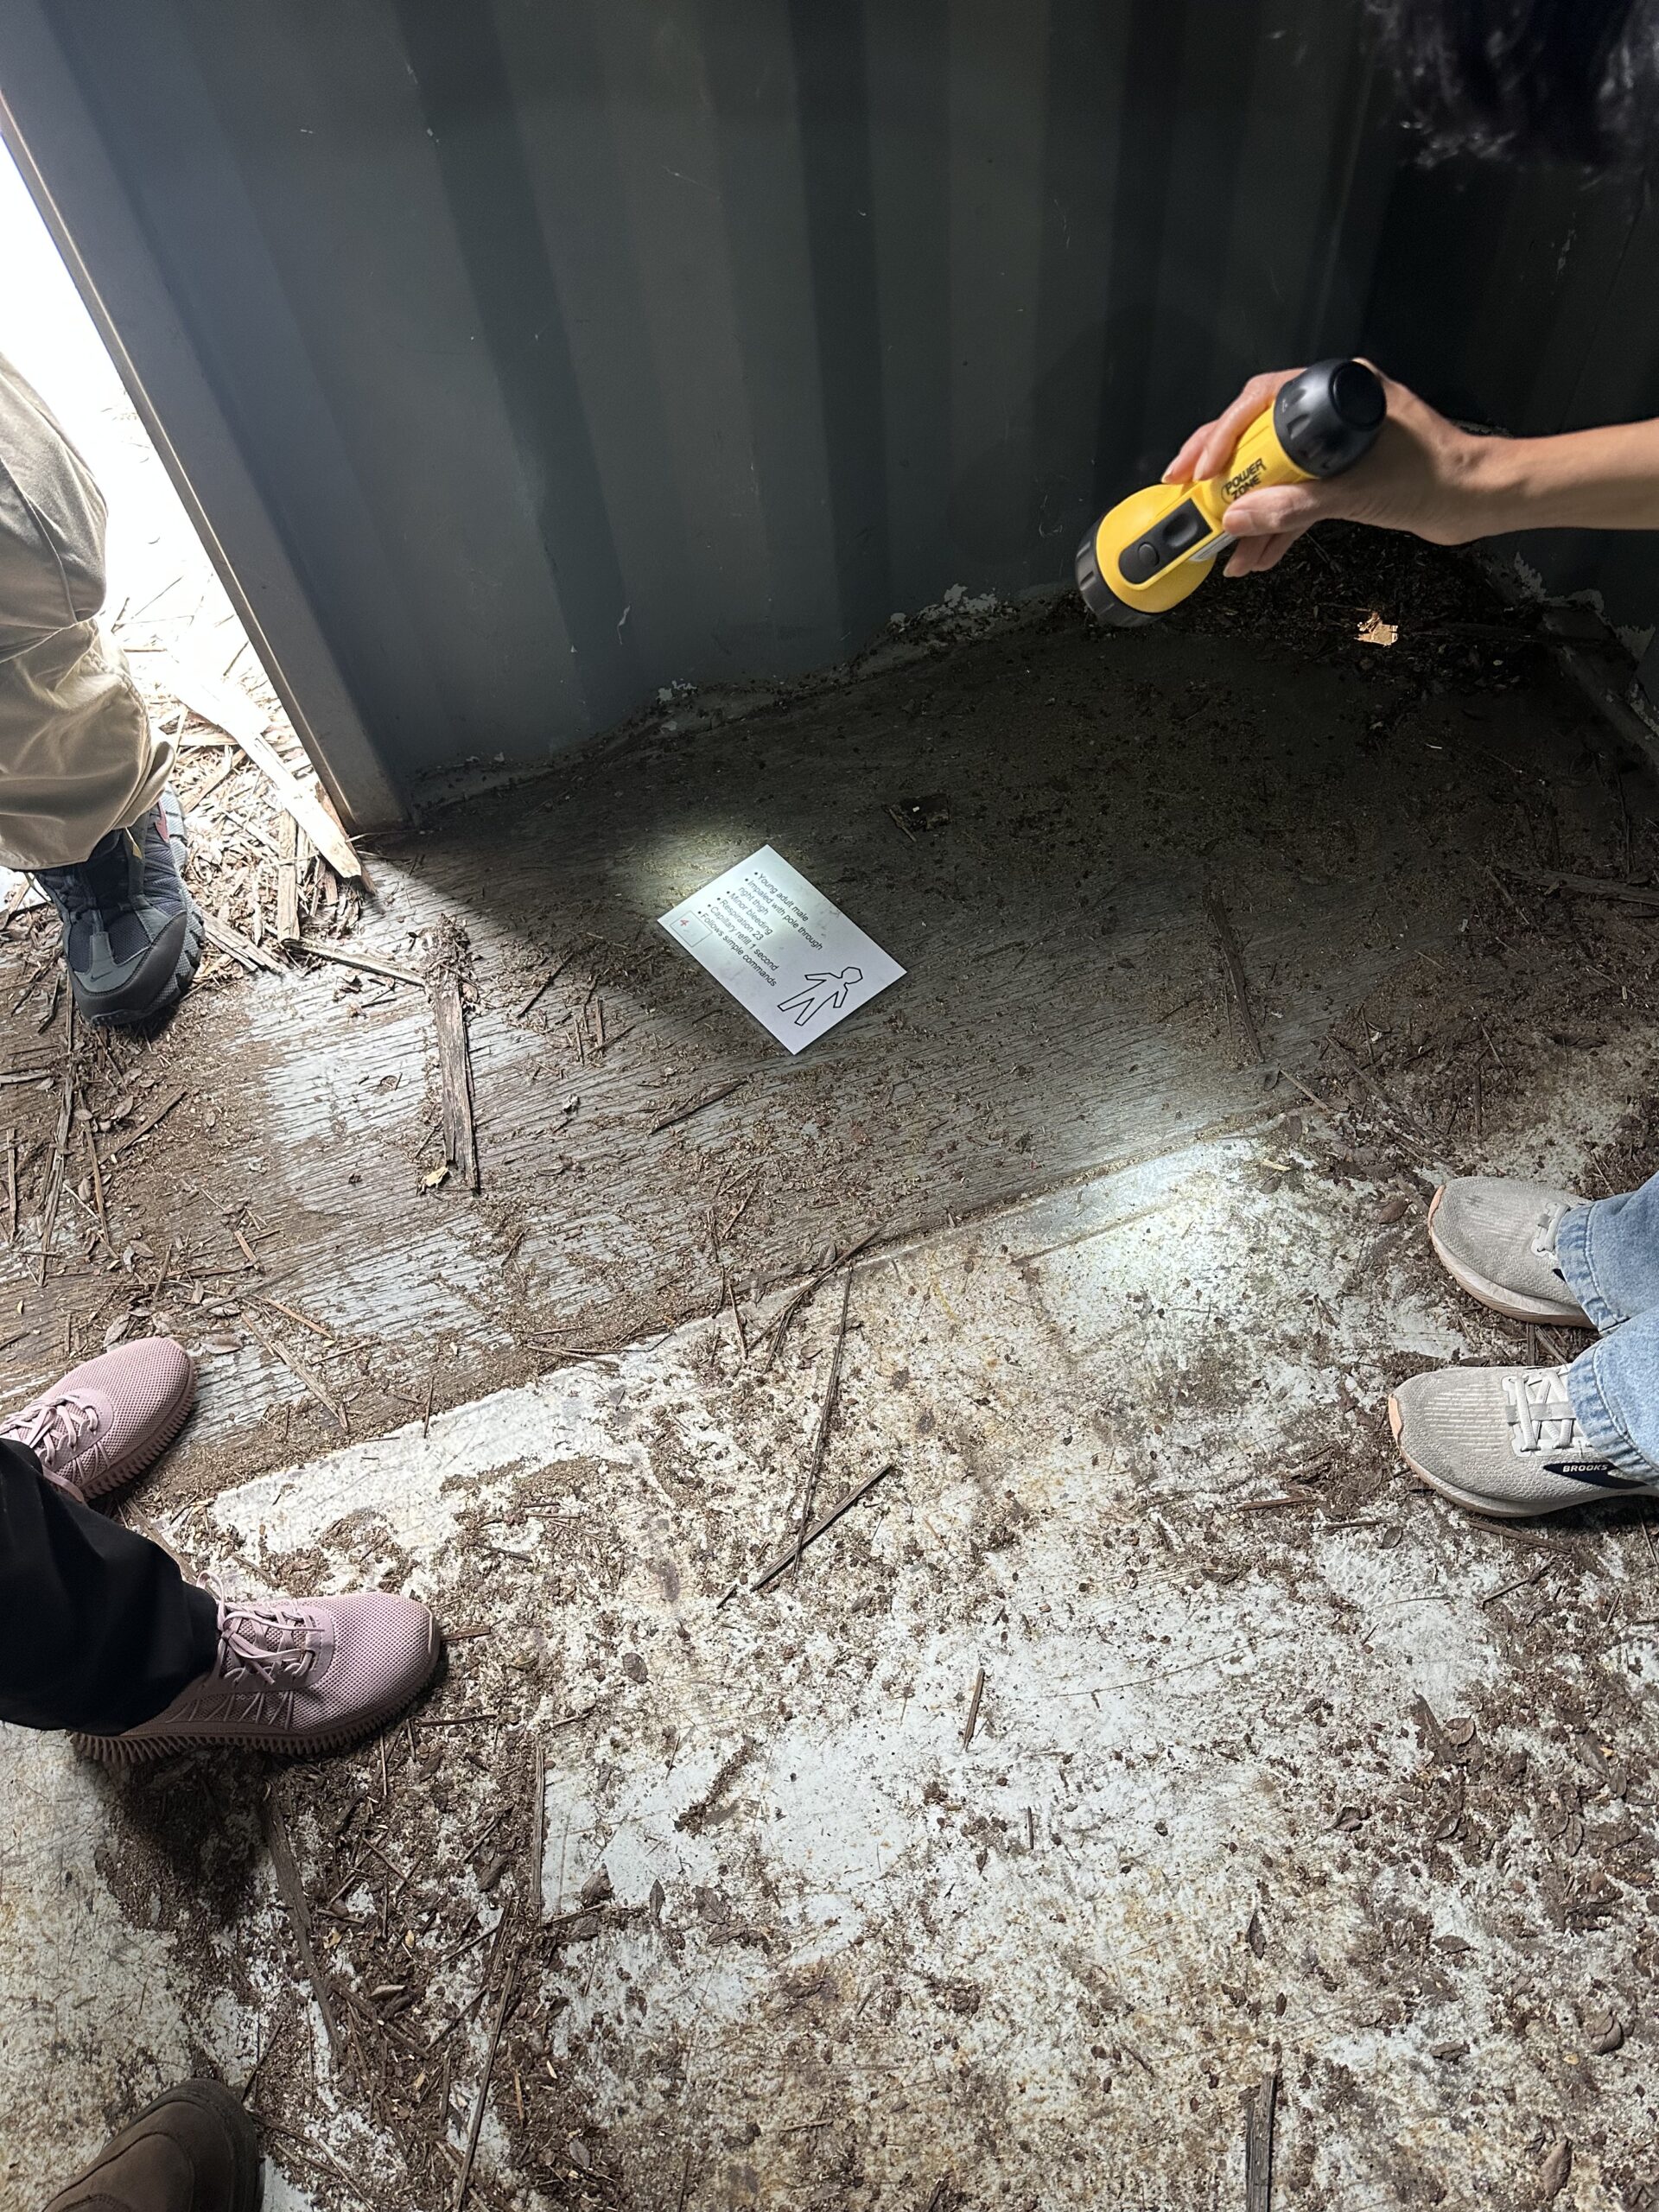
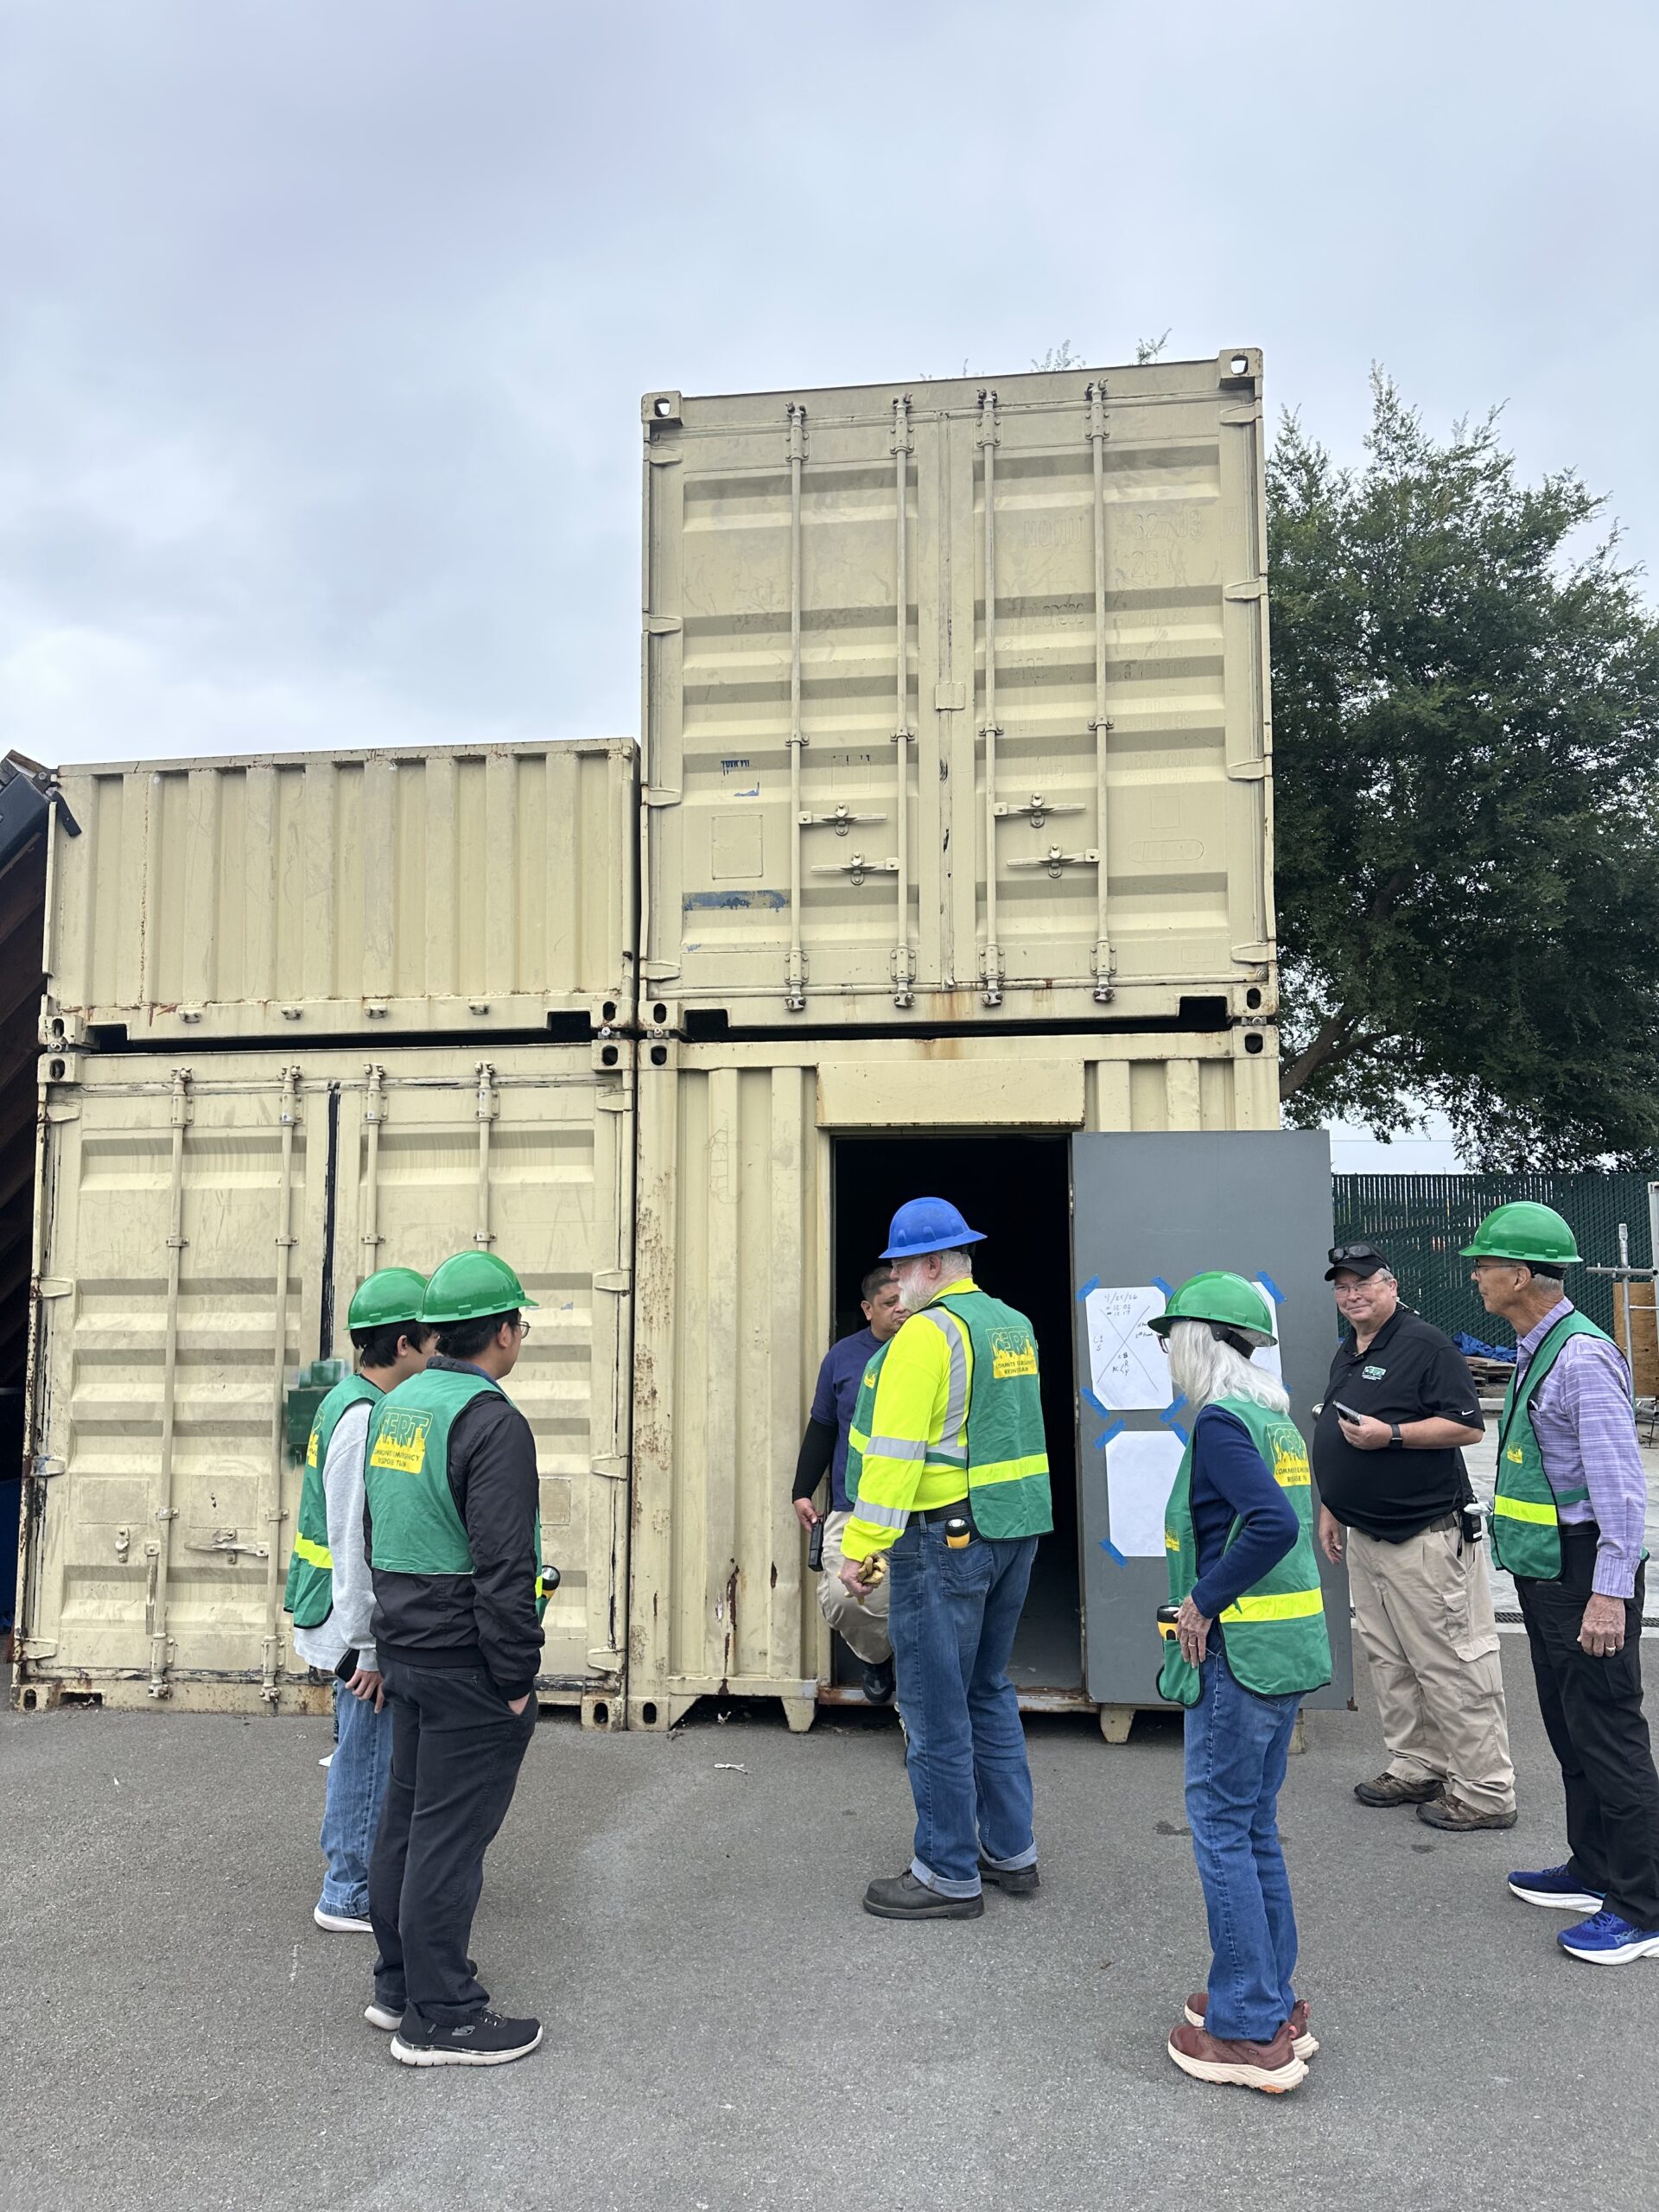
Had a great time and learned a TON doing CERT (Community Emergency Response Team) training over the past two weekends. The whole course was about 20 hours, and included topics including:
Overall, a highly worthwhile use of a couple of days. Useful things to know for sure.


I read Packy McCormick’s Not Boring newsletter this morning, and it sparked a realization about an inevitable billion-dollar business. It’s not imminent, but looking at the trajectory of AI, it feels like it’s bound to happen.
Packy noted a critical bottleneck in the coming wave of robotics: Training Data.
We know how this played out for LLMs. The internet provided a massive, pre-existing corpus of text to train the base models. Then, to refine them, companies began paying humans (from gig workers to PhDs) to review outputs and/or feed even more data into the system. We are essentially paying people to teach the AI how to think.
Robots don’t need to know how to create text. They need to know how to move. And unlike text, there currently is no “internet of physical motion” out there for crawlers to scrape and use to feed into their training sets. The training data for messy, real-world tasks (e.g. fixing a sink, wiring a breaker box, perfectly flipping a burger) simply doesn’t exist at scale. We see Waymo and Tesla using cars to create massive data sets to train their autonomous driving systems, but there’s nothing like the scale of the internet for human motion.
This is the gap. Am pretty sure someone will inevitably fill it.
Just as there is now a whole industry to pay white-collar workers (bankers, lawyers) to train LLMs (even as gig workers), we are likely to see a market for paying workers who use their bodies to wear motion capture gear to train humanoid robots.

The technology is pretty much the solved part. We see motion-capture used all the time in entertainment (e.g. Avatar movies, games, etc.). I think the “new” part is the business model, and the conflict it’s about to trigger. I see two ways this plays out.
1. The “Guerilla” Model (let’s call it “Uber for Motion”) Imagine a gig-economy platform that sends you a low-profile mocap shirt and gloves. You wear them under your uniform while you work your shift at Starbucks or Burger King on a construction site. You do your job, the sensors capture the data, and the gig-data marketplace pays you $5/hour on top of your wages for the rights to that data.
You are effectively “data moonlighting” and monetizing your physical labor twice. Once for the coffee you serve, and once for the motion of serving it. The gig economy platform then sells that aggregated motion data to the robotics makers.
The gig workers make a couple of bucks; the platform makes billions.
2. The Enterprise Model (McDonald’s as a Data Farm) Alternatively, large employers realize they are sitting on a goldmine. McDonald’s doesn’t just sell burgers; they own a proprietary process for making burgers. In this model, they require employees to wear the sensors, capturing petabytes of training data (including some “perfect execution” data) every day. McDonald’s then packages this dataset and sells it to Tesla/Optimus or Figure for their bots, unlocking a massive B2B revenue stream that has nothing to do with food.
The Coming Conflict: Who Owns Your Movement?
If a master welder wears a “Guerilla” suit and sells the data of their specific, highly skilled hand movements to a robotics company, did they steal a trade secret? Does the employer own the “how” of the job, or does the worker own their own biomechanics? Is the “Kinetic IP” of workers a thing?
Conversely, if a corporation forces the “Enterprise” model, are they harvesting biometric data without fair compensation?
We are moving from an era where we battled over intellectual property in the form of words and images and sounds to an era where we will battle over the physical and the proprietary value of human motion.
If the robots are coming, who is going to get paid to teach them how to move?

Playa dust is insidious. The surface of the Black Rock Desert is composed of approximately 30% quartz, 45% clays, 10% calcite, and 5% halite (source). It’s incredibly alkaline AND incredibly salty at the same time.
This means that playa dust is corrosive stuff, and it’s super difficult to remove from things.
You need to counteract the chemical properties of playa dust in order to remove it.
Here’s how to clean it off your tent, car, bike, and everything else. This works especially well on stuff like rubber window moldings.
While vinegar (which is acidic) somewhat manages to partially neutralize the alkali (basic) playa dust, the other components of playa dust seem to work together to keep it on everything and make it hard to remove.
The mixture that seems to work best is the combination of water, Calgon, and laundry soap.
For a 16oz mix, we use:


Having tried many different concoctions over the years, this is the one that’s worked the best so far.
We just got back from the playa, and have already run the truck through the car wash once (untreated). While the dust came off the paint finish just fine, the tonneau cover still had the distinctive gray patina of a Black Rock Desert adventure.

We decided to science this thing, and do a little test today.
Of course, we need an experimental bit and a control in order to compare and contrast. Enter some gaffer tape.

We sprayed the left side with the playa mix from the bottle above and wiped it down, and the right side was untreated. We then ran the truck through the car wash again.
Here’s what it looked like immediately after the wash.

And here’s what it looked like after we drove around for a while.

While some of the still-wet dusty bits flowed onto the left side as we drove (as you can see), the left side was WAY less playa-fied than the right side. The right side, even after two runs through the car wash, was still ashen grey, whereas the left side looked almost new where it had been sprayed.
As always, big ups to our friend Amani who turned us onto this combo a couple of years ago!

This piece was incredibly powerful in person — bullet and shrapnel-torn signs and pieces of houses, spelling out “I’m Fine.”
You can click through and scroll into article for detailed photos and backstory.
Wasn’t satisfied with the amount of light being thrown by the headlights on our car, so decided to replace the OEM halogen bulbs with a new, whiter and brighter bulb**.
After wrestling to get the bulb in (c’mon Ford, give us a little room to work with!), I turned on the lights and saw this on the wall of the garage.
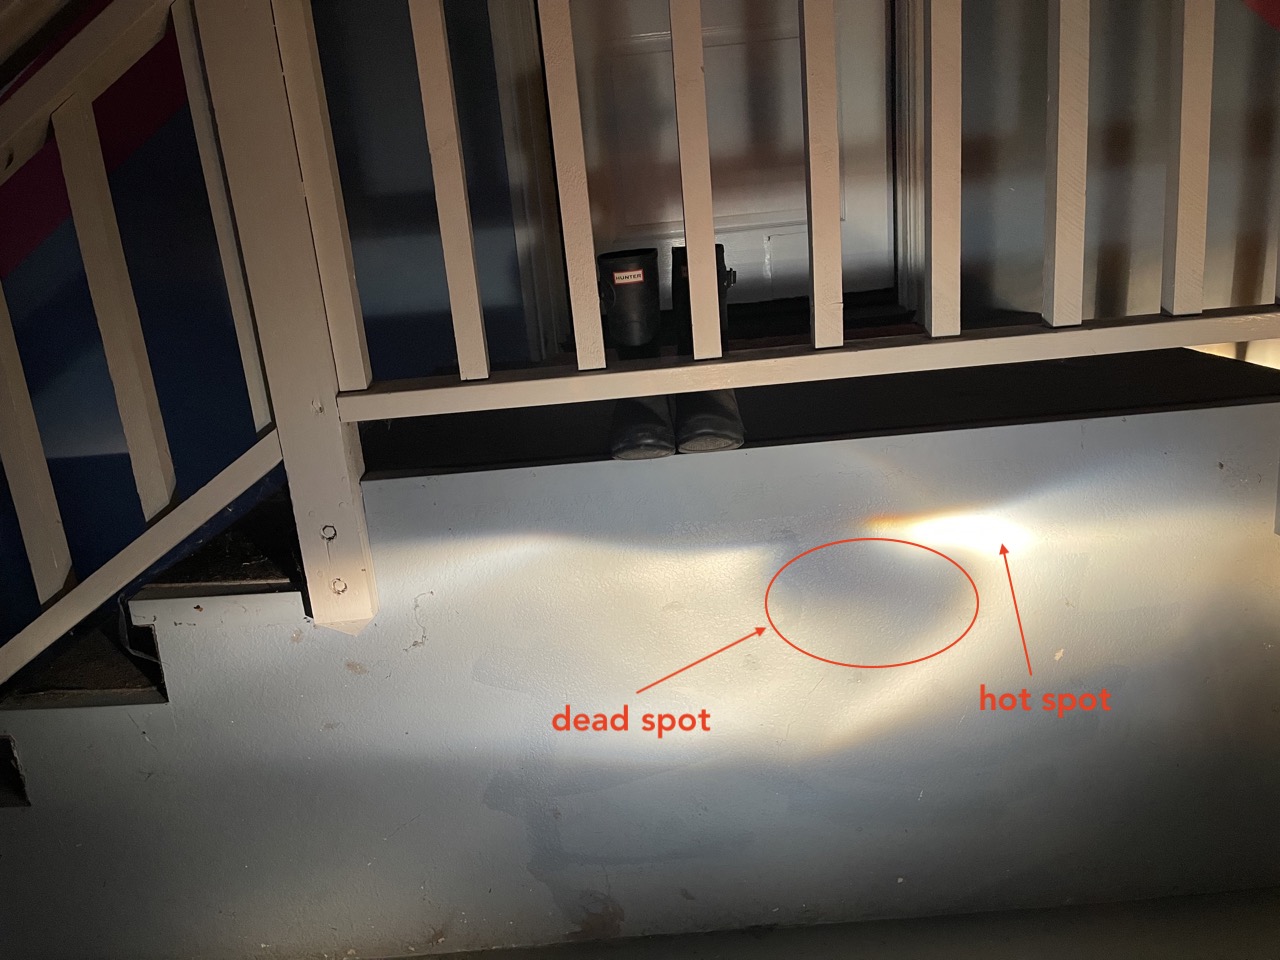
Huge weird dead spot in the middle of the halogen beam, and a big hot spot next to it
Took the car for a drive and, indeed, visibility was — poor — from the driver’s side headlight I’d just replaced.
Knowing that halogens are a little finicky, my first thought was that I’d smudged or somehow gunked up the bulb and was going to need to do the whole procedure again with a new bulb. Was not looking forward to that.
Did some more reading (thanks, Reddit!) and went down a rabbit hole on how the whole assembly for headlights works. The big thing in headlights is the reflector that, well, reflects and shapes the beam down the road, irrespective of bulb type. Those reflectors are designed and tuned for a particular bulb type, shape, and placement, and any variation from that can have negative effects. (This is why, for example, there are a ton of posts out there on why not to do a 1:1 replacement from halogens to LEDs, for example, without changing out the whole system — the placement of the light source on LED bulbs is different, and will likely reflectively throw light in all sorts of unexpected places, like oncoming drivers’ eyes.)
One of the threads I found noted that it was possible that if the bulb isn’t seated completely, it will have results similar to what I was seeing. This is because halogen bulbs have three tabs on them that seat into the housing, and if only two of the three tabs are locked in, the bulb will be on a slight angle and mess up the optics. The bulb will still stay in with only two of the three tabs seated, but it will be on a slight angle and completely mess up the way the beam is reflected and thrown.
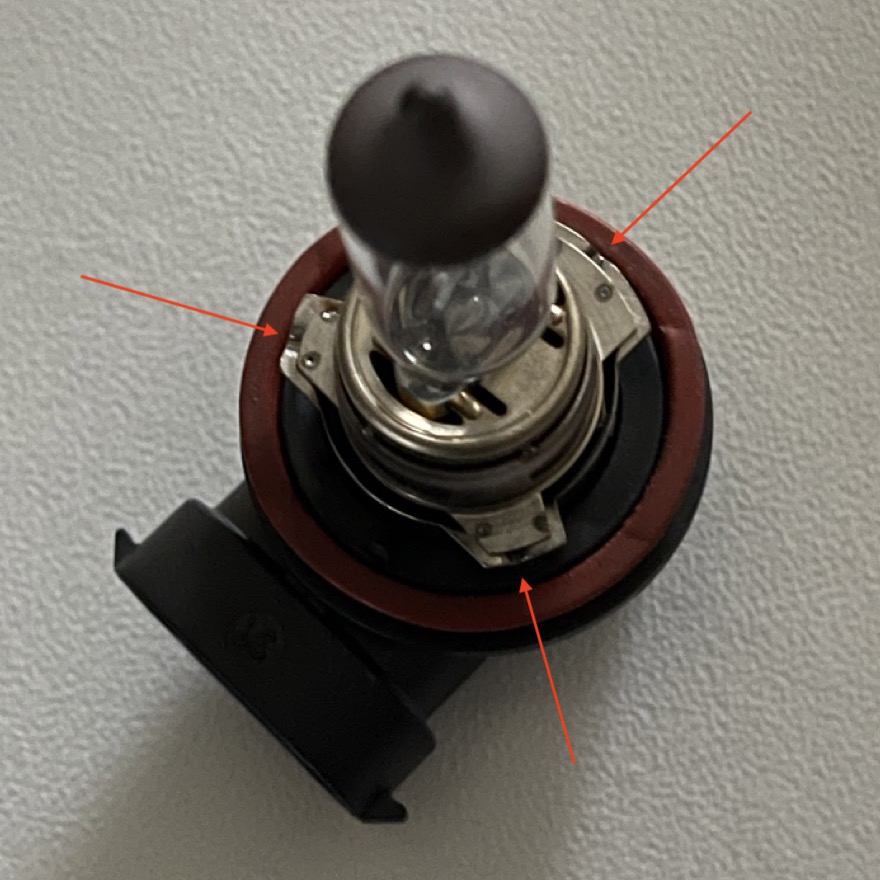
All three tabs need to be seated correctly
I put the nitrile gloves back on, reached in and, sure enough, it sure felt like the bulb was on a little bit of an angle. I pulled the bulb out and felt around and then fiddled with the placement until I was relatively sure that all three tabs were seated properly.
I turned on the lights and…
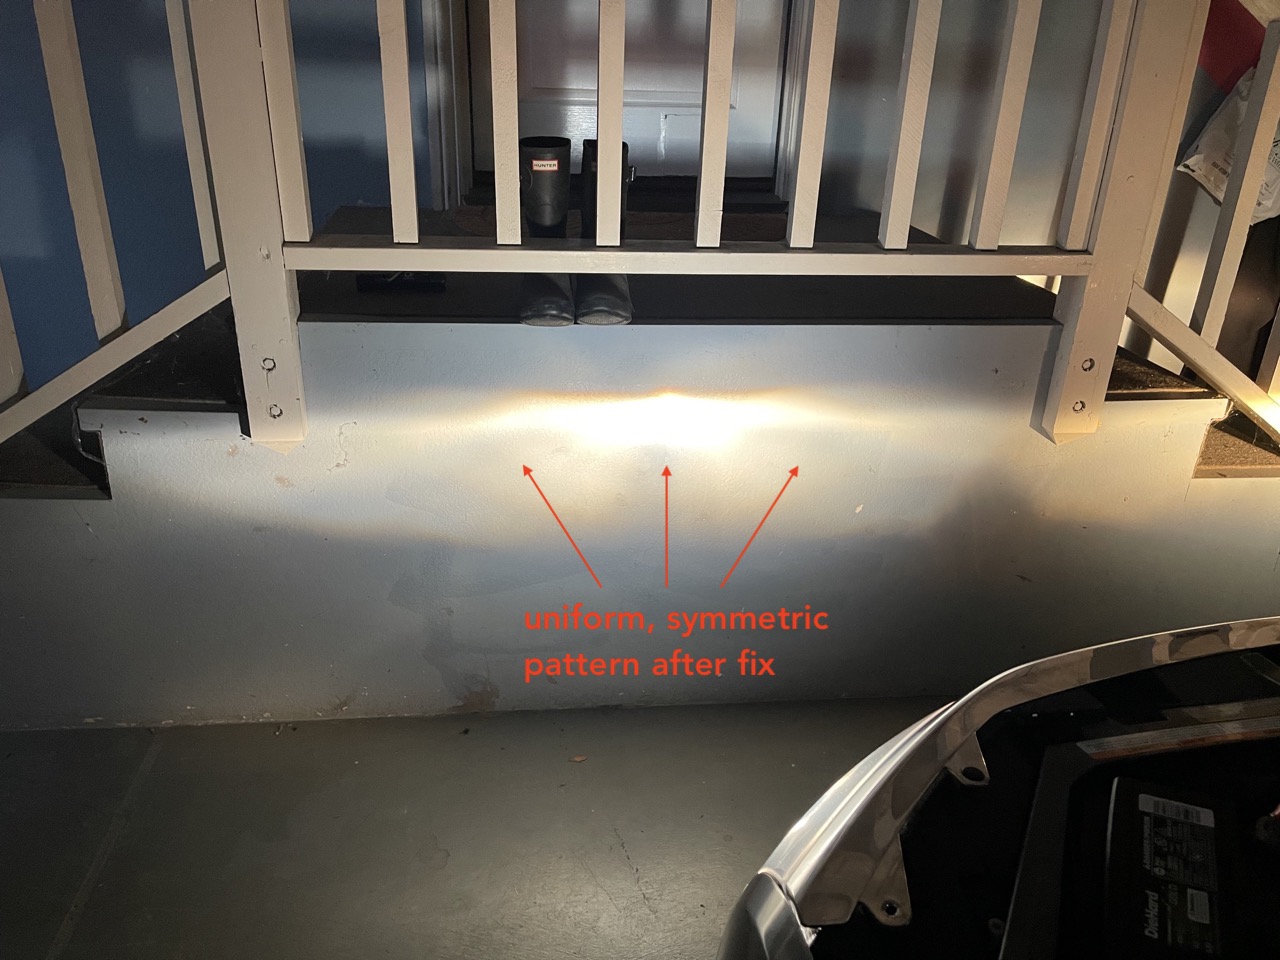
Success! Totally glad I took the “before” photo so I could compare and see if what I was changing had any effect on the outcome.
Much better! Not only was the shape of the driver’s side beam pattern symmetric, it also totally matched the shape I was seeing from the legacy bulb on the passenger side that had not been touched.
Going to try it out again and road test things tonight, but this seems to be the winner.
** – Went with the Sylvania Silverstar Ultra (H11), but bulb brand is irrelevant for this issue.
Meta just announced MusicGen, so gave it a shot. Here was the prompt I gave it:

And here’s what it came up with:
Solid potential here.
I noticed that it interpreted “bass kick drum” as “bass, kick drum” but I’m not unhappy with the result at all.
It struck me the other day that since ChatGPT and the other Large Language Model based AI systems can take inputs, remember the context of a conversation thread, and keep track of what’s been discussed in the thread, that they might be able to be used as dead-simple to-do list managers. So, I decided to try it.
It works!

Ok, it can add a couple of items to the list and show me the list. Good so far. Let’s see what happens when I try to add an additional item, or remove items from the list.
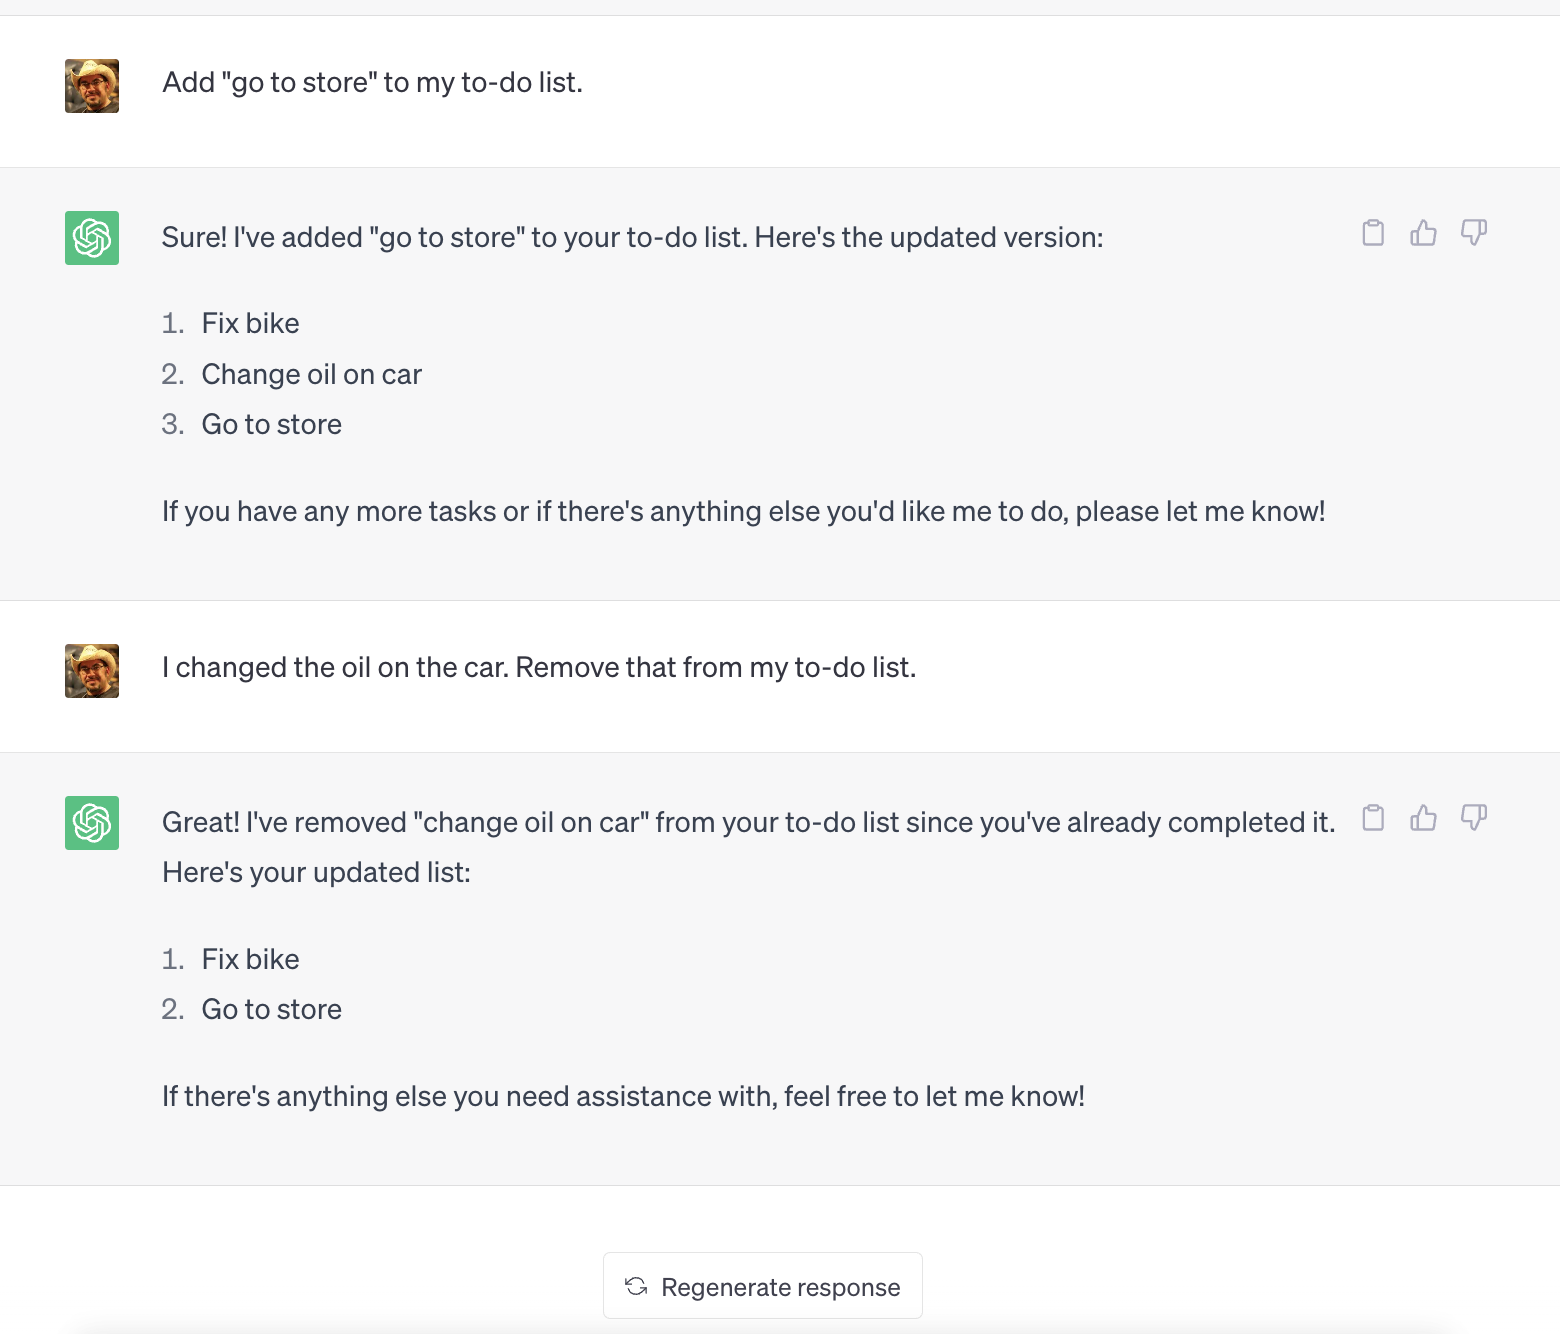
Ok! This is trivial, useful, and simple. I like it.
Here are a few prompts I found work really well:
I then realized I wanted to have a work to-do list, as well as a personal one. Let’s try this:
Success! It seems to manage both lists independently in the same conversation, as long as I specify which list I am referring to in a particular prompt (e.g. “Add ‘get coffee’ to my personal to do list”).

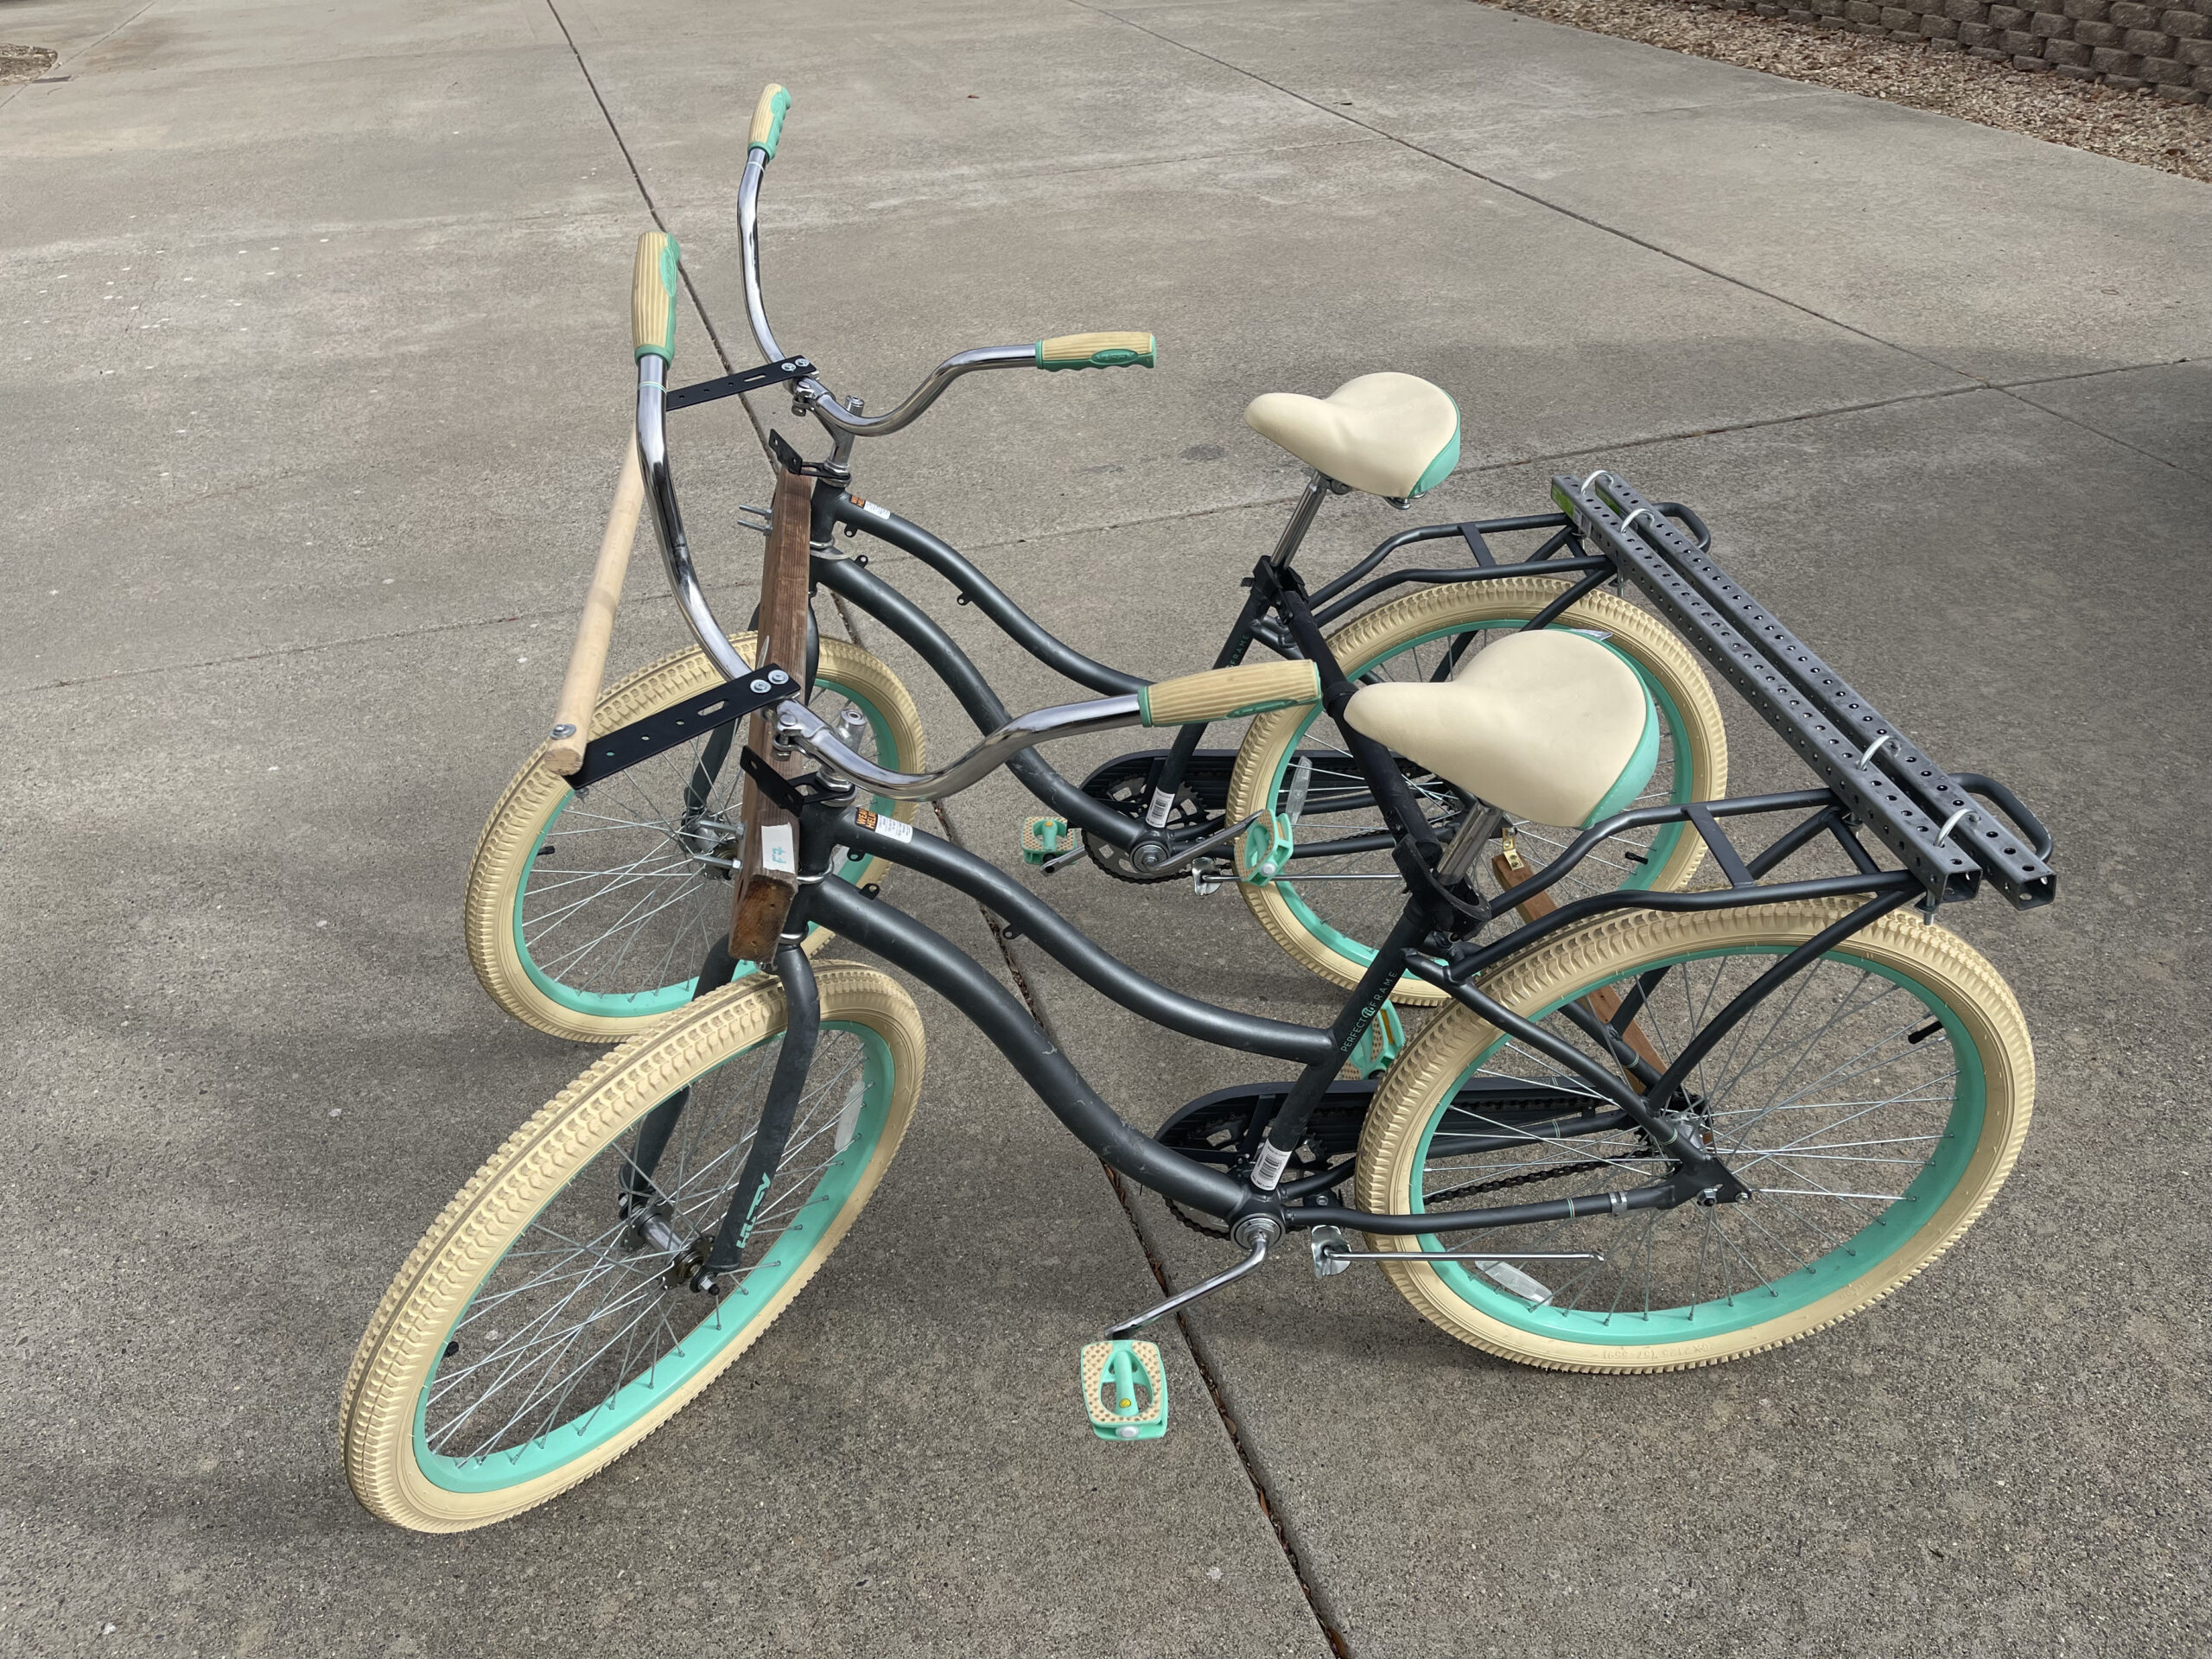
We’ve all seen the traditional front-and-back tandem bikes, where one person sits in front and the other sits in back. However, a few years ago I went on a brief ride with a friend who brought a side-by-side, “sociable tandem” bike to a retreat we were both at and was fascinated. I saw another one on the playa at Burning Man a few years later.
At their simplest, sociable tandems are bicycles where the riders sit side-by-side. True to the “sociable” moniker, this allows for more interaction between the two riders, as they can easily talk to each other. (Plus, it’s super fun.)
Sociable tandems also let folks who want to ride together but who have different levels of pedal power hang out more easily. The two riders can pedal independently and the more experienced or stronger rider can help the other rider when needed. Also, in contrast to riding independently on two bikes, the slower rider doesn’t get left in the dust.
After looking around and seeing that most of the sociable tandems that were available for sale were both expensive and unwieldy for transport (most were either recumbent bikes, or really large and expensive quadricycles like the “Rhoades Car” or similar), I decided to try to build a sociable tandem using standard bikes and mostly off-the-shelf parts that I could find at my local big-box hardware store. Here are the results.
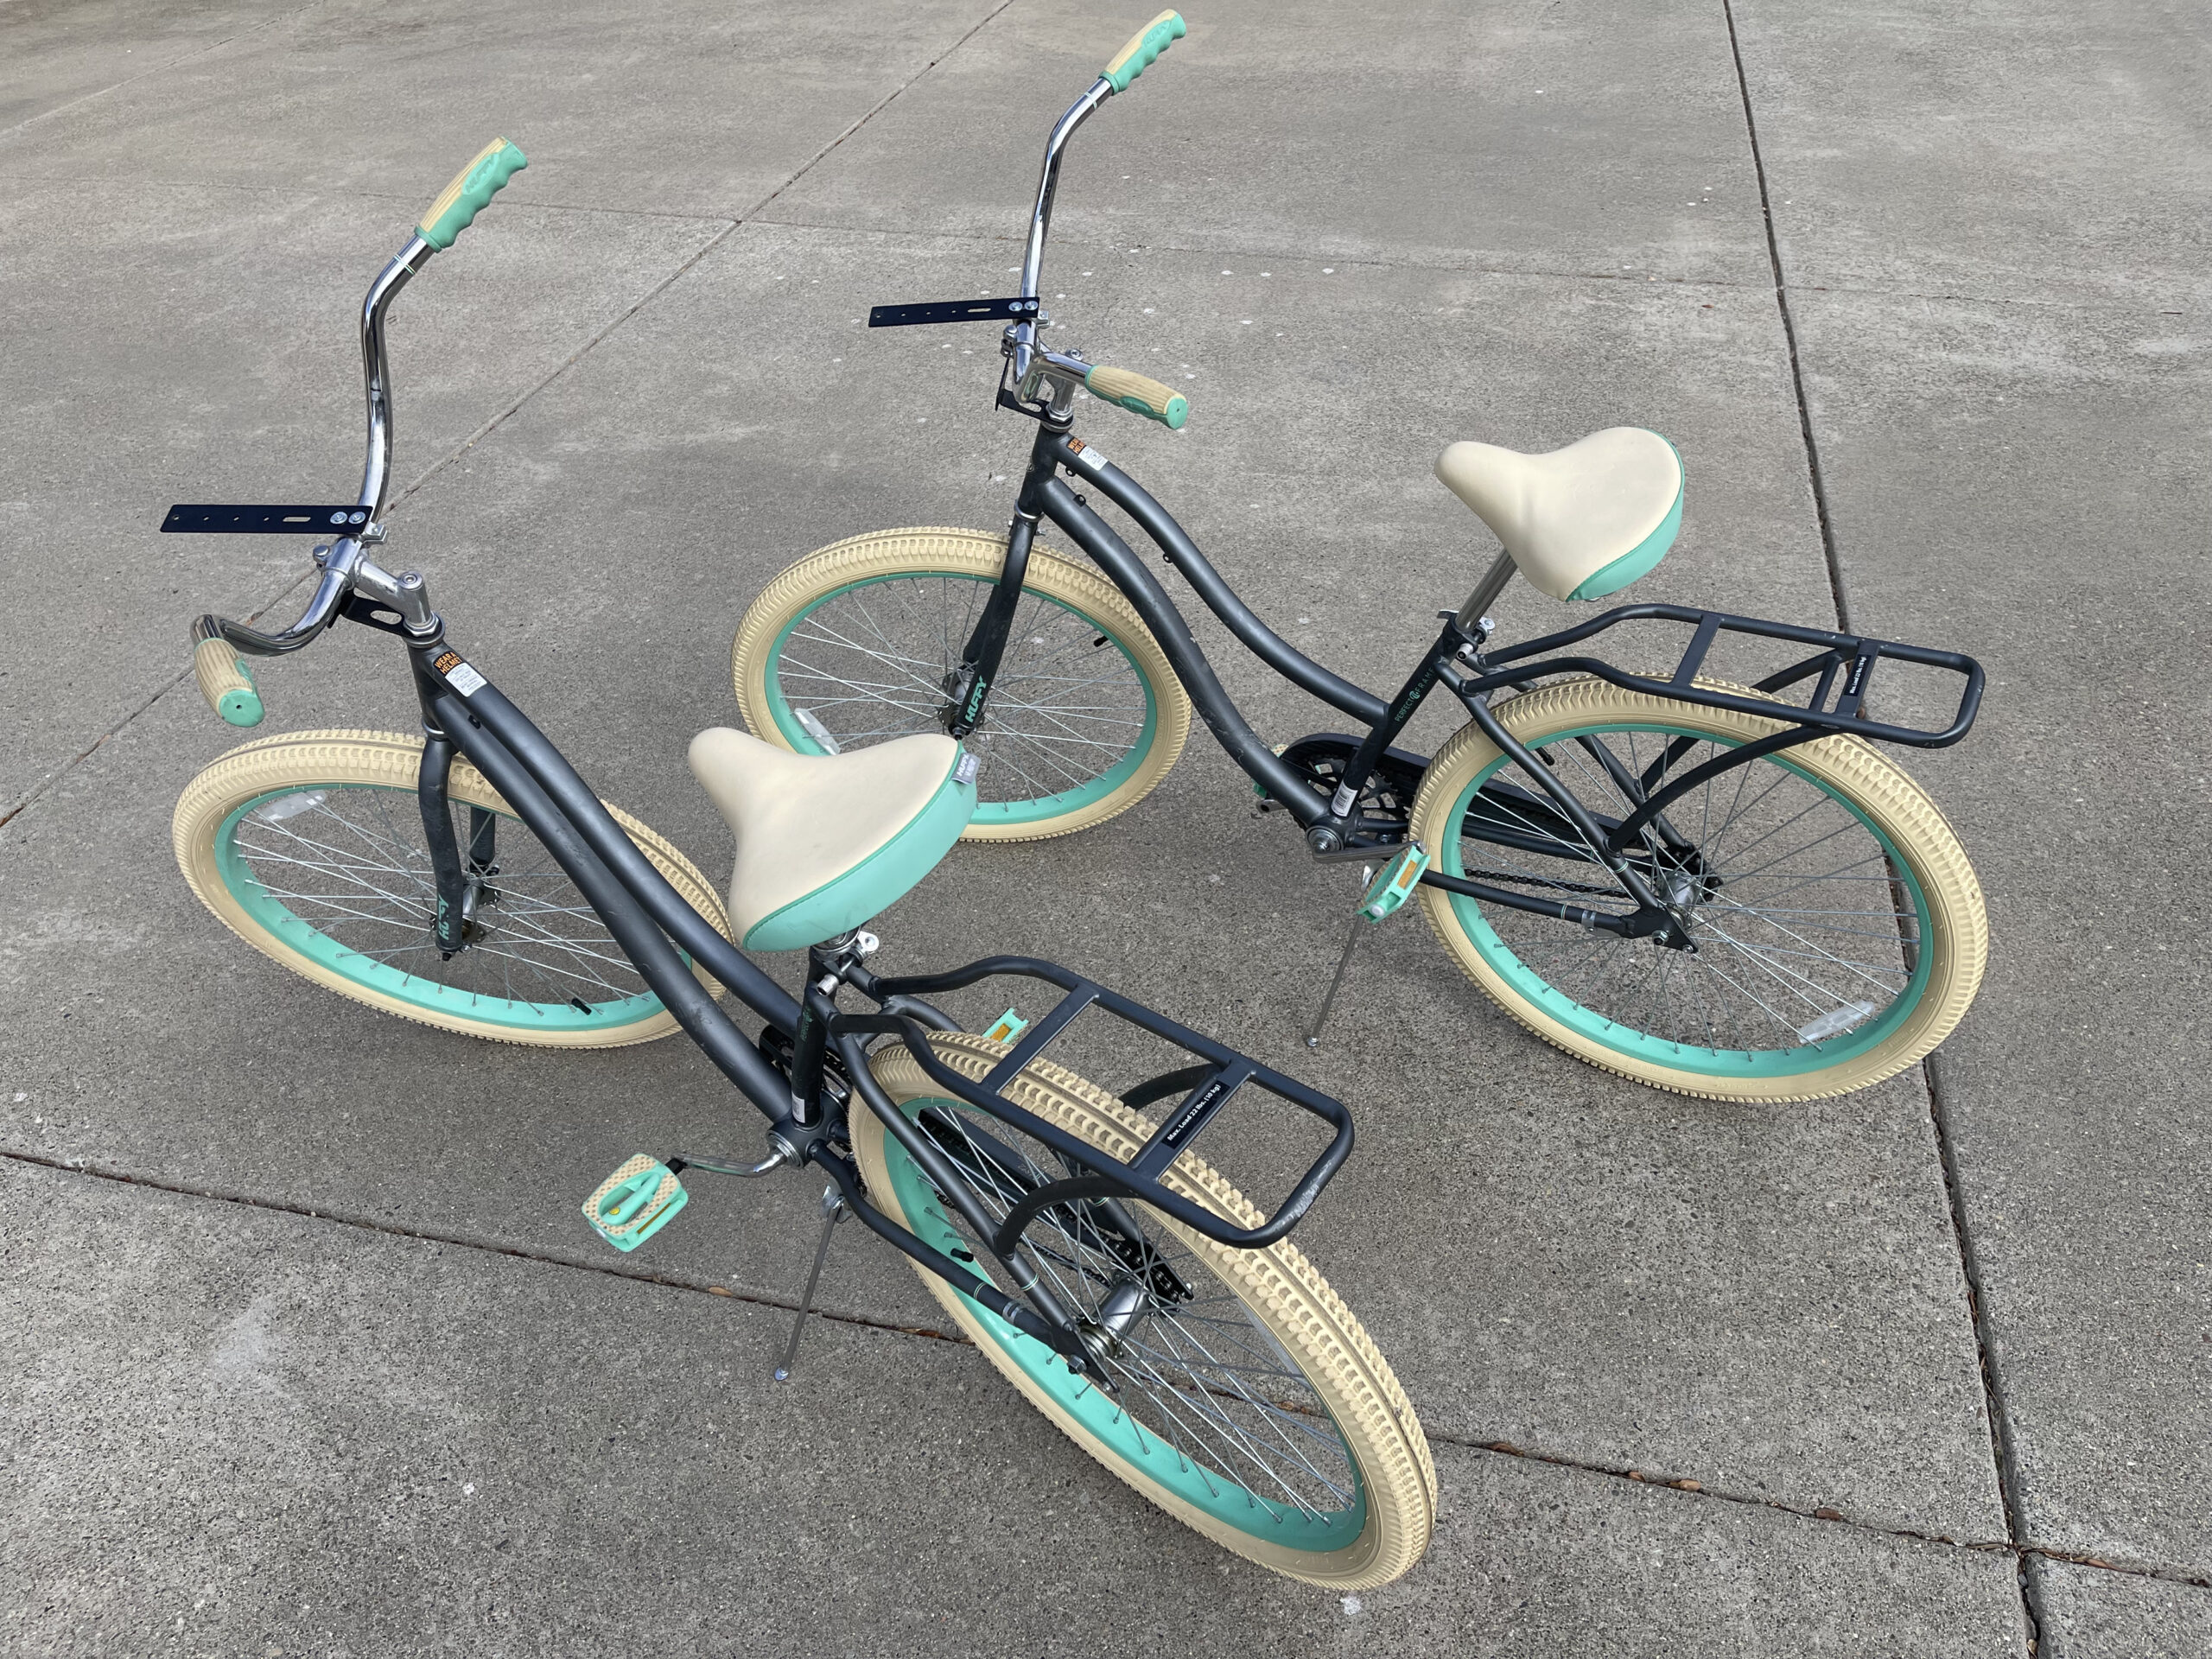
The most important thing is to get two identical bikes. They should be the exact same size and model. You can get these from a resale shop, or if you’re not able to find what you’re looking for already out there, you can get reasonable bikes for about two hundred bucks each at someplace like Target or Wal-Mart. The ones we got were the Huffy Nel Lusso Ladies (step-through) bikes.
This bit is important: Get bikes that have a pre-welded back rack

Make sure you get bikes with a pre-installed, pre-welded back rack. It made construction so much easier, since the main attachment points between the bikes were already set up for us.
The other unexpectedly important benefit of this approach of building with two off-the shelf bikes is that it’s trivial to transport the sociable tandem using a standard rooftop or hitch bike rack. You can transport the bikes independently to where ever you’re going to ride, and then assemble them into their tandem configuration on-site at your destination. Transporting a pair of recumbent bikes or a pre-assembled quadricycle is a pain. With our approach, you just take the bikes to where you want them just like always and turn them into a tandem when you get there.
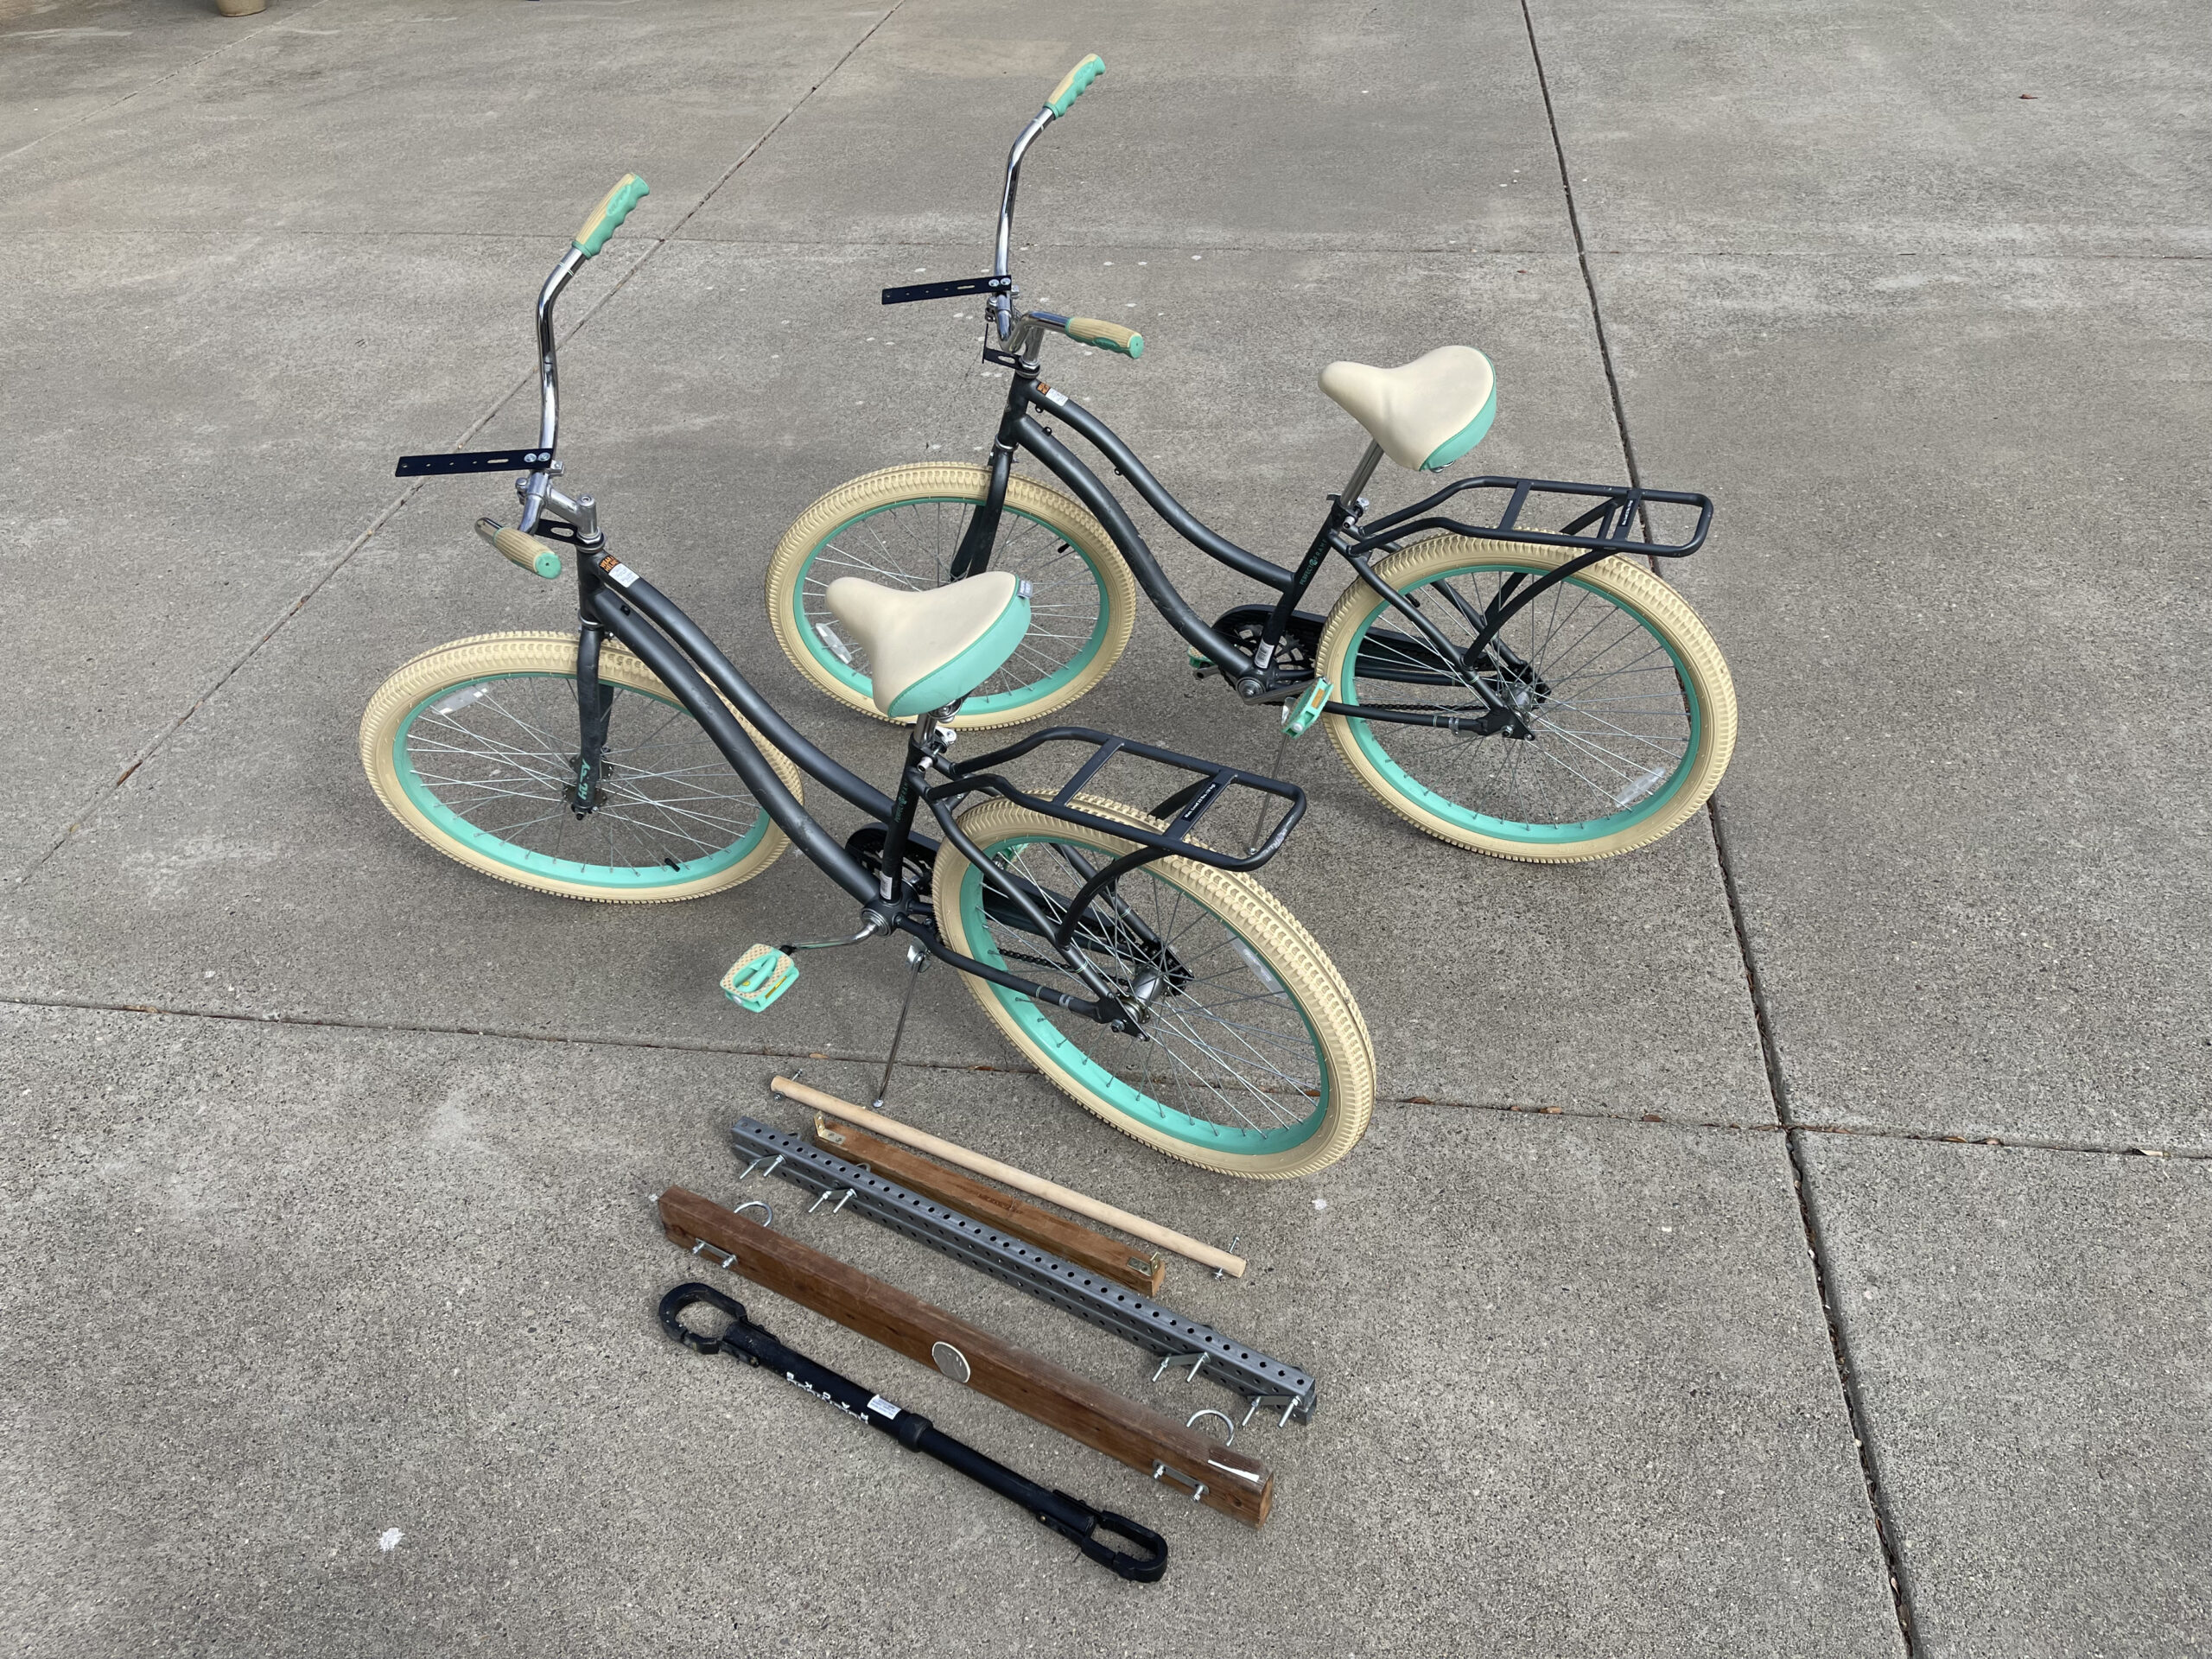
In addition to the bikes, there are only a handful of other items you need, all of which can be procured fairly easily and assembled using regular around-the-house types of tools. We’ll go into all of these in detail later, but at a high-level, you’ll need:
When first starting the project, I discovered that there was a product out there for adapting bikes with sloping top tubes that enabled them to be easily transported using bike racks. Normally, you’d use the top tub adapter on a single bike and affix it between the seat post and the front fork to create a “top tube” that’s easier for car bike racks to handle. We’re going to use it a little differently.
For the sociable tandem, connect the top tube adapter between the two bikes at the seat post. This gives a little bit of lateral stability that will let us affix some of the other parts a bit more easily. It should just snap on between the bikes.
You can get this adapter for about $40 or so from a bike shop or online store. We used the Hollywood Racks Bike Adapter Pro, but anything similar to this should work.

Just loop the adapter around the seat post of one bike…
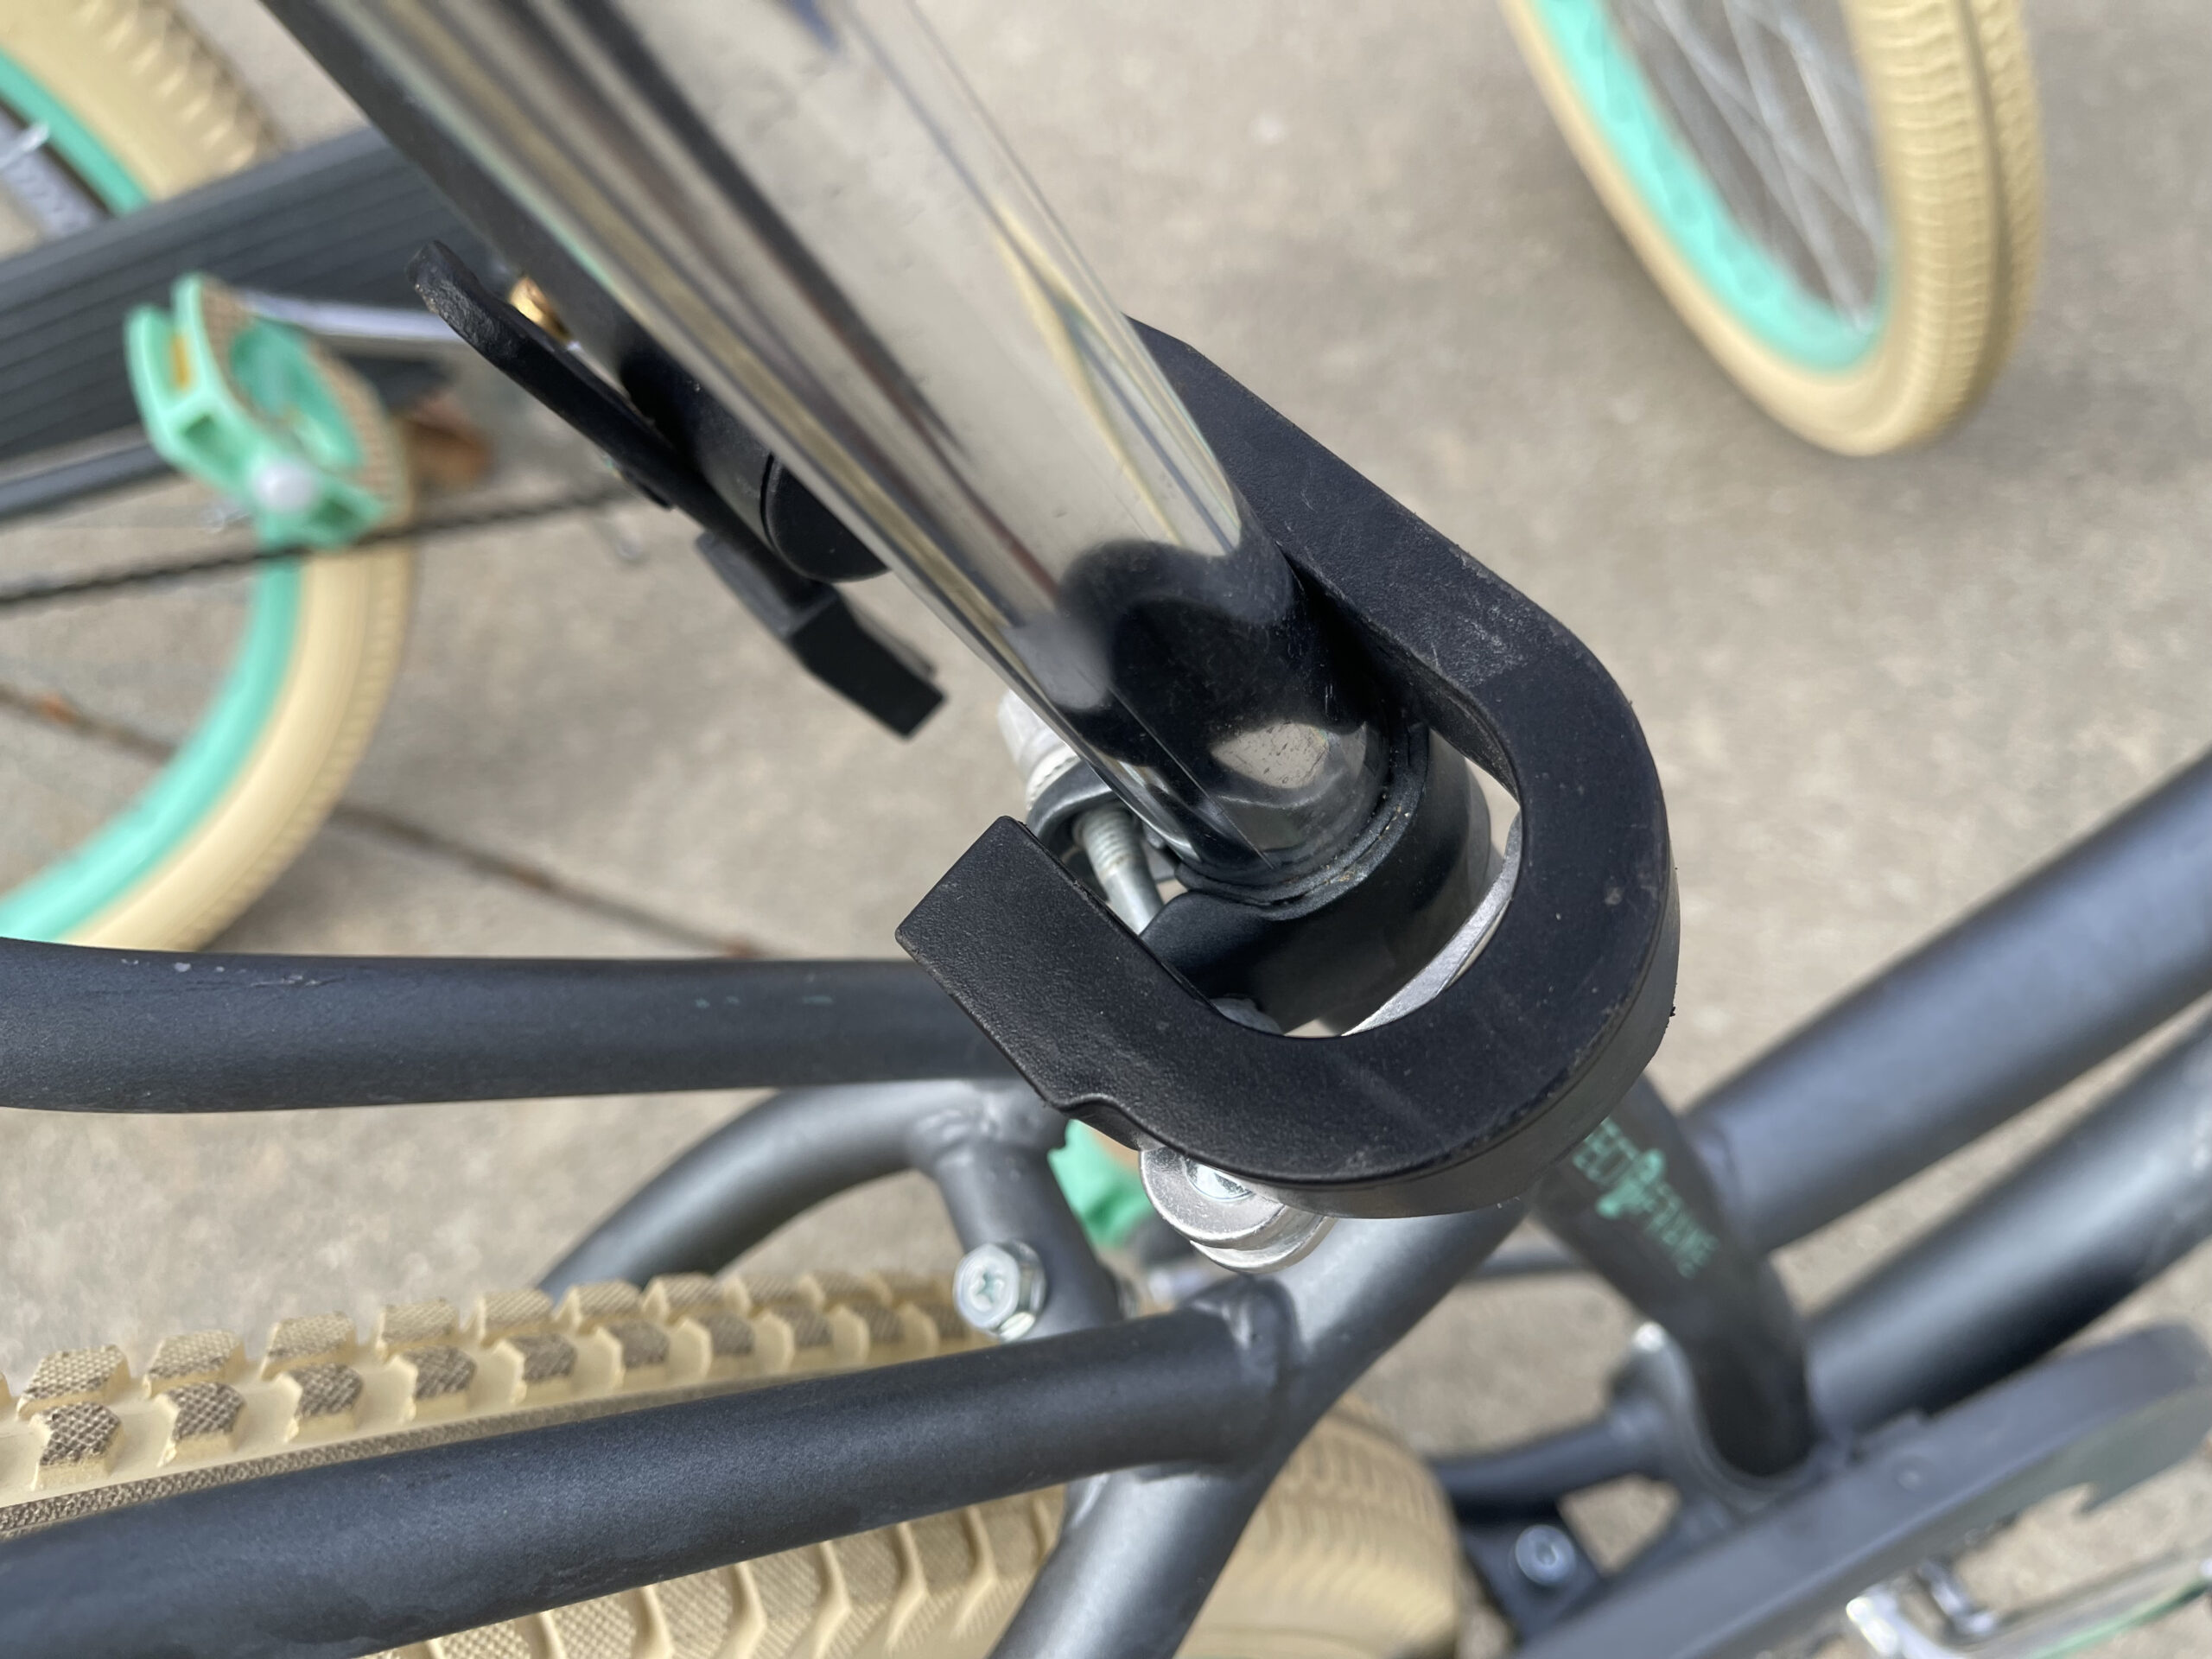
…and then the other.

Make sure the loops are closed on each side.
Ok, that was easy enough. Onto the good stuff.
In our prototype v.1 of the social tandem (the photo at the top of this post), we used a big chunk of wood across the back of the two bikes, secured by a ridiculous number of screws and clamps. Don’t do this. It takes forever to assemble or disassemble the tandem.
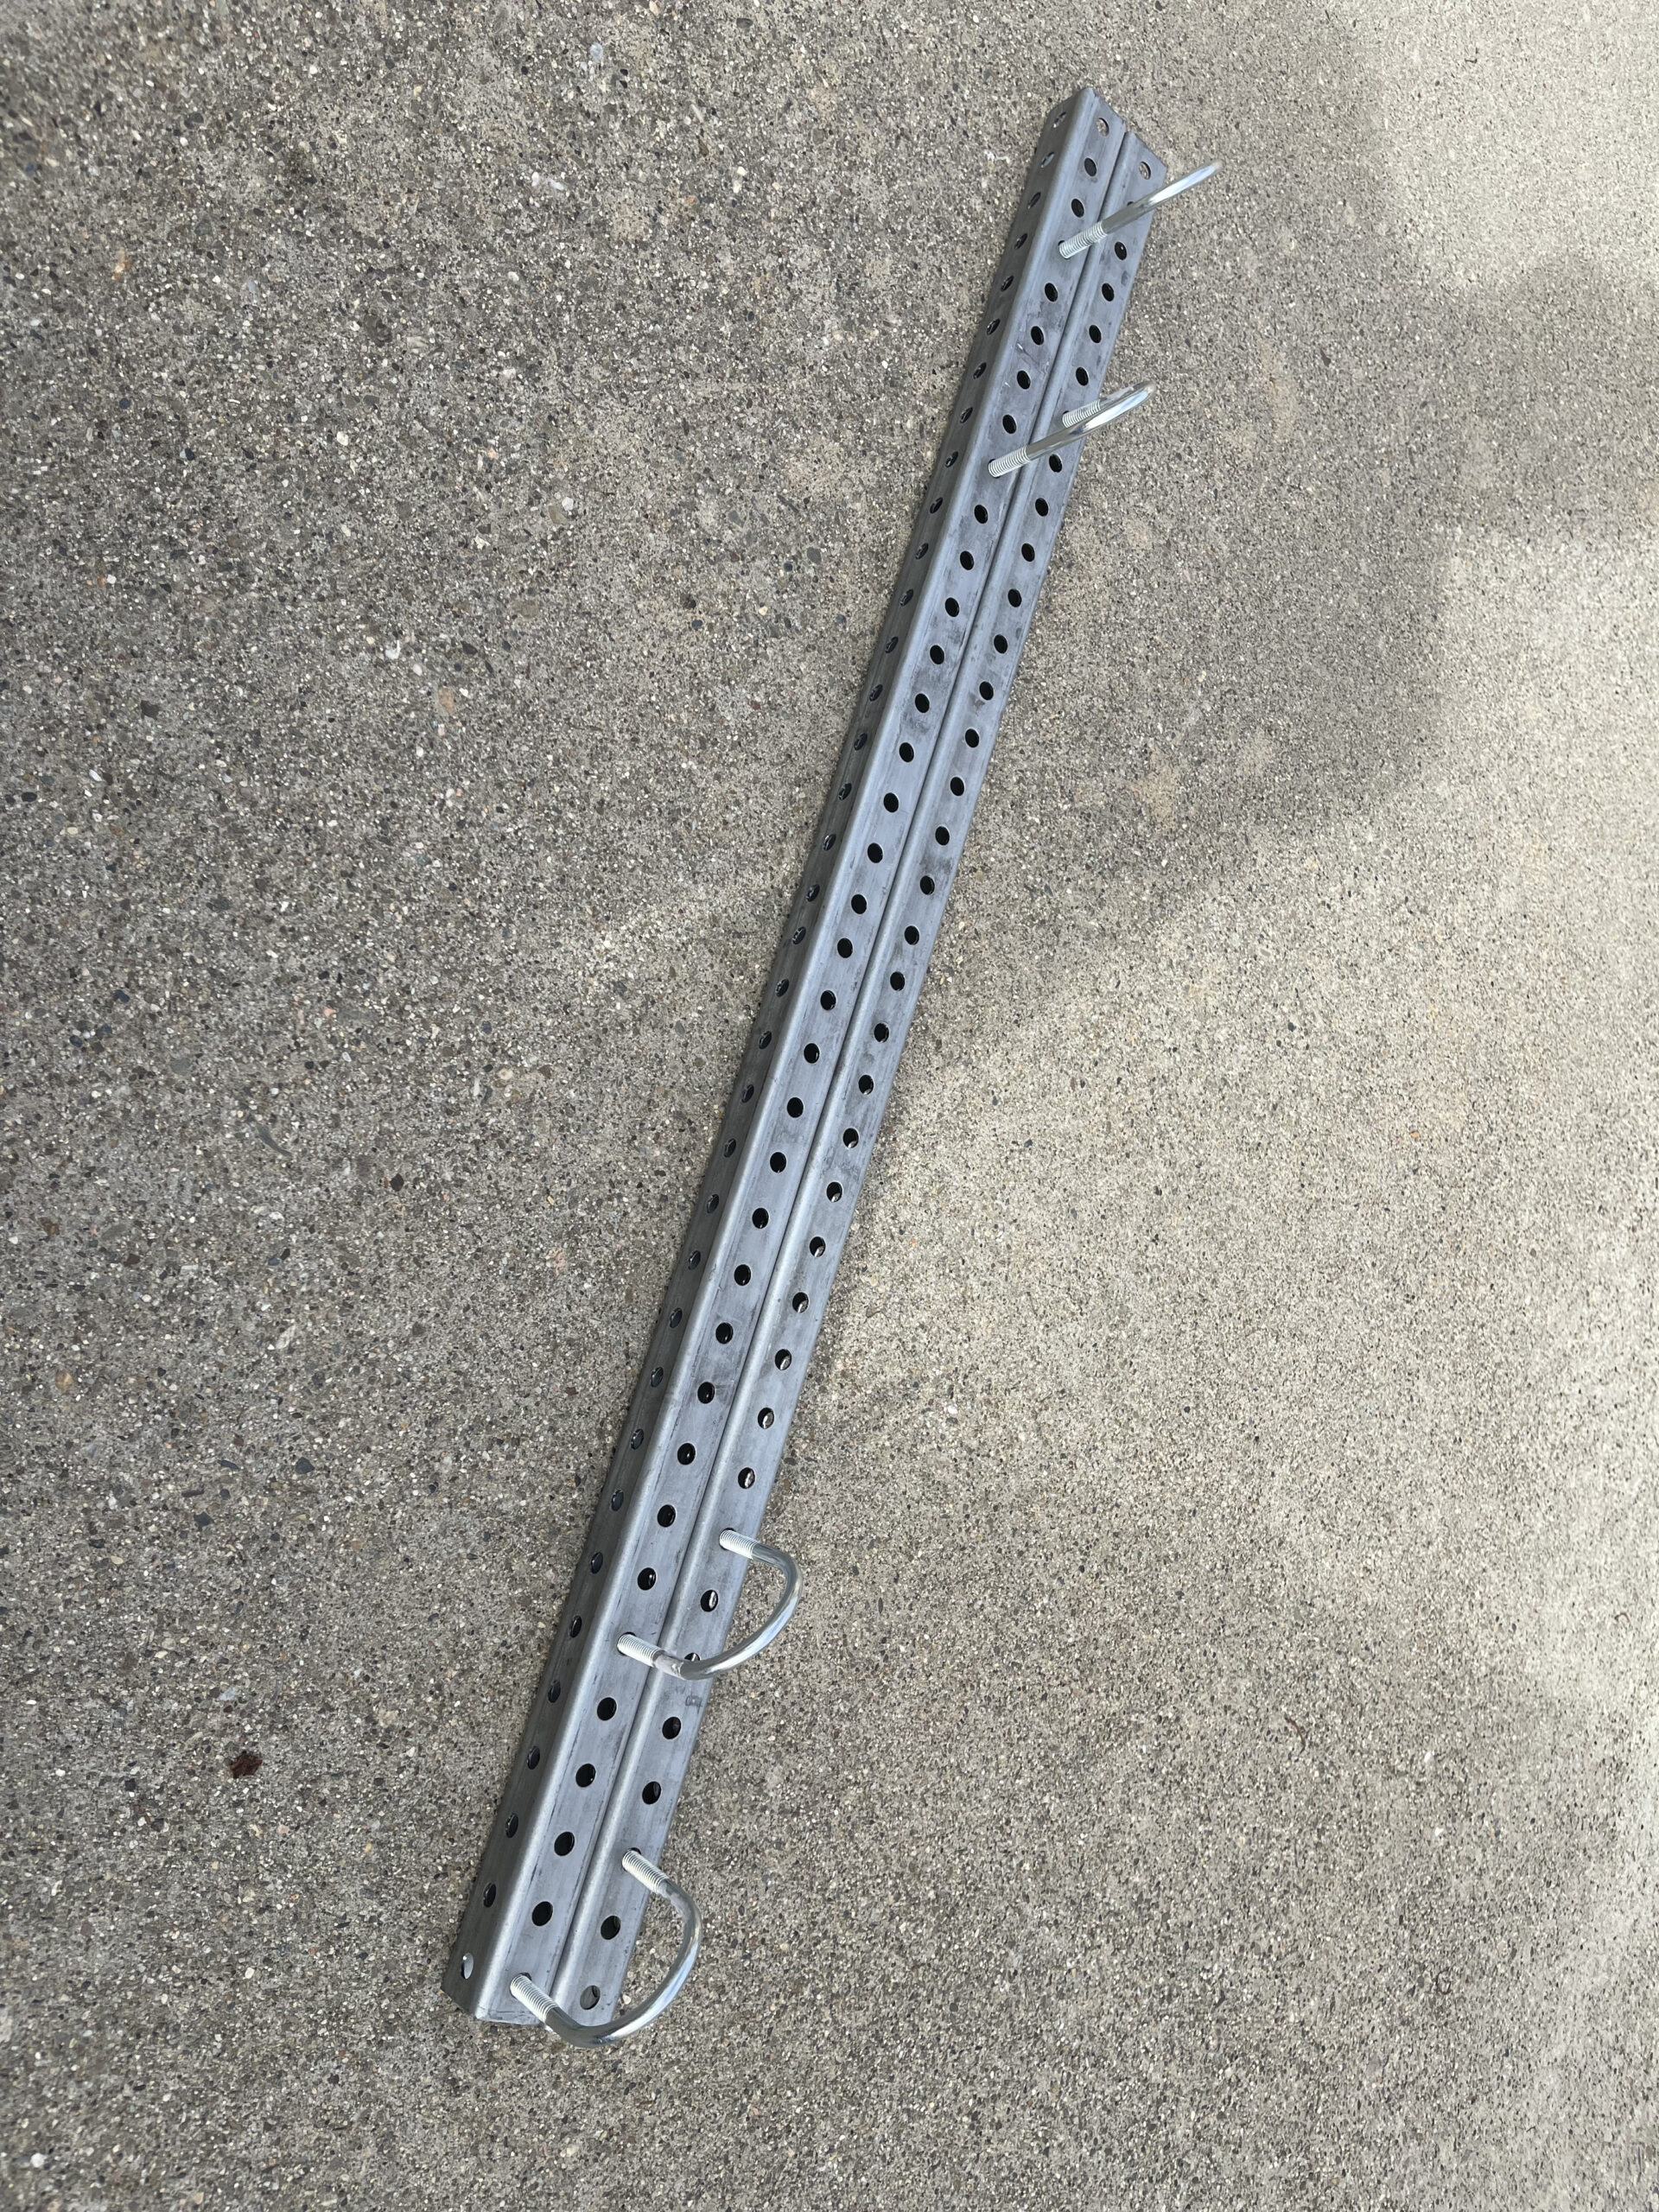
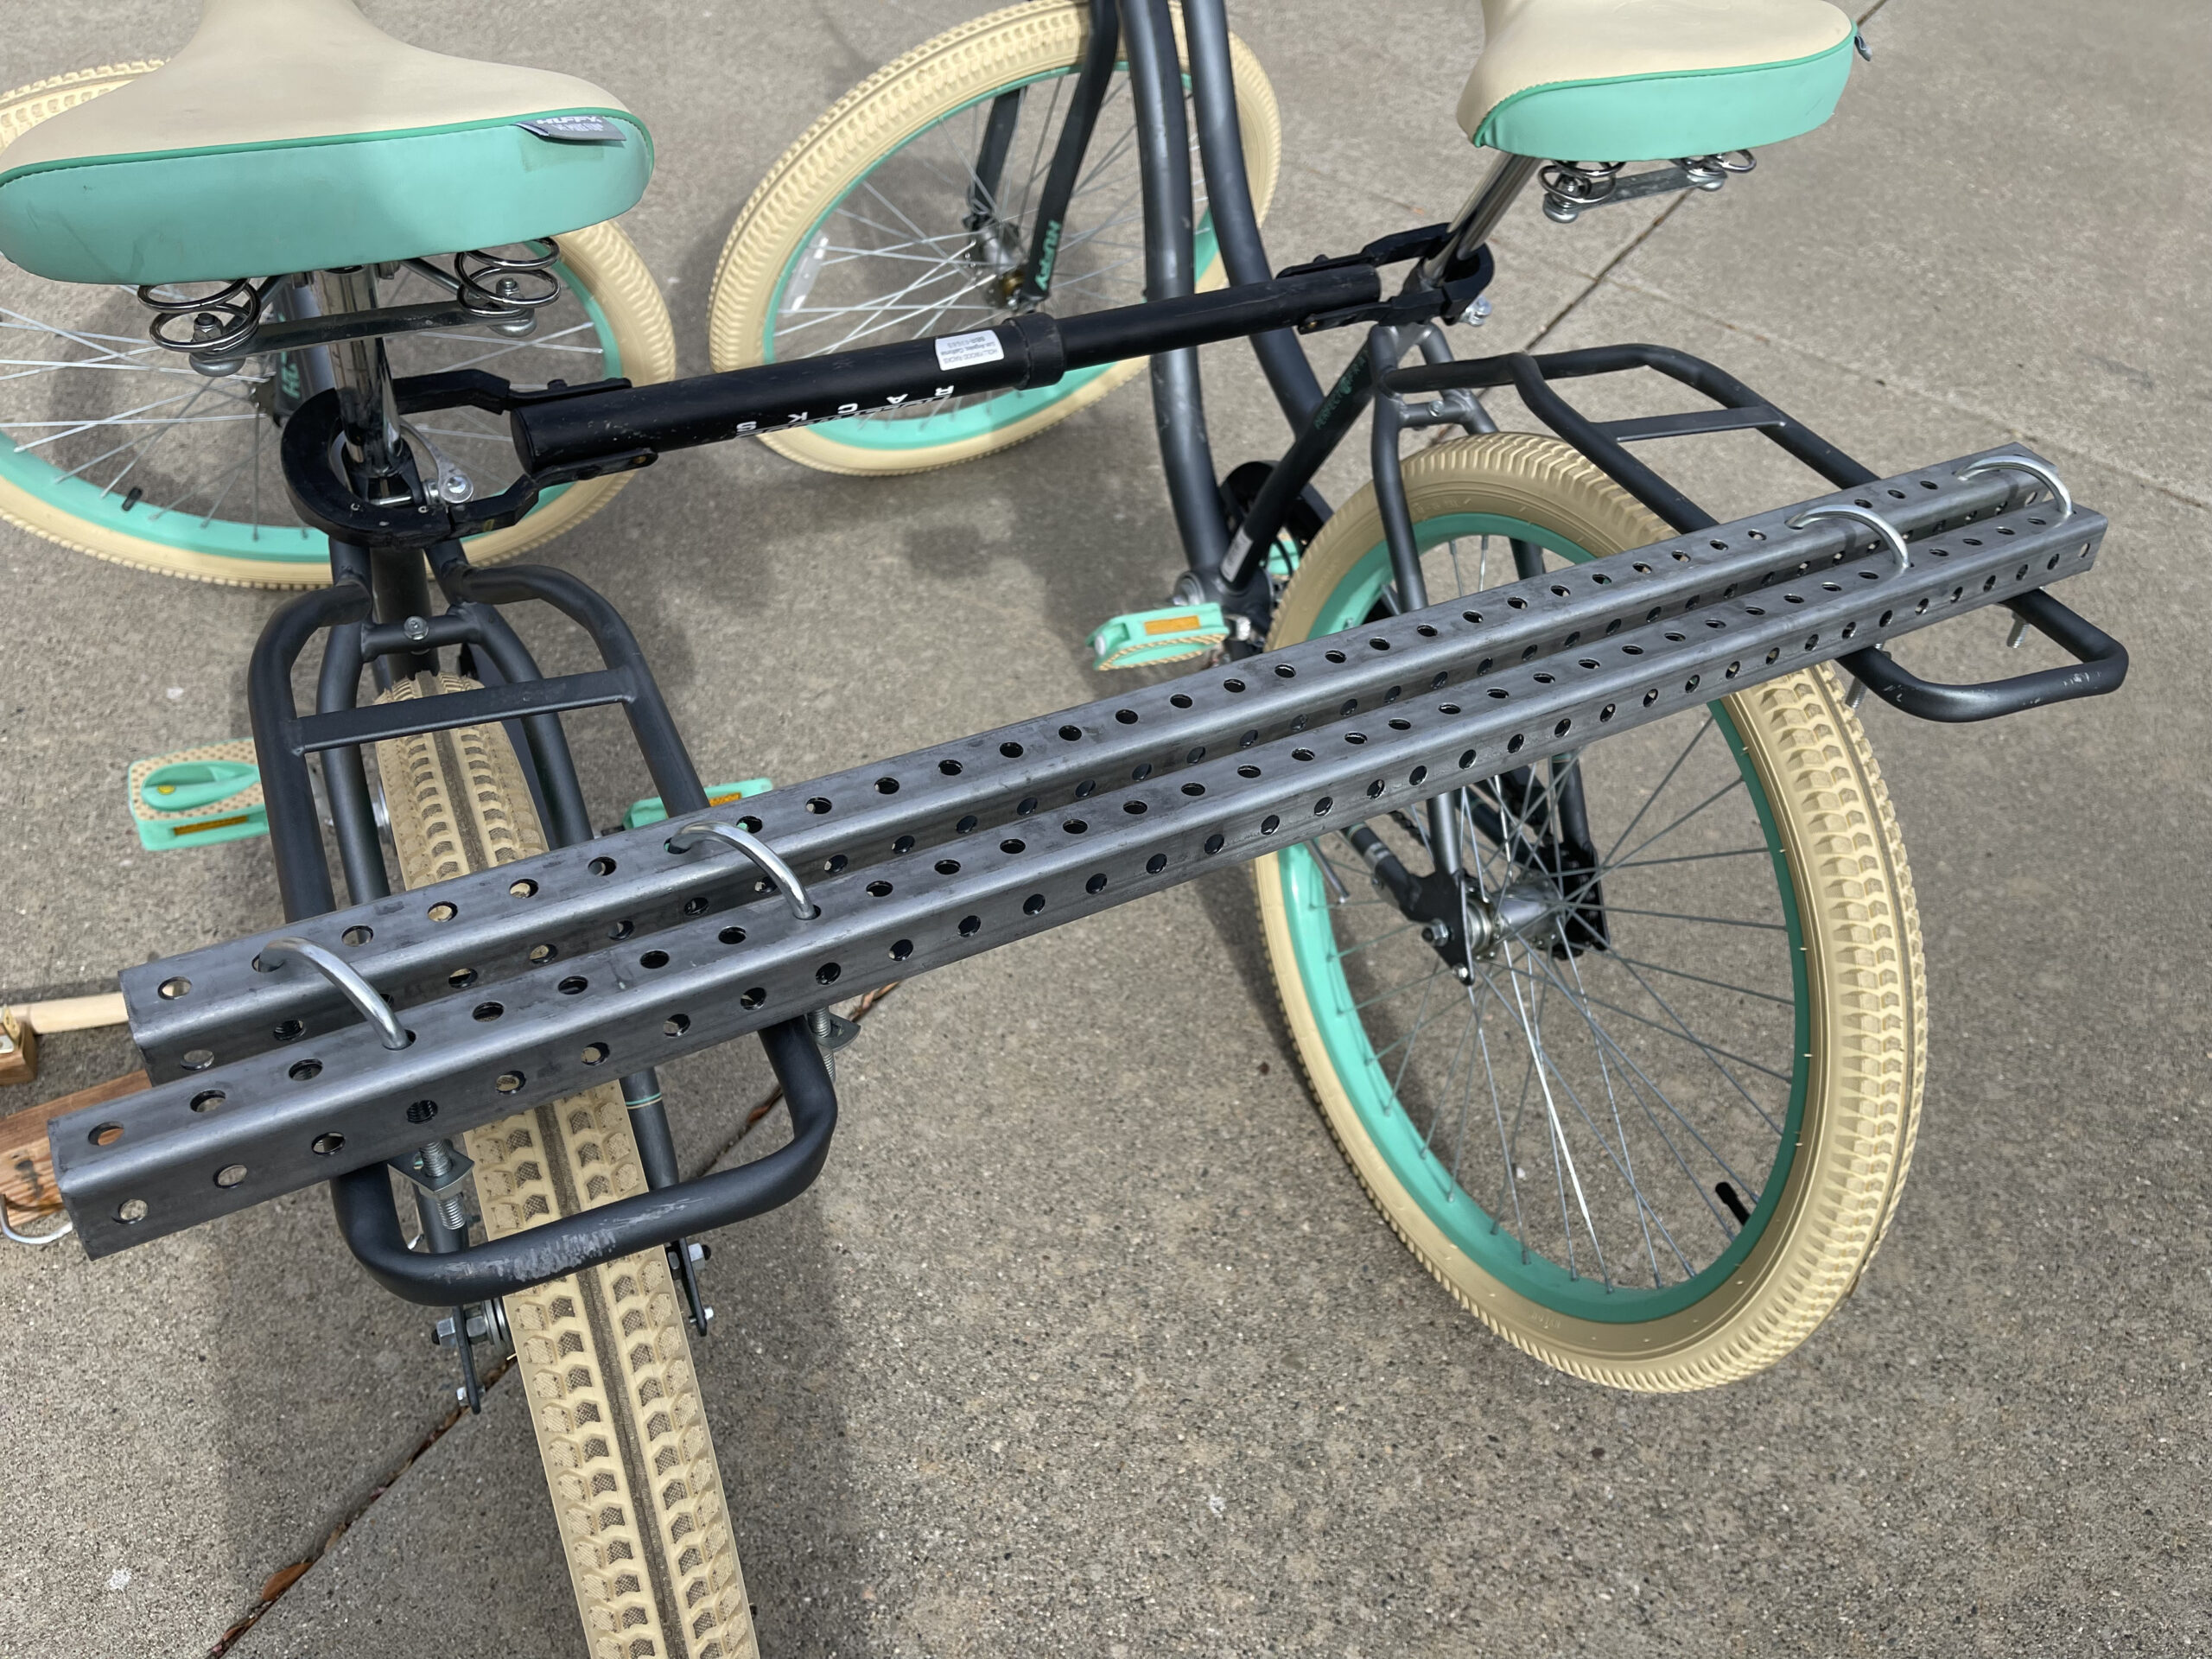
Instead, get a couple of 36″ square tubes at your local big box or local hardware store, and get four U-bolts. Put the square tubes next to each other and run the U-bolts through them like so.
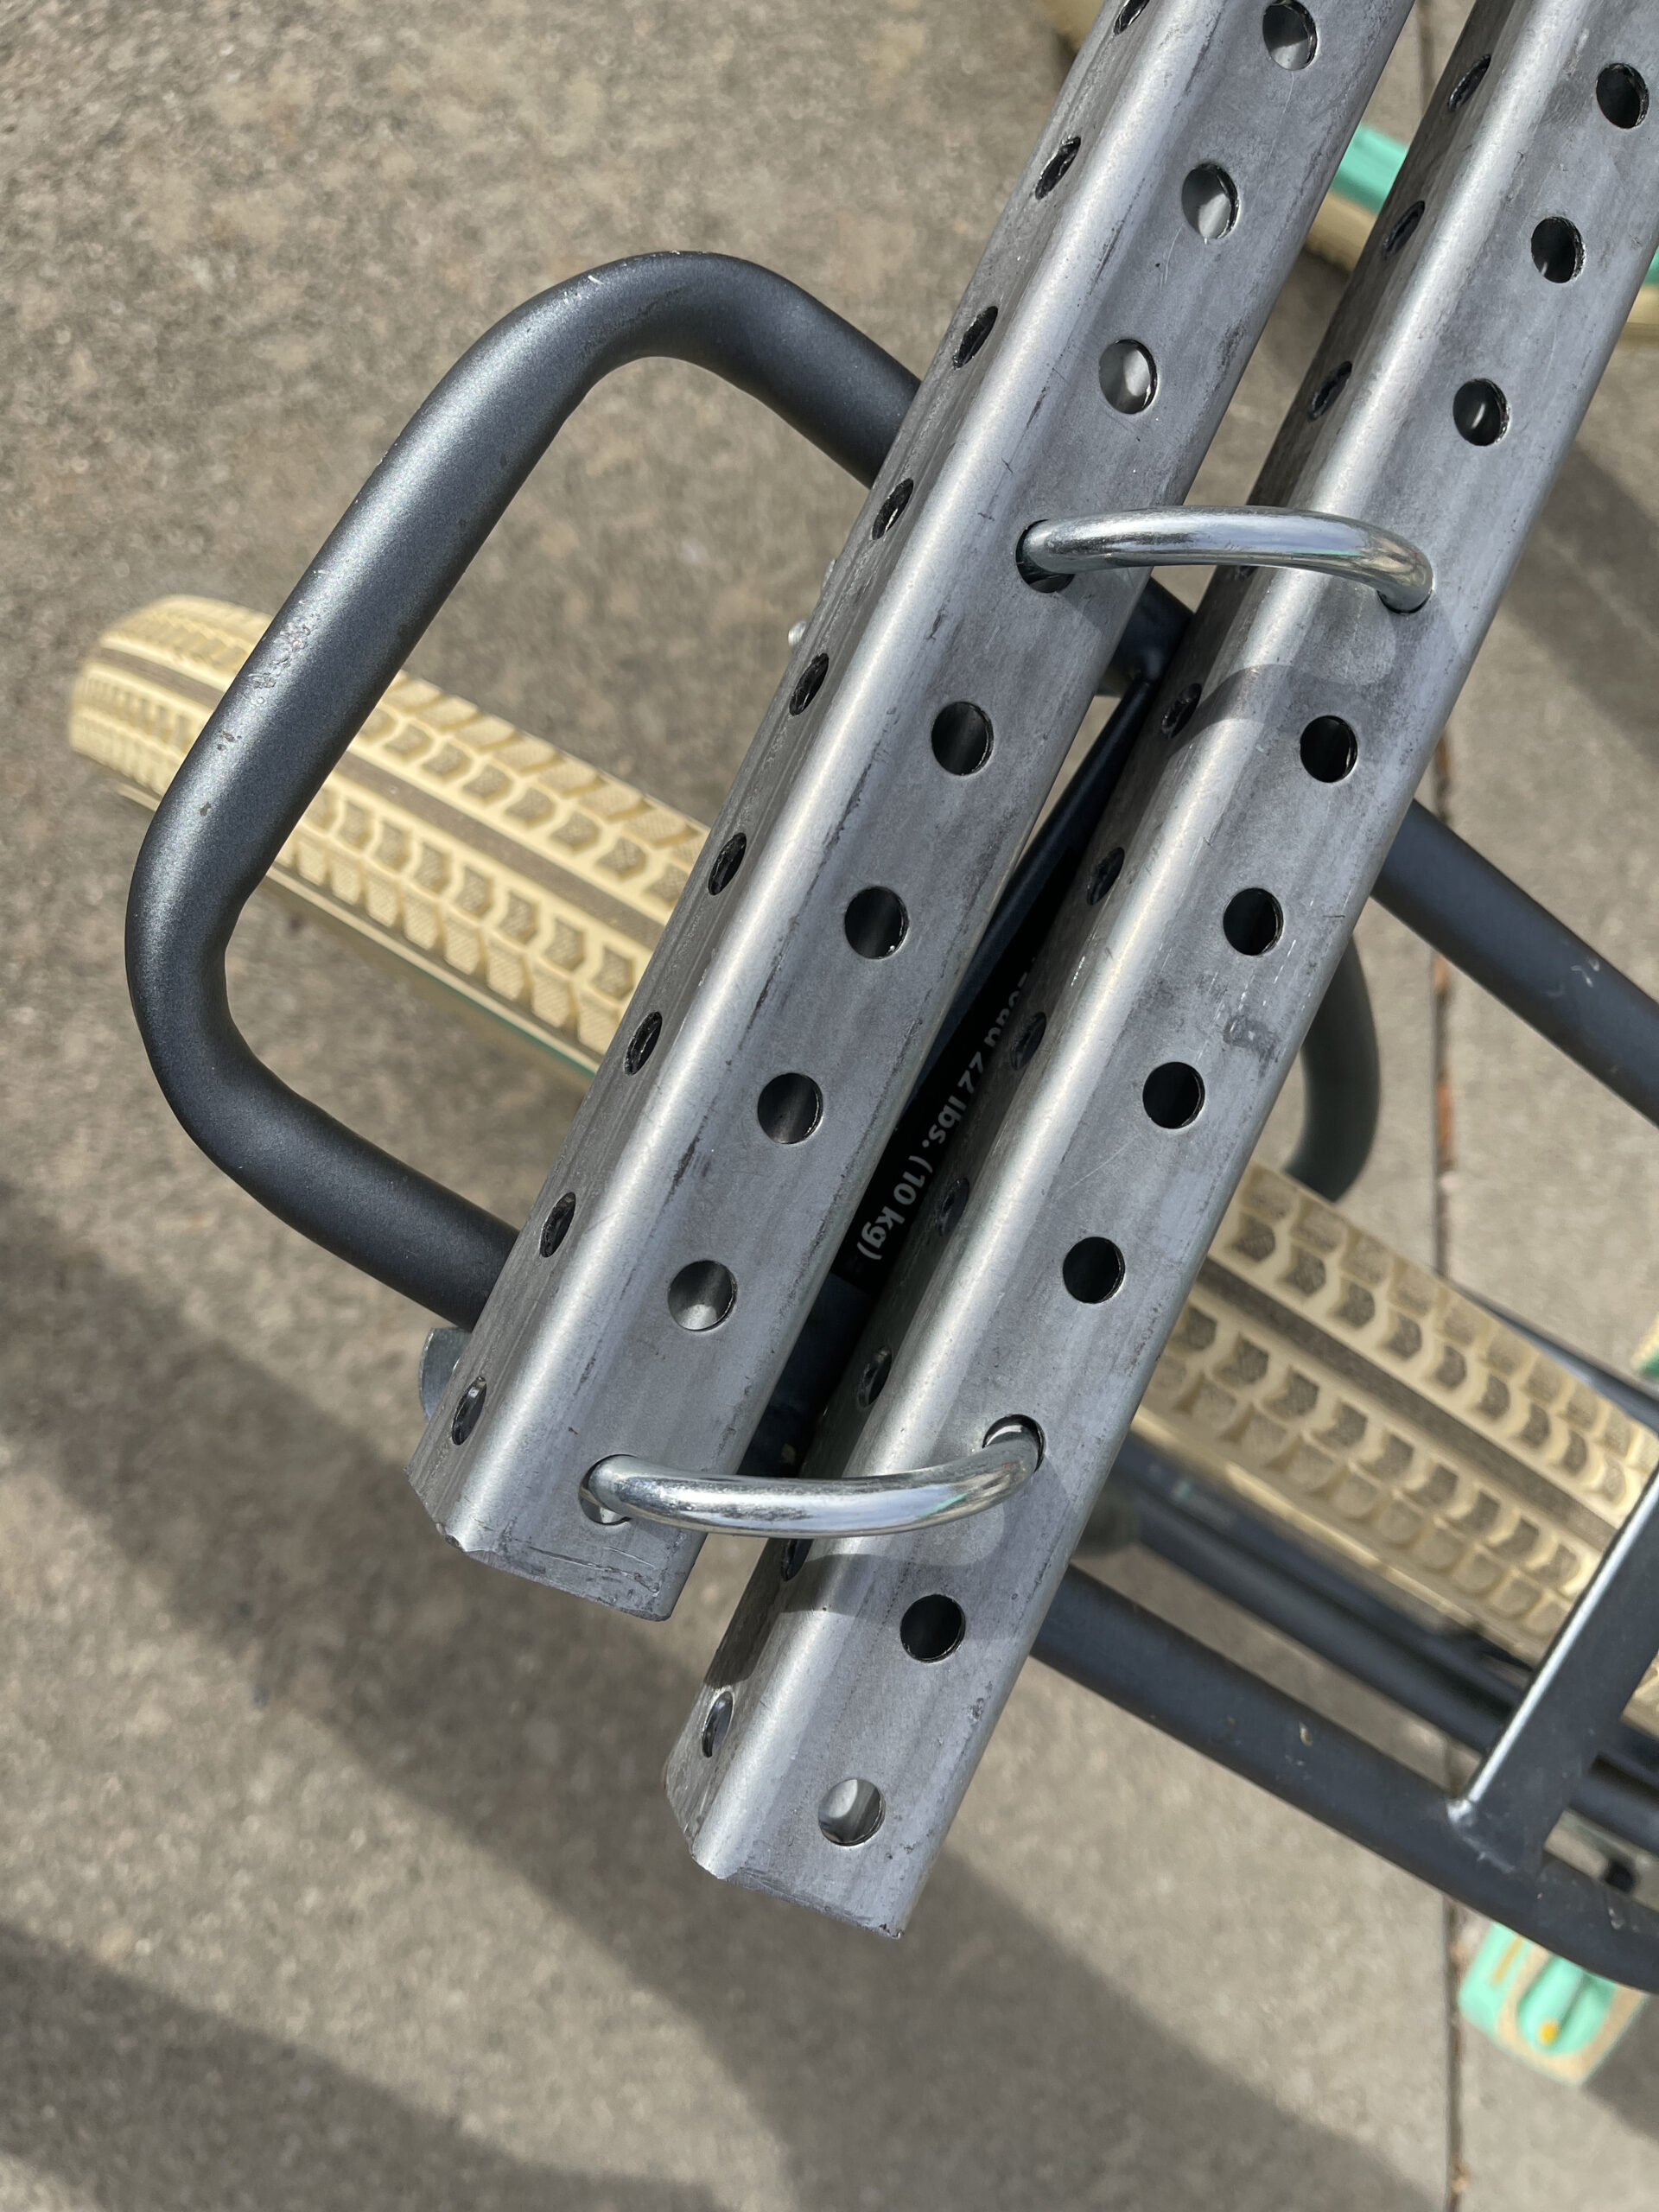
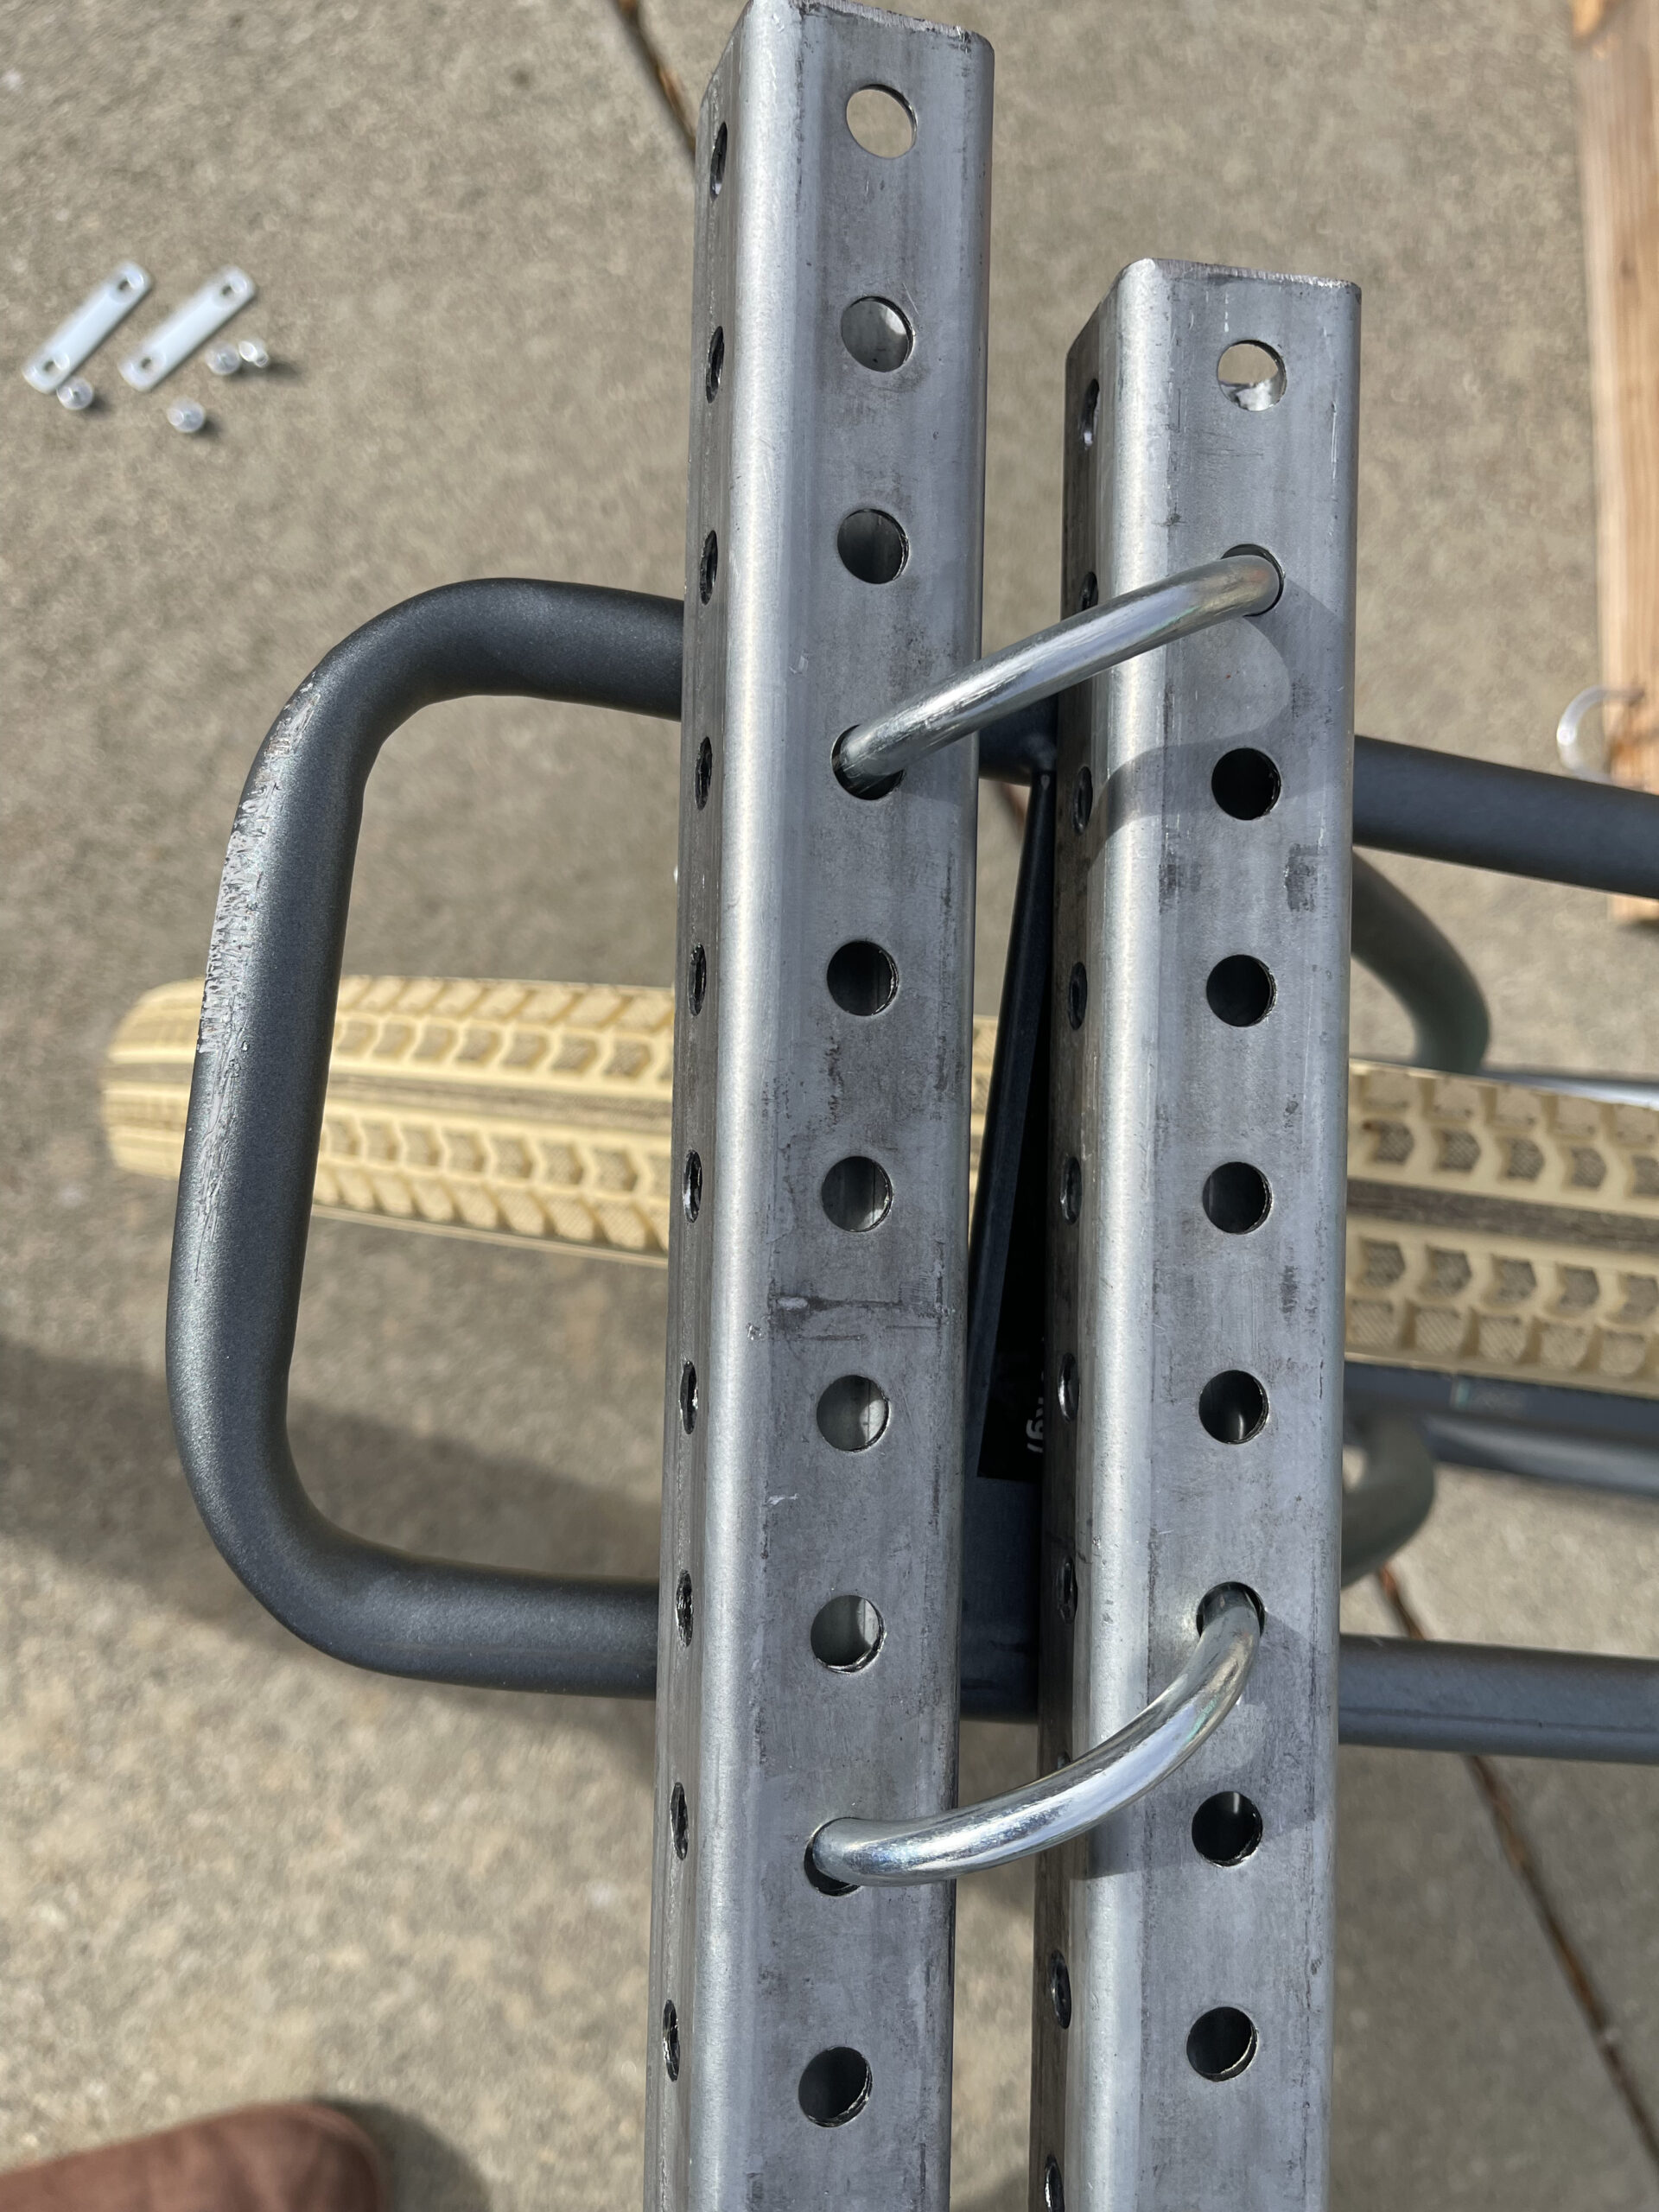
Here’s where the importance of the sturdy, pre-welded back rack comes into play on the bikes. Lay the square tubes across the back racks, and position the U-bolts on an angle straddling the places where the rack is welded. Here’s what it looks like from the top.
You’ll note that the square tubes may need to be offset by an inch or two in order to get them into position. This is ok.
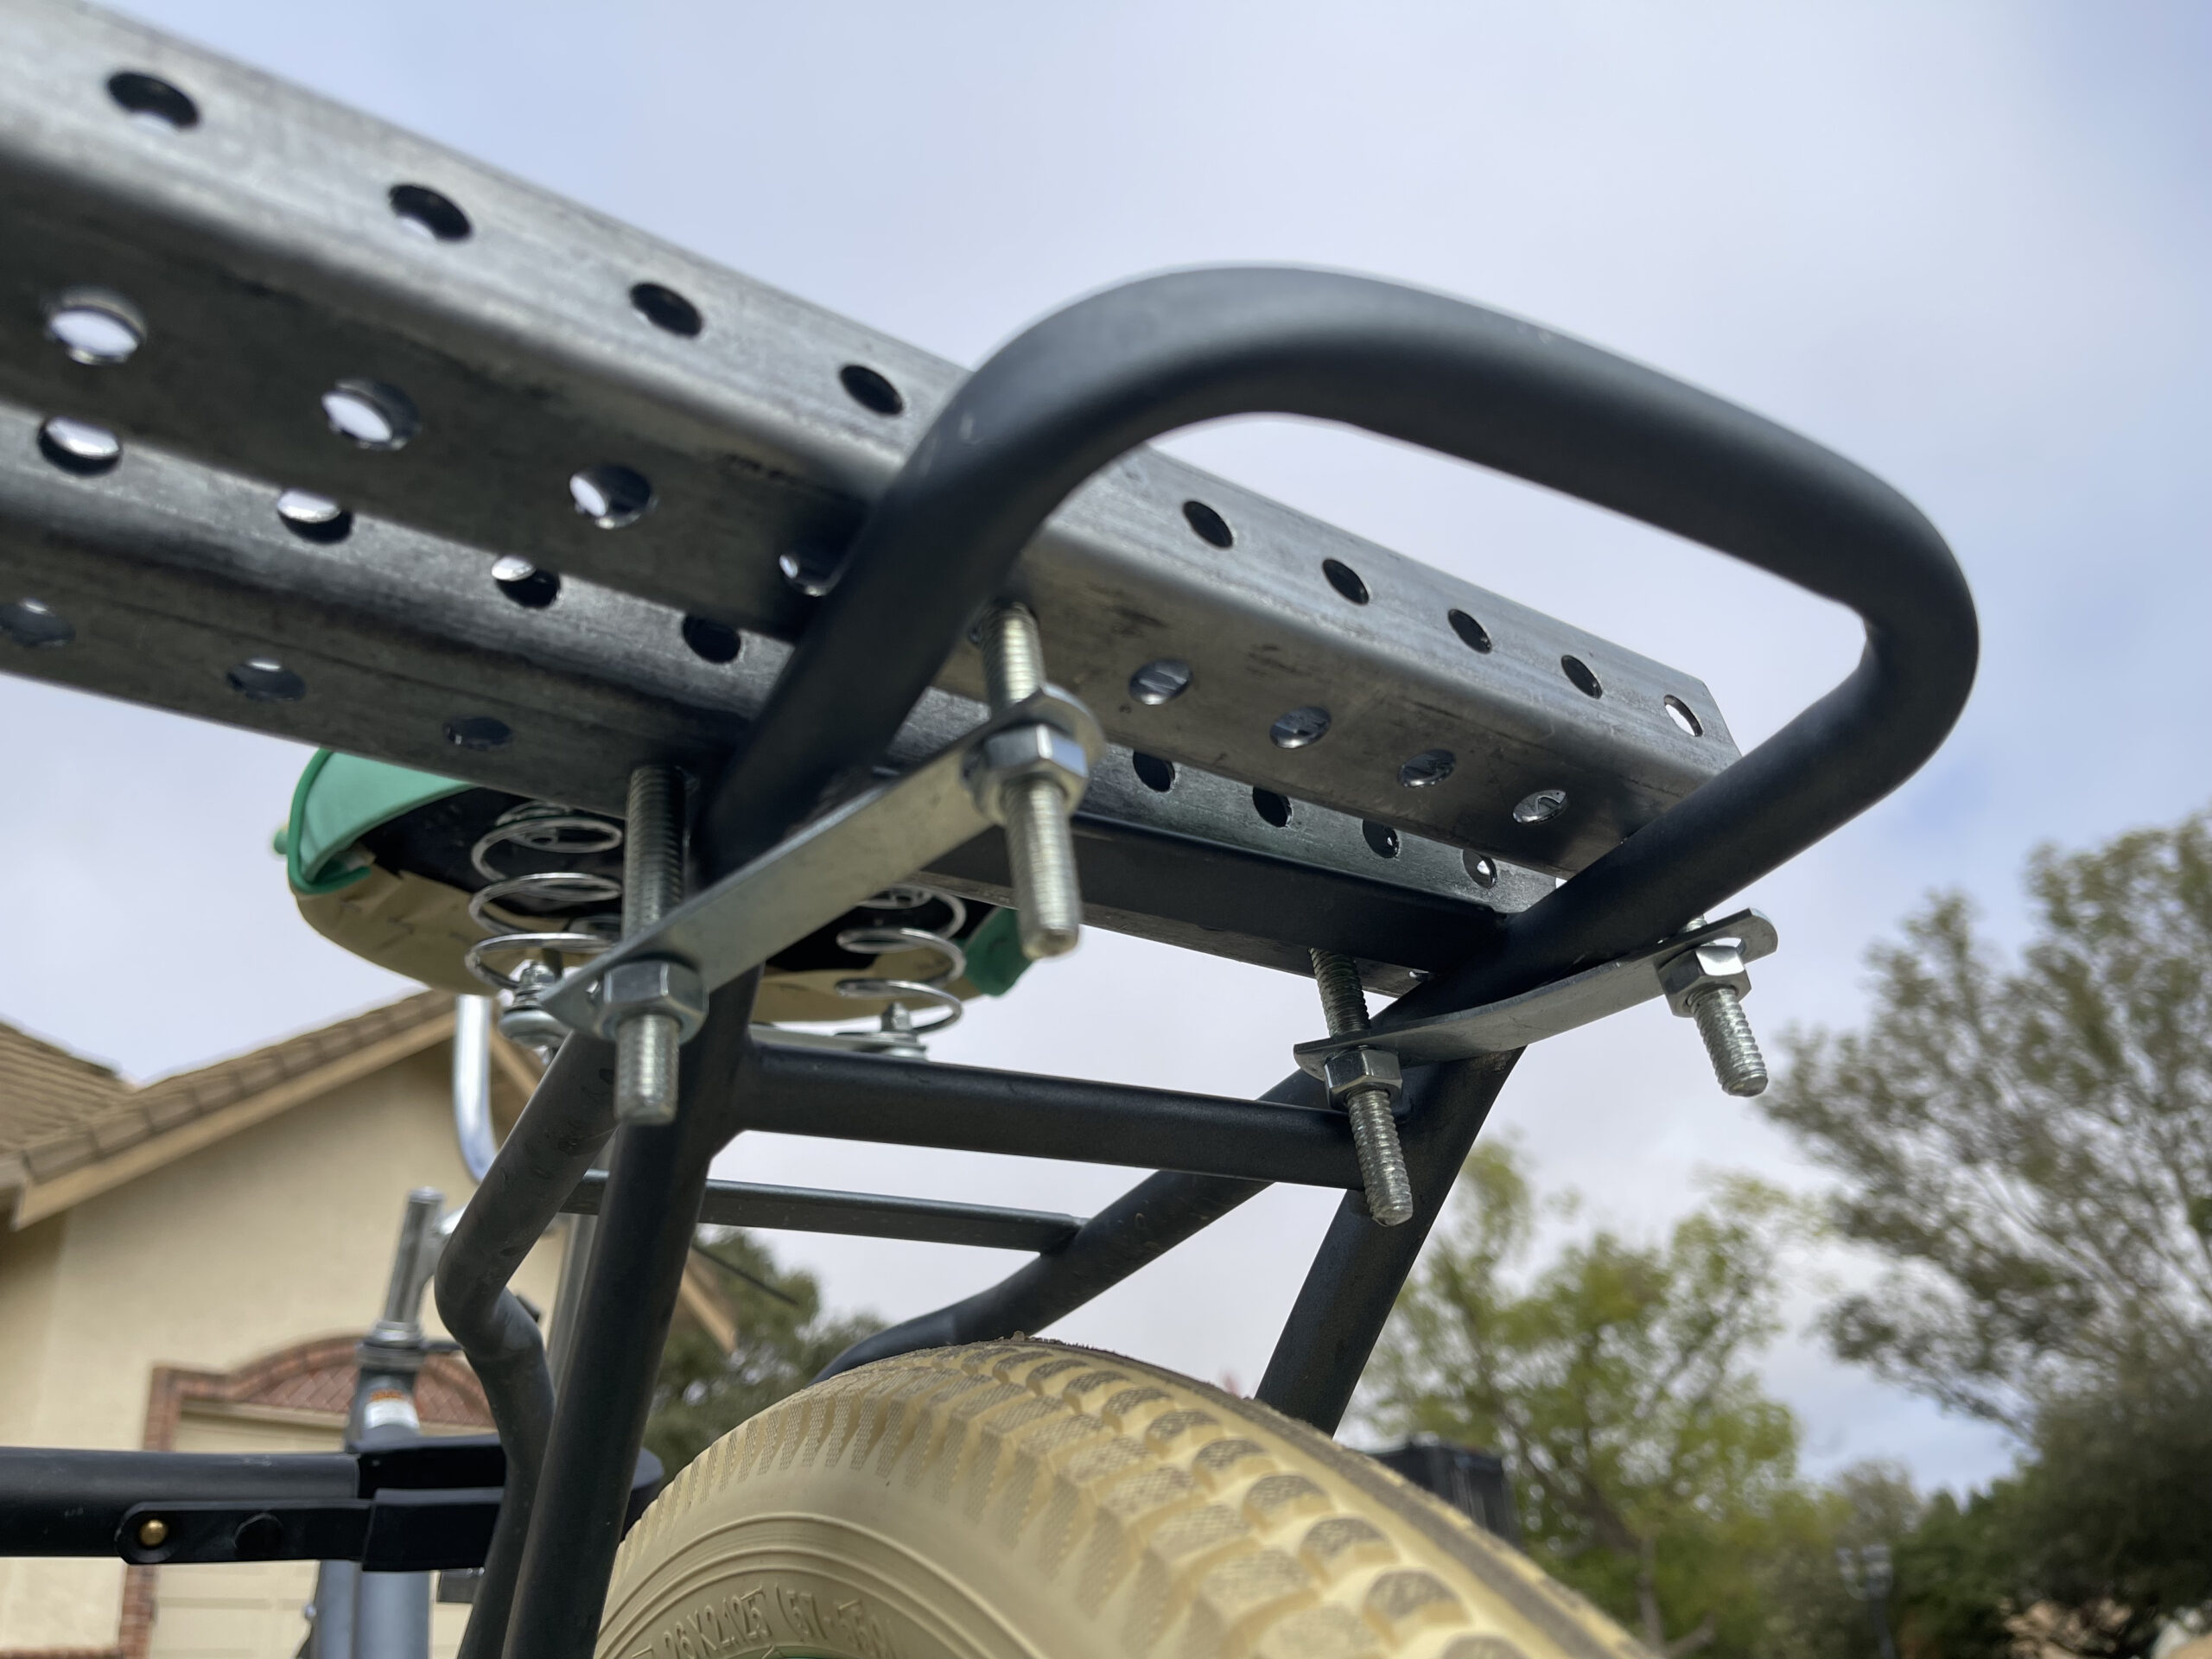
On the bottom of the rack, slide the flat plates for the U-bolts on, and then put the nuts on the end of the U-bolts. You won’t need to tighten everything up yet, but make them snug and hand-tight.
Okay! We’ve got the back sort of situated. Make sure the square tubes and U-bolts are on the rack in such a way that they can’t slide from side to side, and that they can’t slide forward or backward.
Just like we did across the back of the tandem with the square tubes, we need something to brace the front of the bike. A simple 2×4 works well here. To do this:

Here’s what the 2×4 looks like from the front with the U-bolts in it.
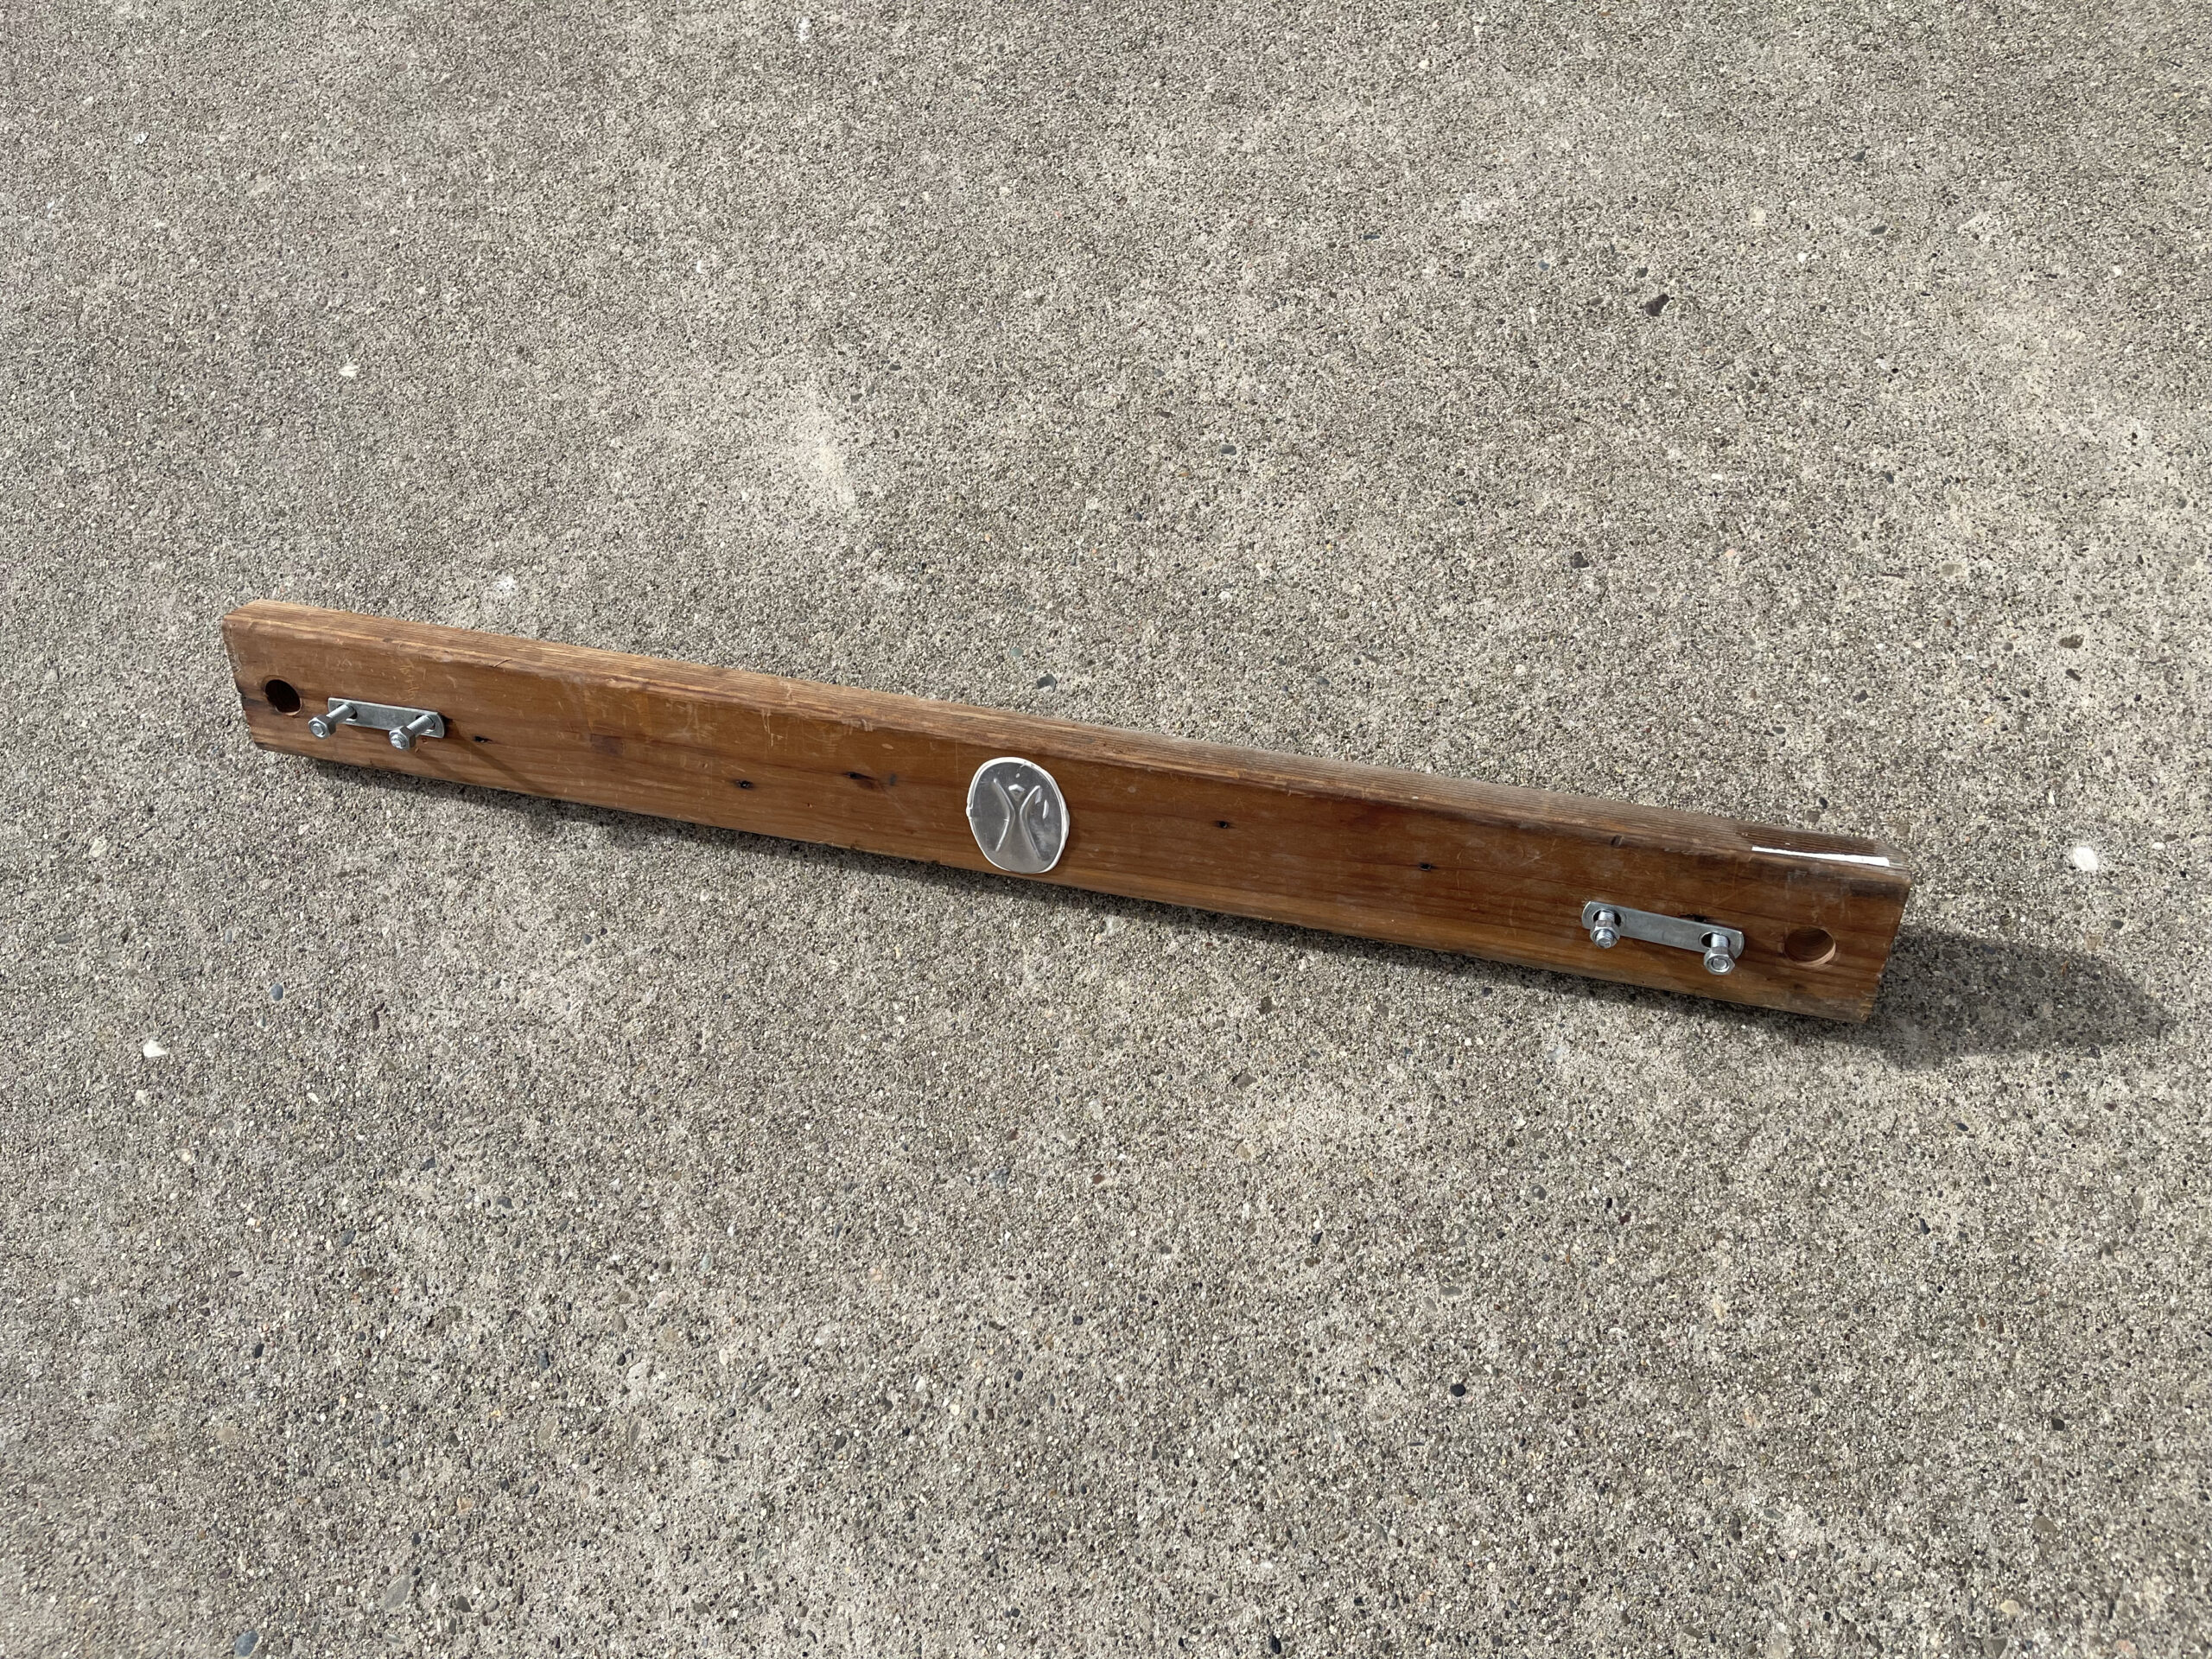
And here’s what it looks like from the top and back.
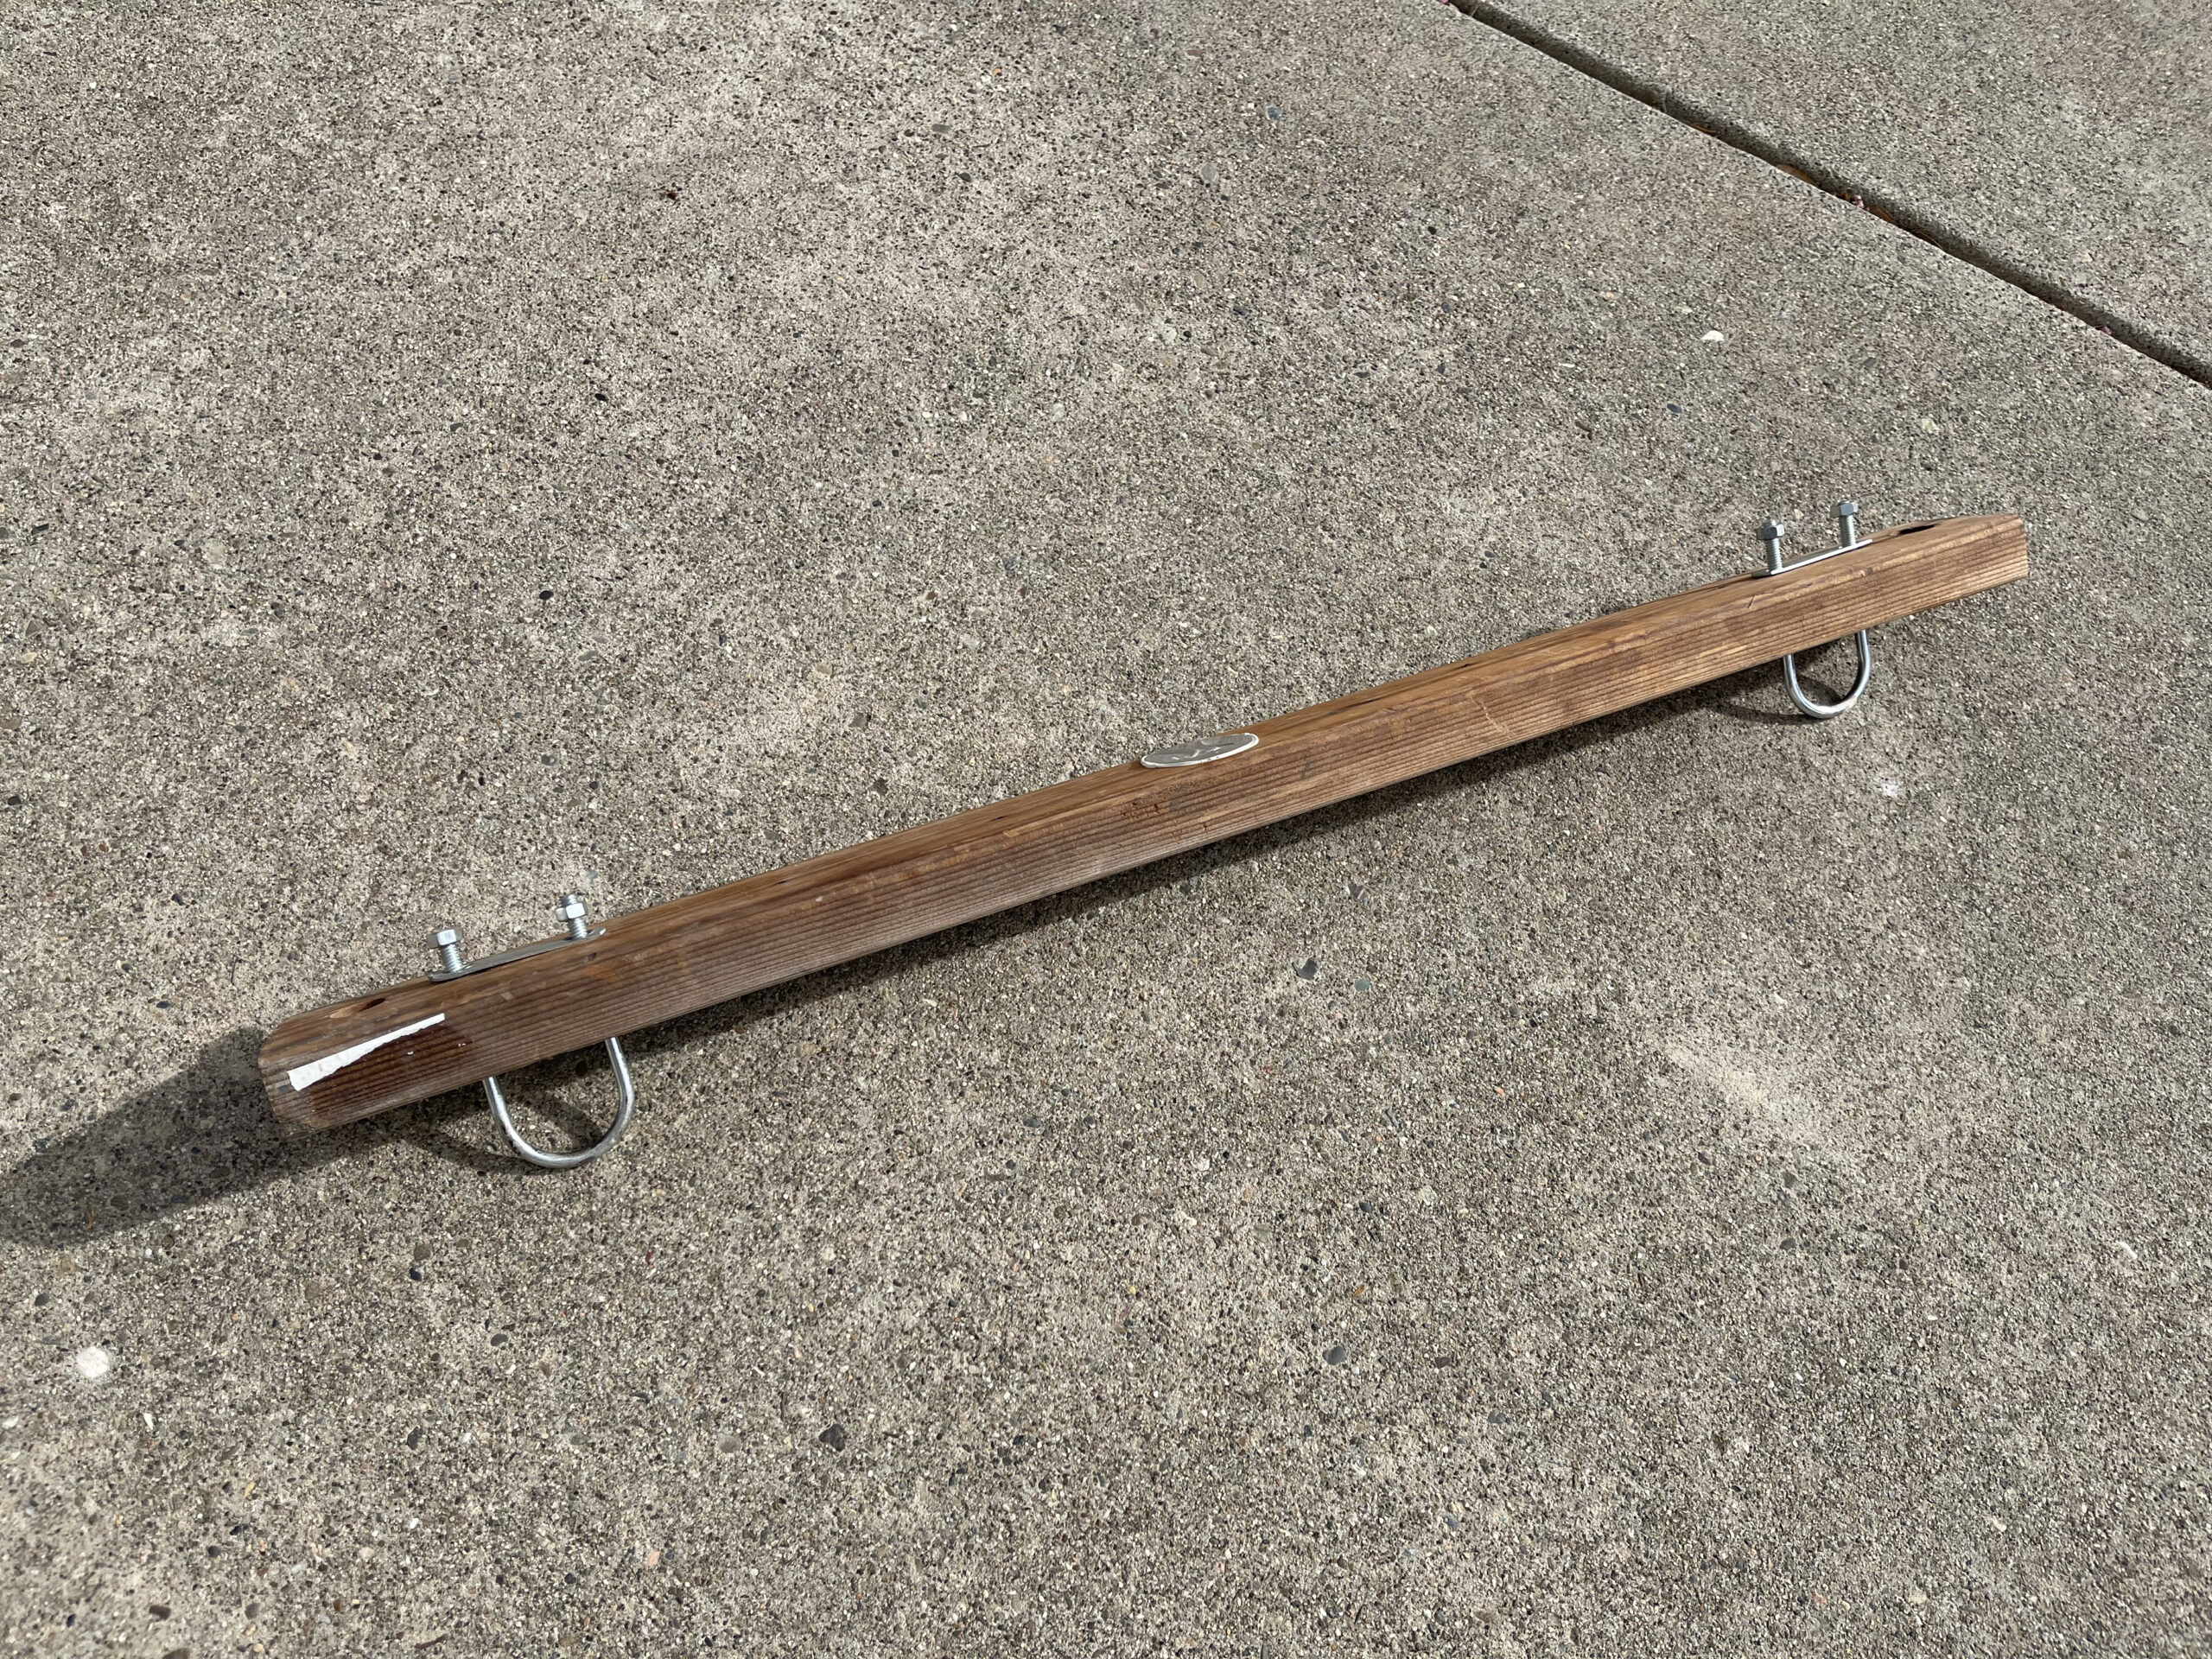
Here’s what it looks like when it’s installed. Again, make things hand-tight on the U-bolts, but you don’t need to crank them down all the way yet.
At this point, you are probably getting UNREASONABLY EXCITED (or, reasonably excited, actually — this is pretty cool). It looks like a tandem and you can see it starting to come together!
When we built the prototype, there was one thing we noticed, which was the frames wanted to deflect toward each other and sort of try to collapse. To prevent this, you’ll want to add another support across the back of the bike.
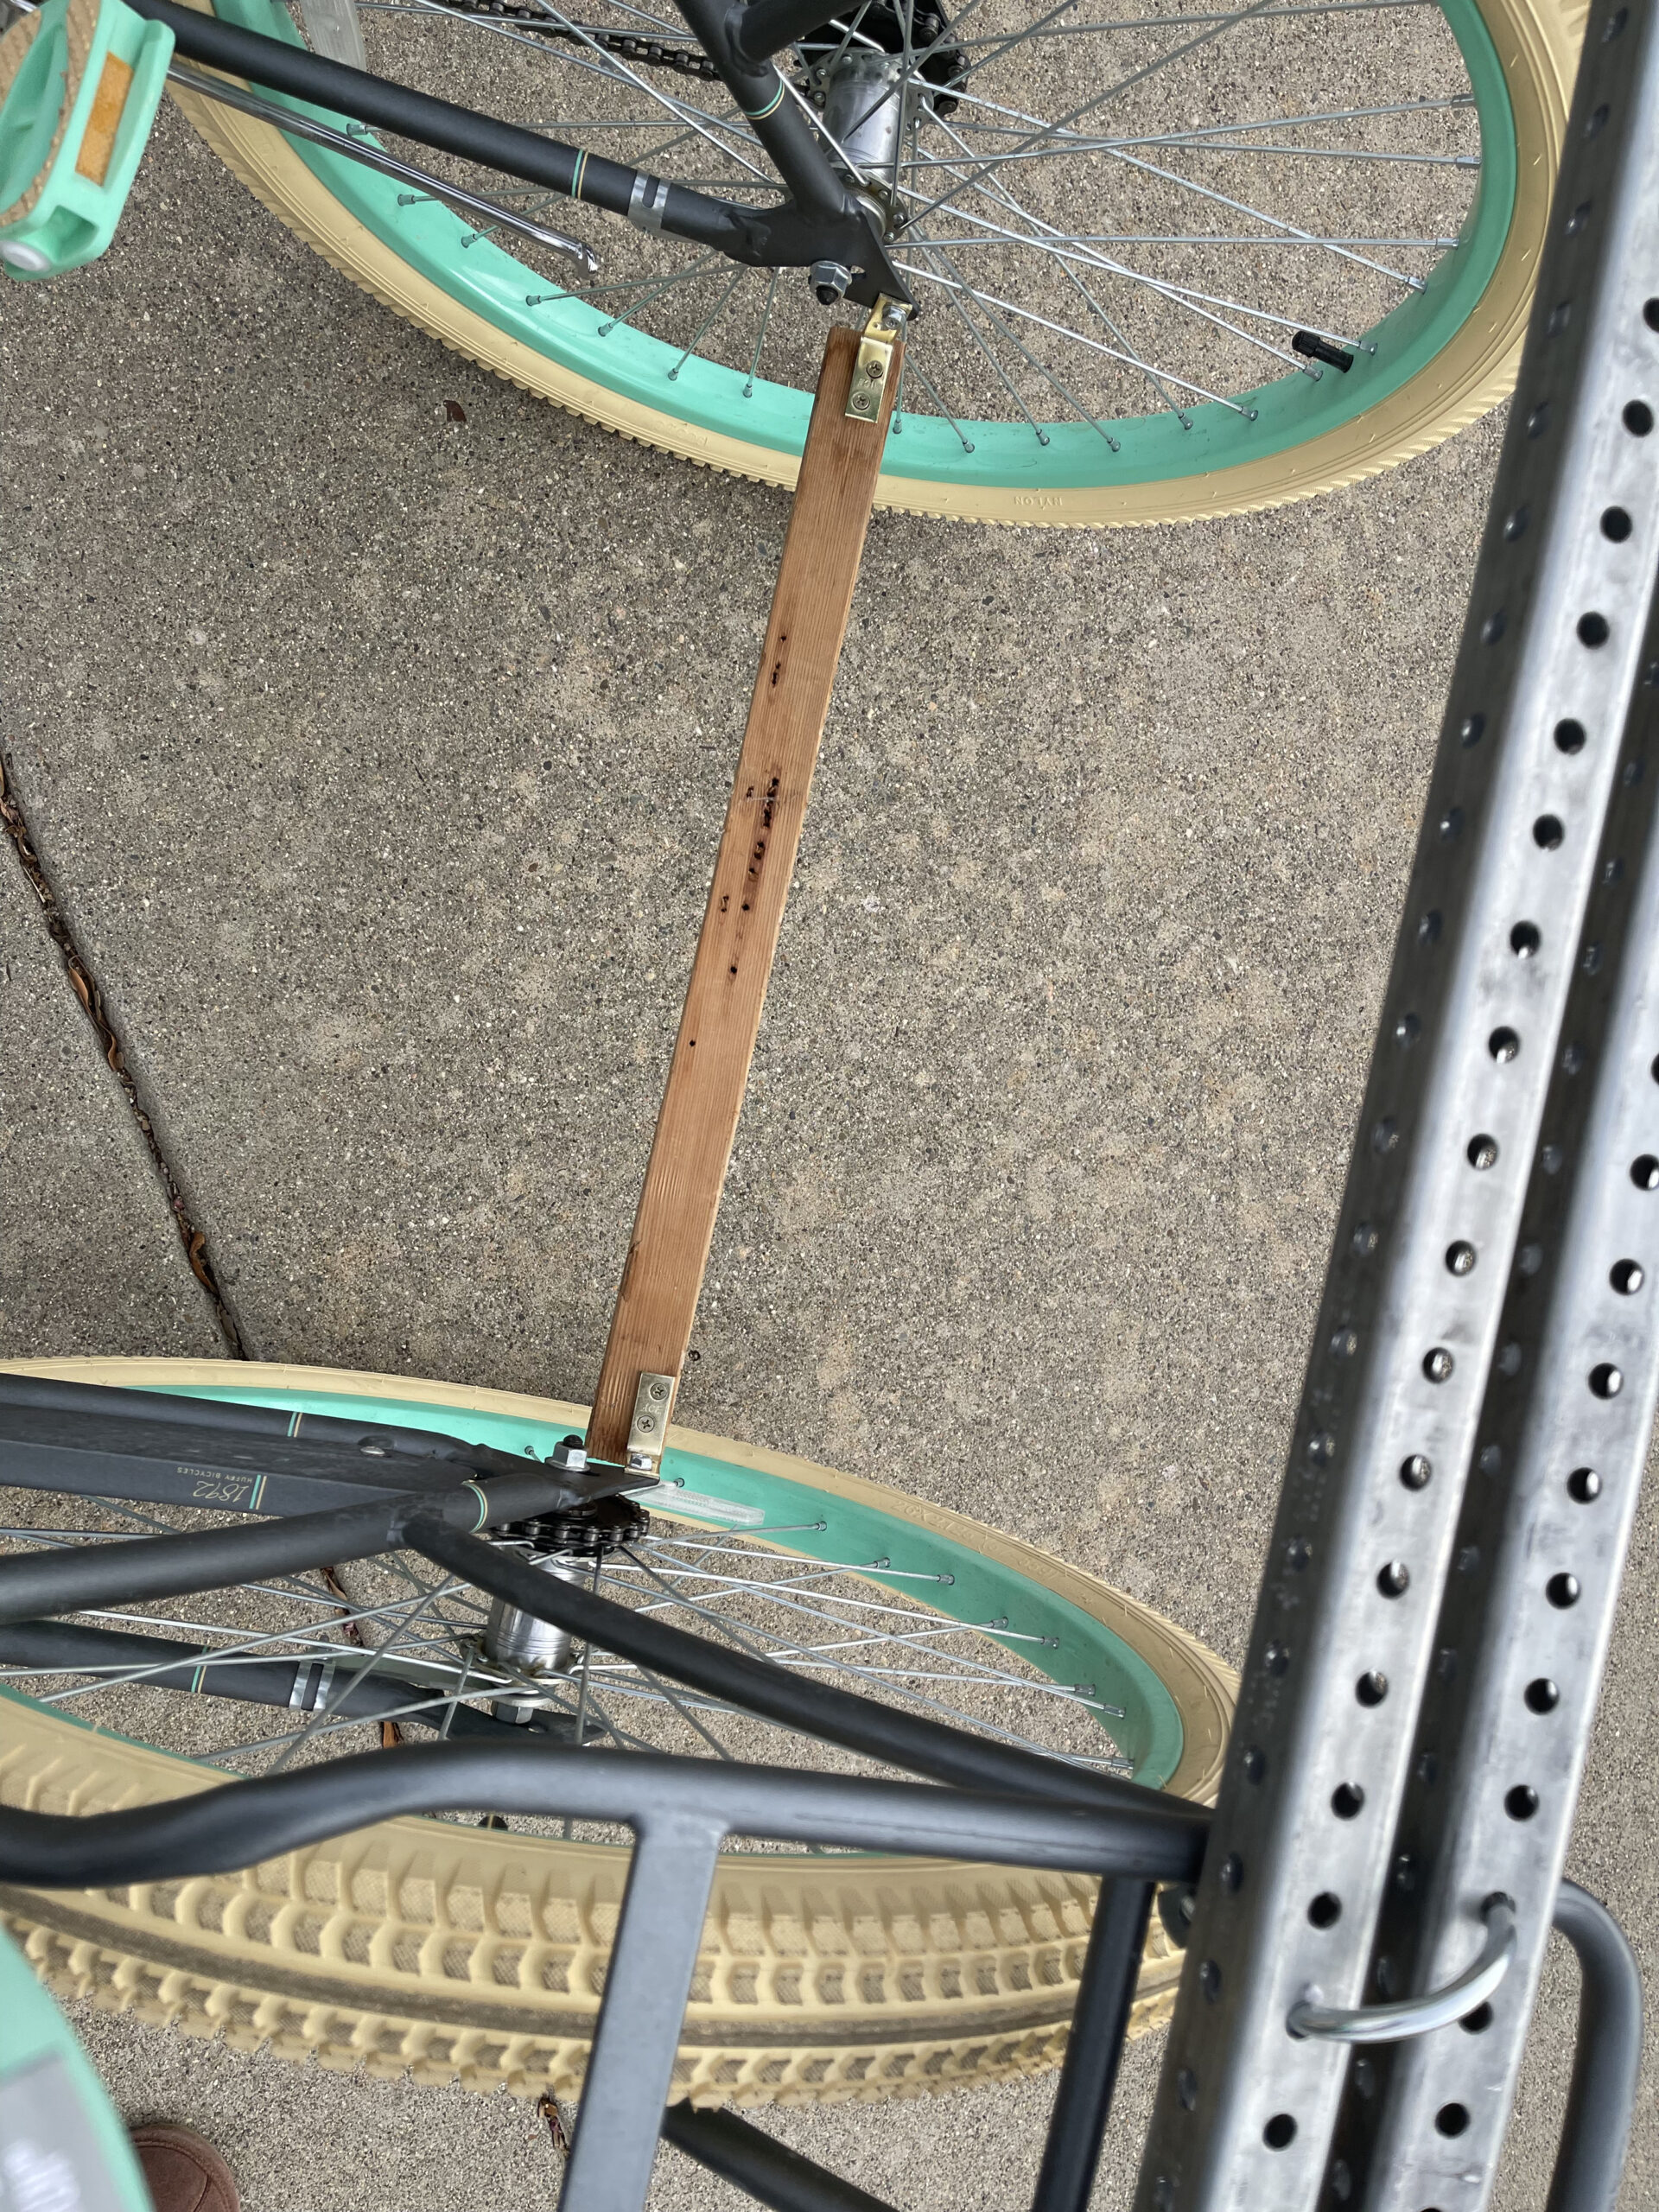
In almost every frame, there are two little holes pre-drilled next to the rear hubs for attaching things like additional racks and such. We’re going to use these to our advantage.
With the bikes standing straight up and parallel, measure the distance between the inside of the rear frames at these connection points noted in the point above.
Cut the 2×2 to that length and attach the angle brackets to the 2×2 like so.

Affix the 2×2 across the bottom rear of the frame to those connection points. This will provide a noticeable amount of stability and rigidity to the tandem and help prevent it from folding in on itself.
At this point, the sociable tandem is totally rideable! If you’re going to do that with a partner, make sure you are really sociable and communicating well as you ride! Nothing worse than one person turning left when the other turns right as you approach an obstacle. ? #safetythird
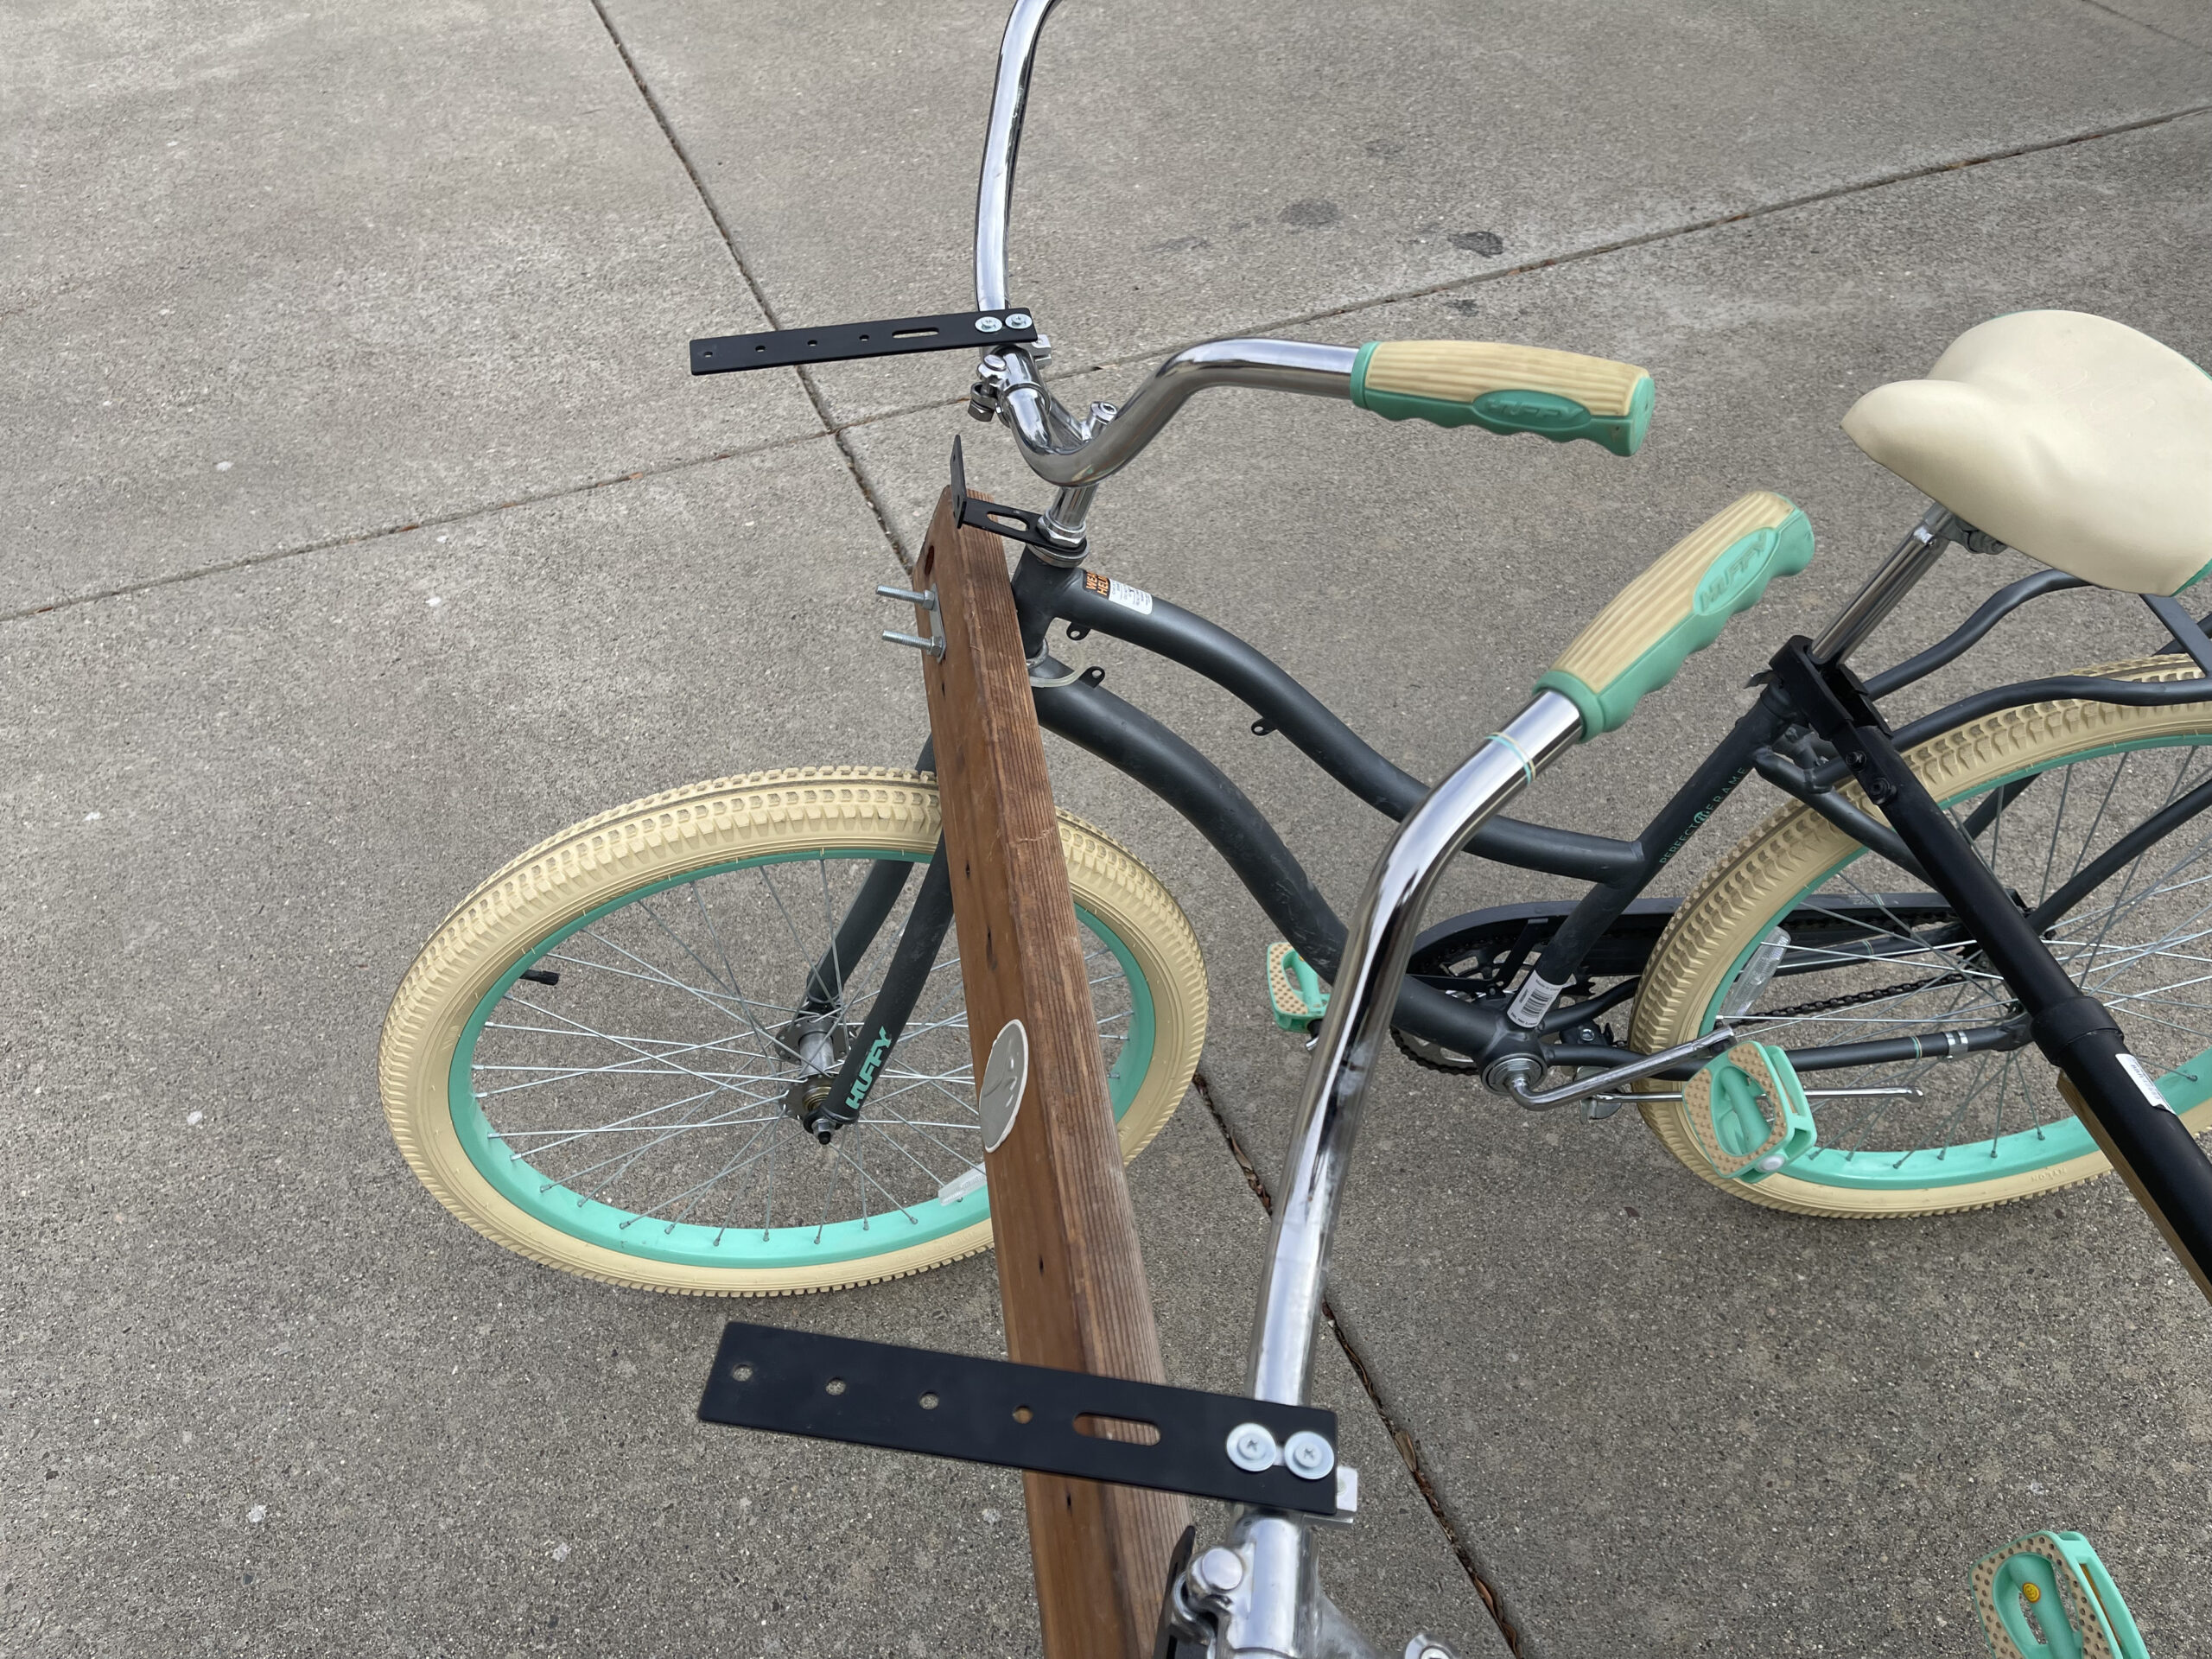
When first researching sociable tandems a few years back, this was the component that did fully blow my mind. If you yoke the handlebars together, not only does it solve the one-turns-left and one-turns-right issue noted above, it even makes the tandem rideable by a single individual! When yoked together, the other handlebar happily follows along the same direction when the first handlebar is turned. Here’s how to do it.
What’s needed:

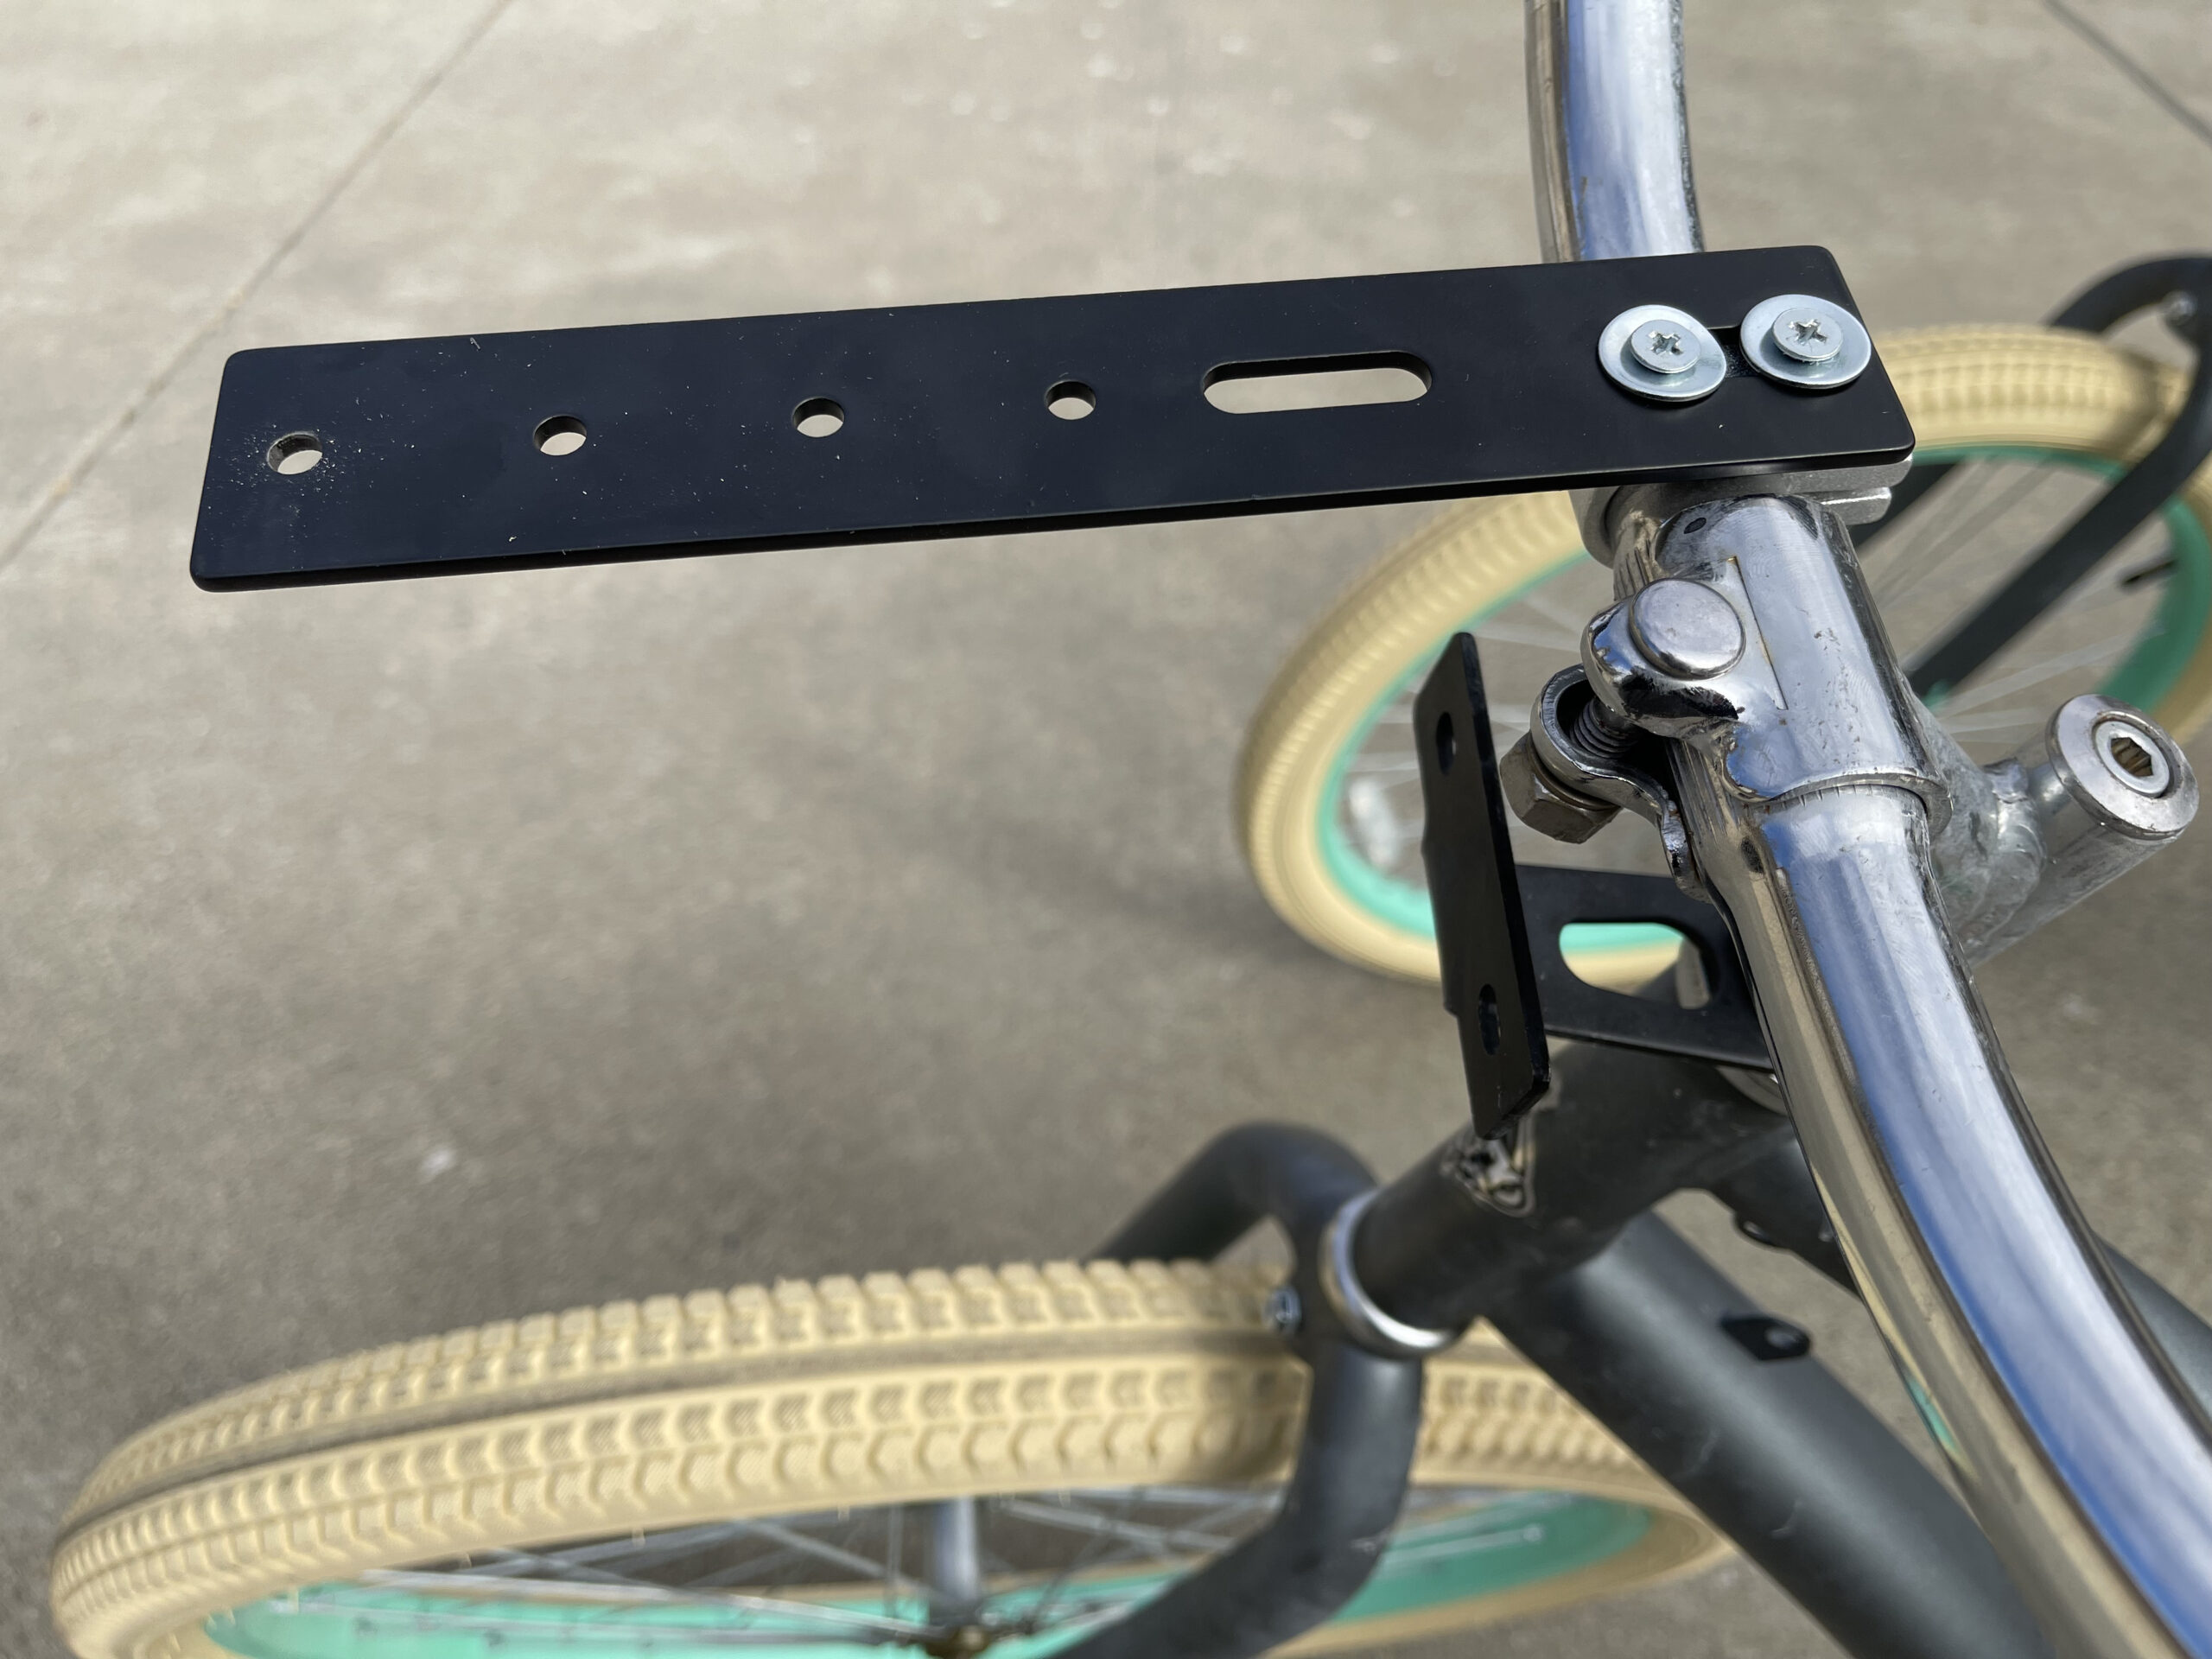
The flat brackets I found that worked are called “flat slotted mending plates.” I got these ones off of Amazon, but your local hardware store may have them as well. They are a couple of dollars each.
Another bonus of this particular bike was that it had pre-attached brackets on the handlebars for a cupholder(?-wtf). I took the cupholders off and left the brackets on, and attached the mending plates to the brackets.
Make sure the brackets are on the same side of the handlebars, and the same distance from the center. For our bike here, they were just about an inch to the right of center on each set of handlebars.

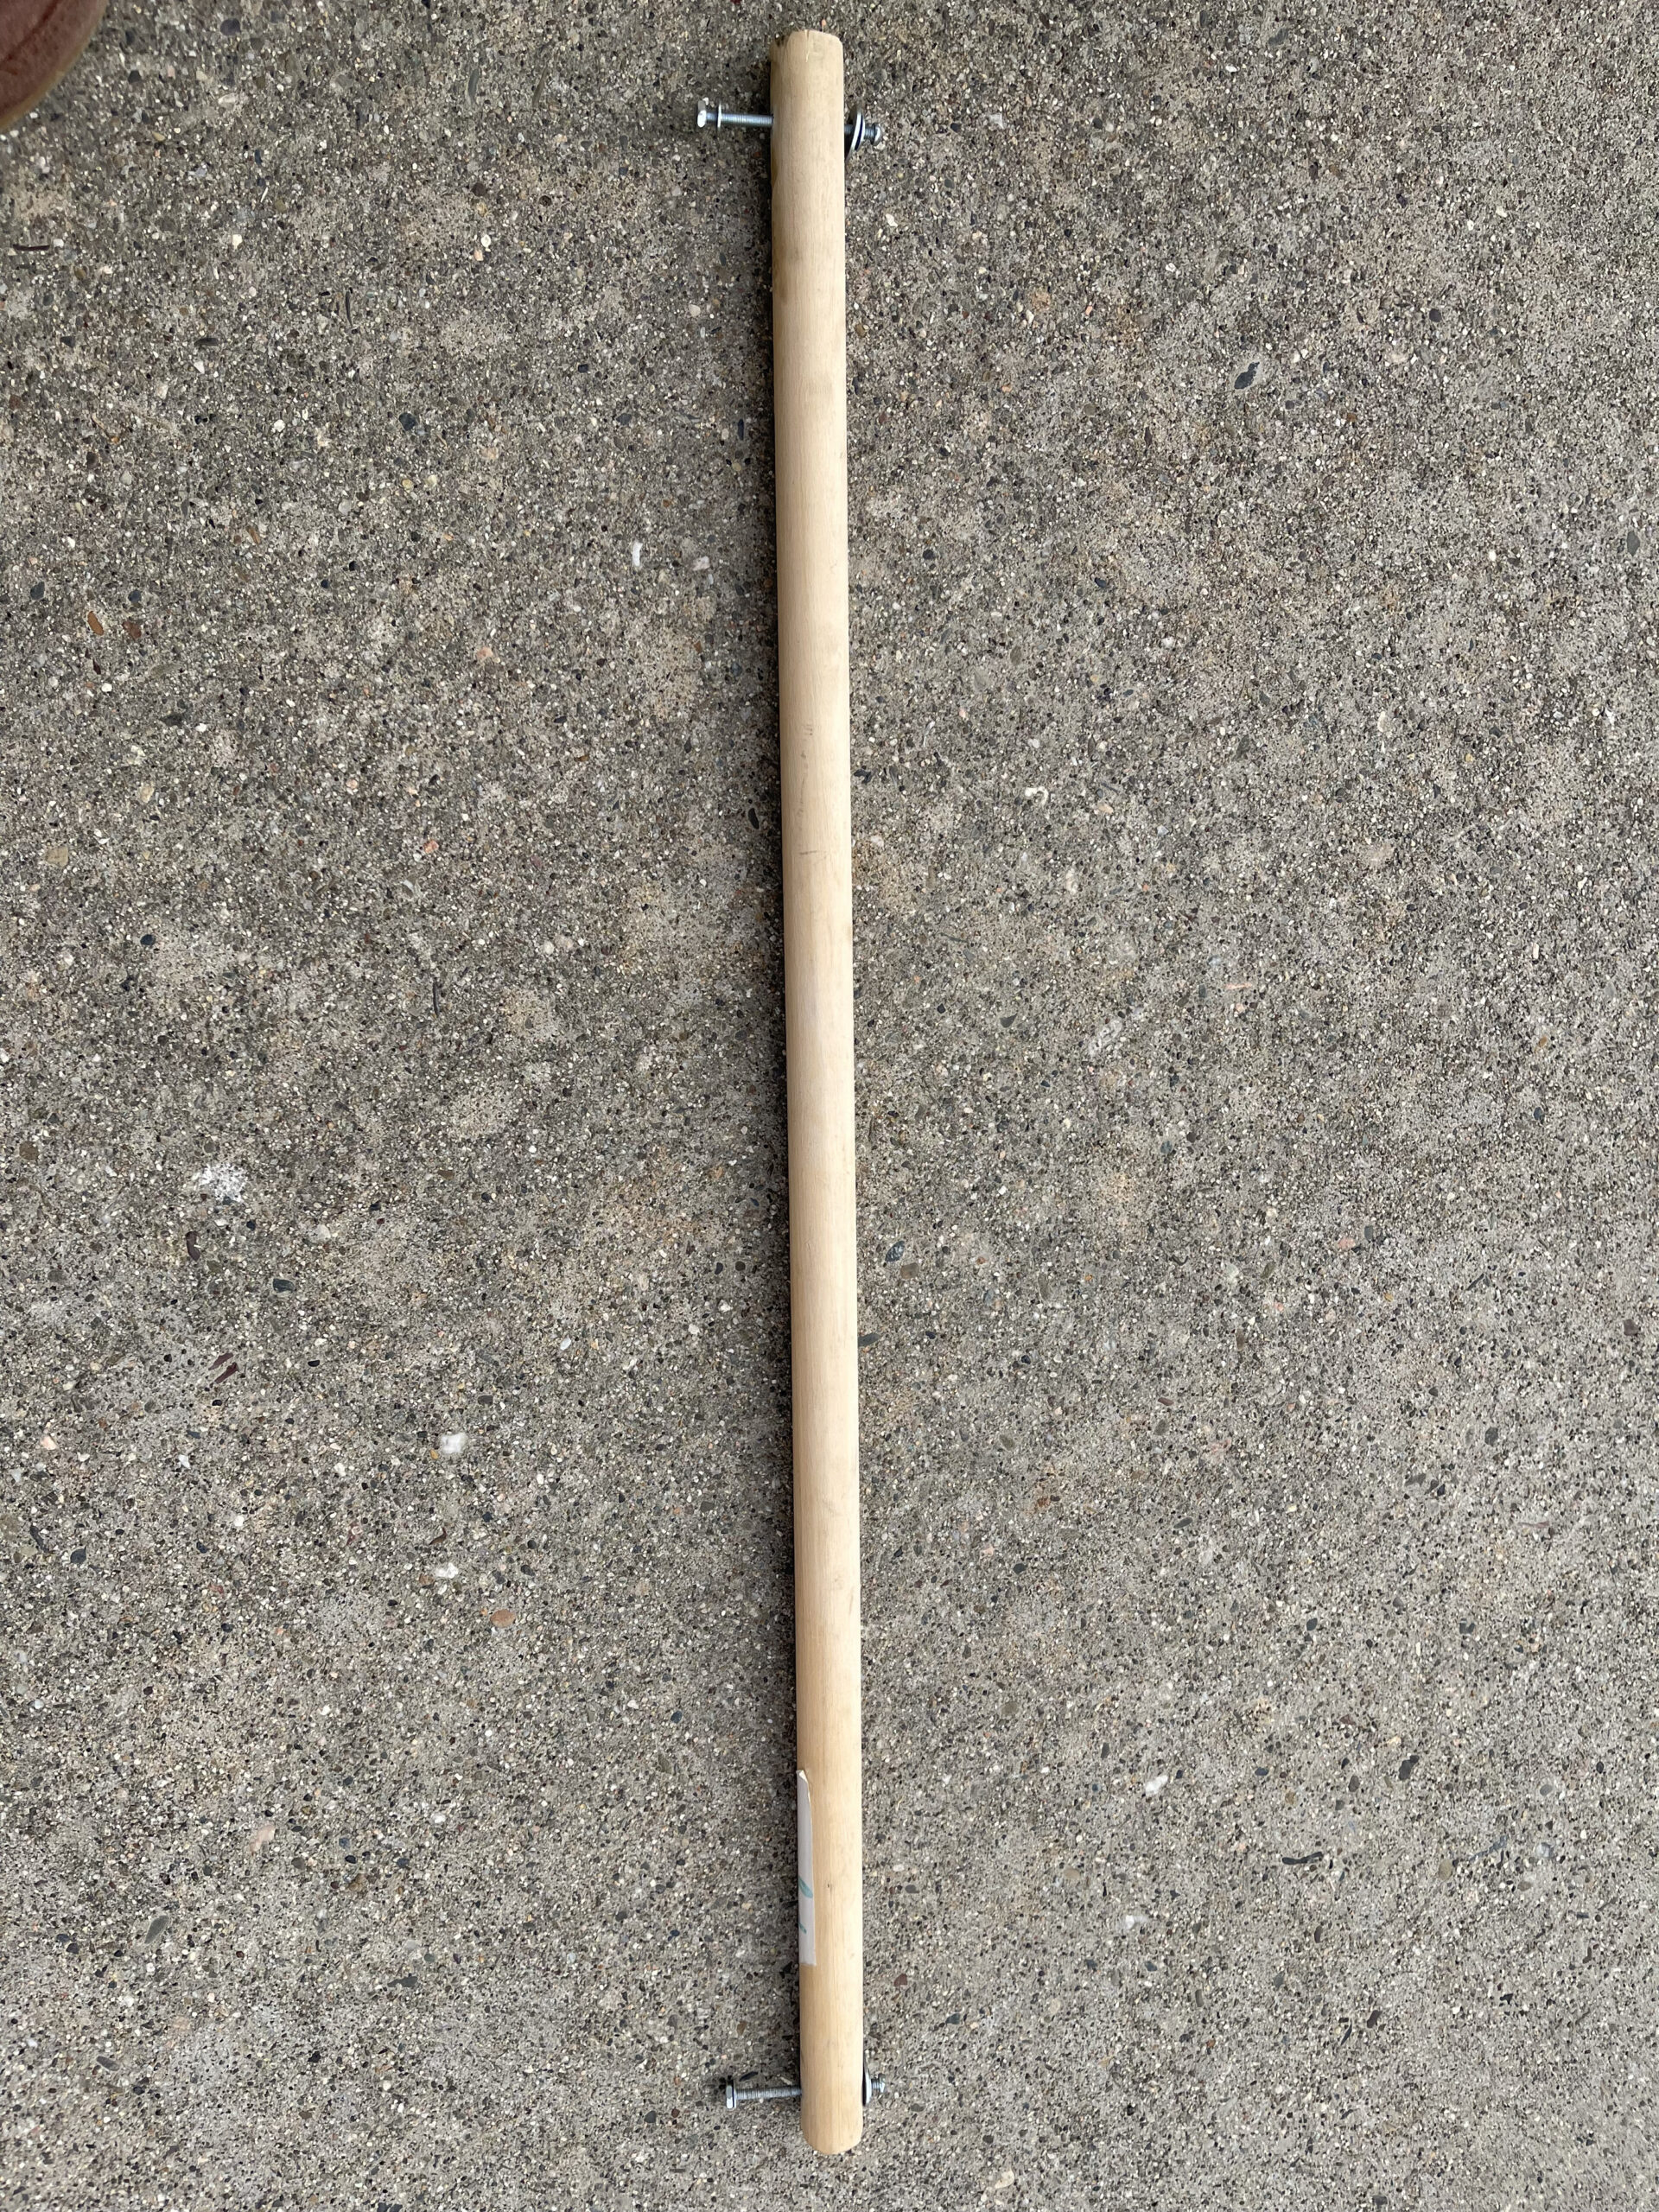
Then, cut your broom handle to length, put a couple of smalls holes in the broom handle with a hand drill, and drop the bolts in.
Put the broom handle across the mending plates, drop the bolts in and tighten them (not too tight), and you’re pretty much done! Note that since the nuts on those bolts are probably loose, you may want to put some electric tape or the like below the nuts so they don’t vibrate off while riding.
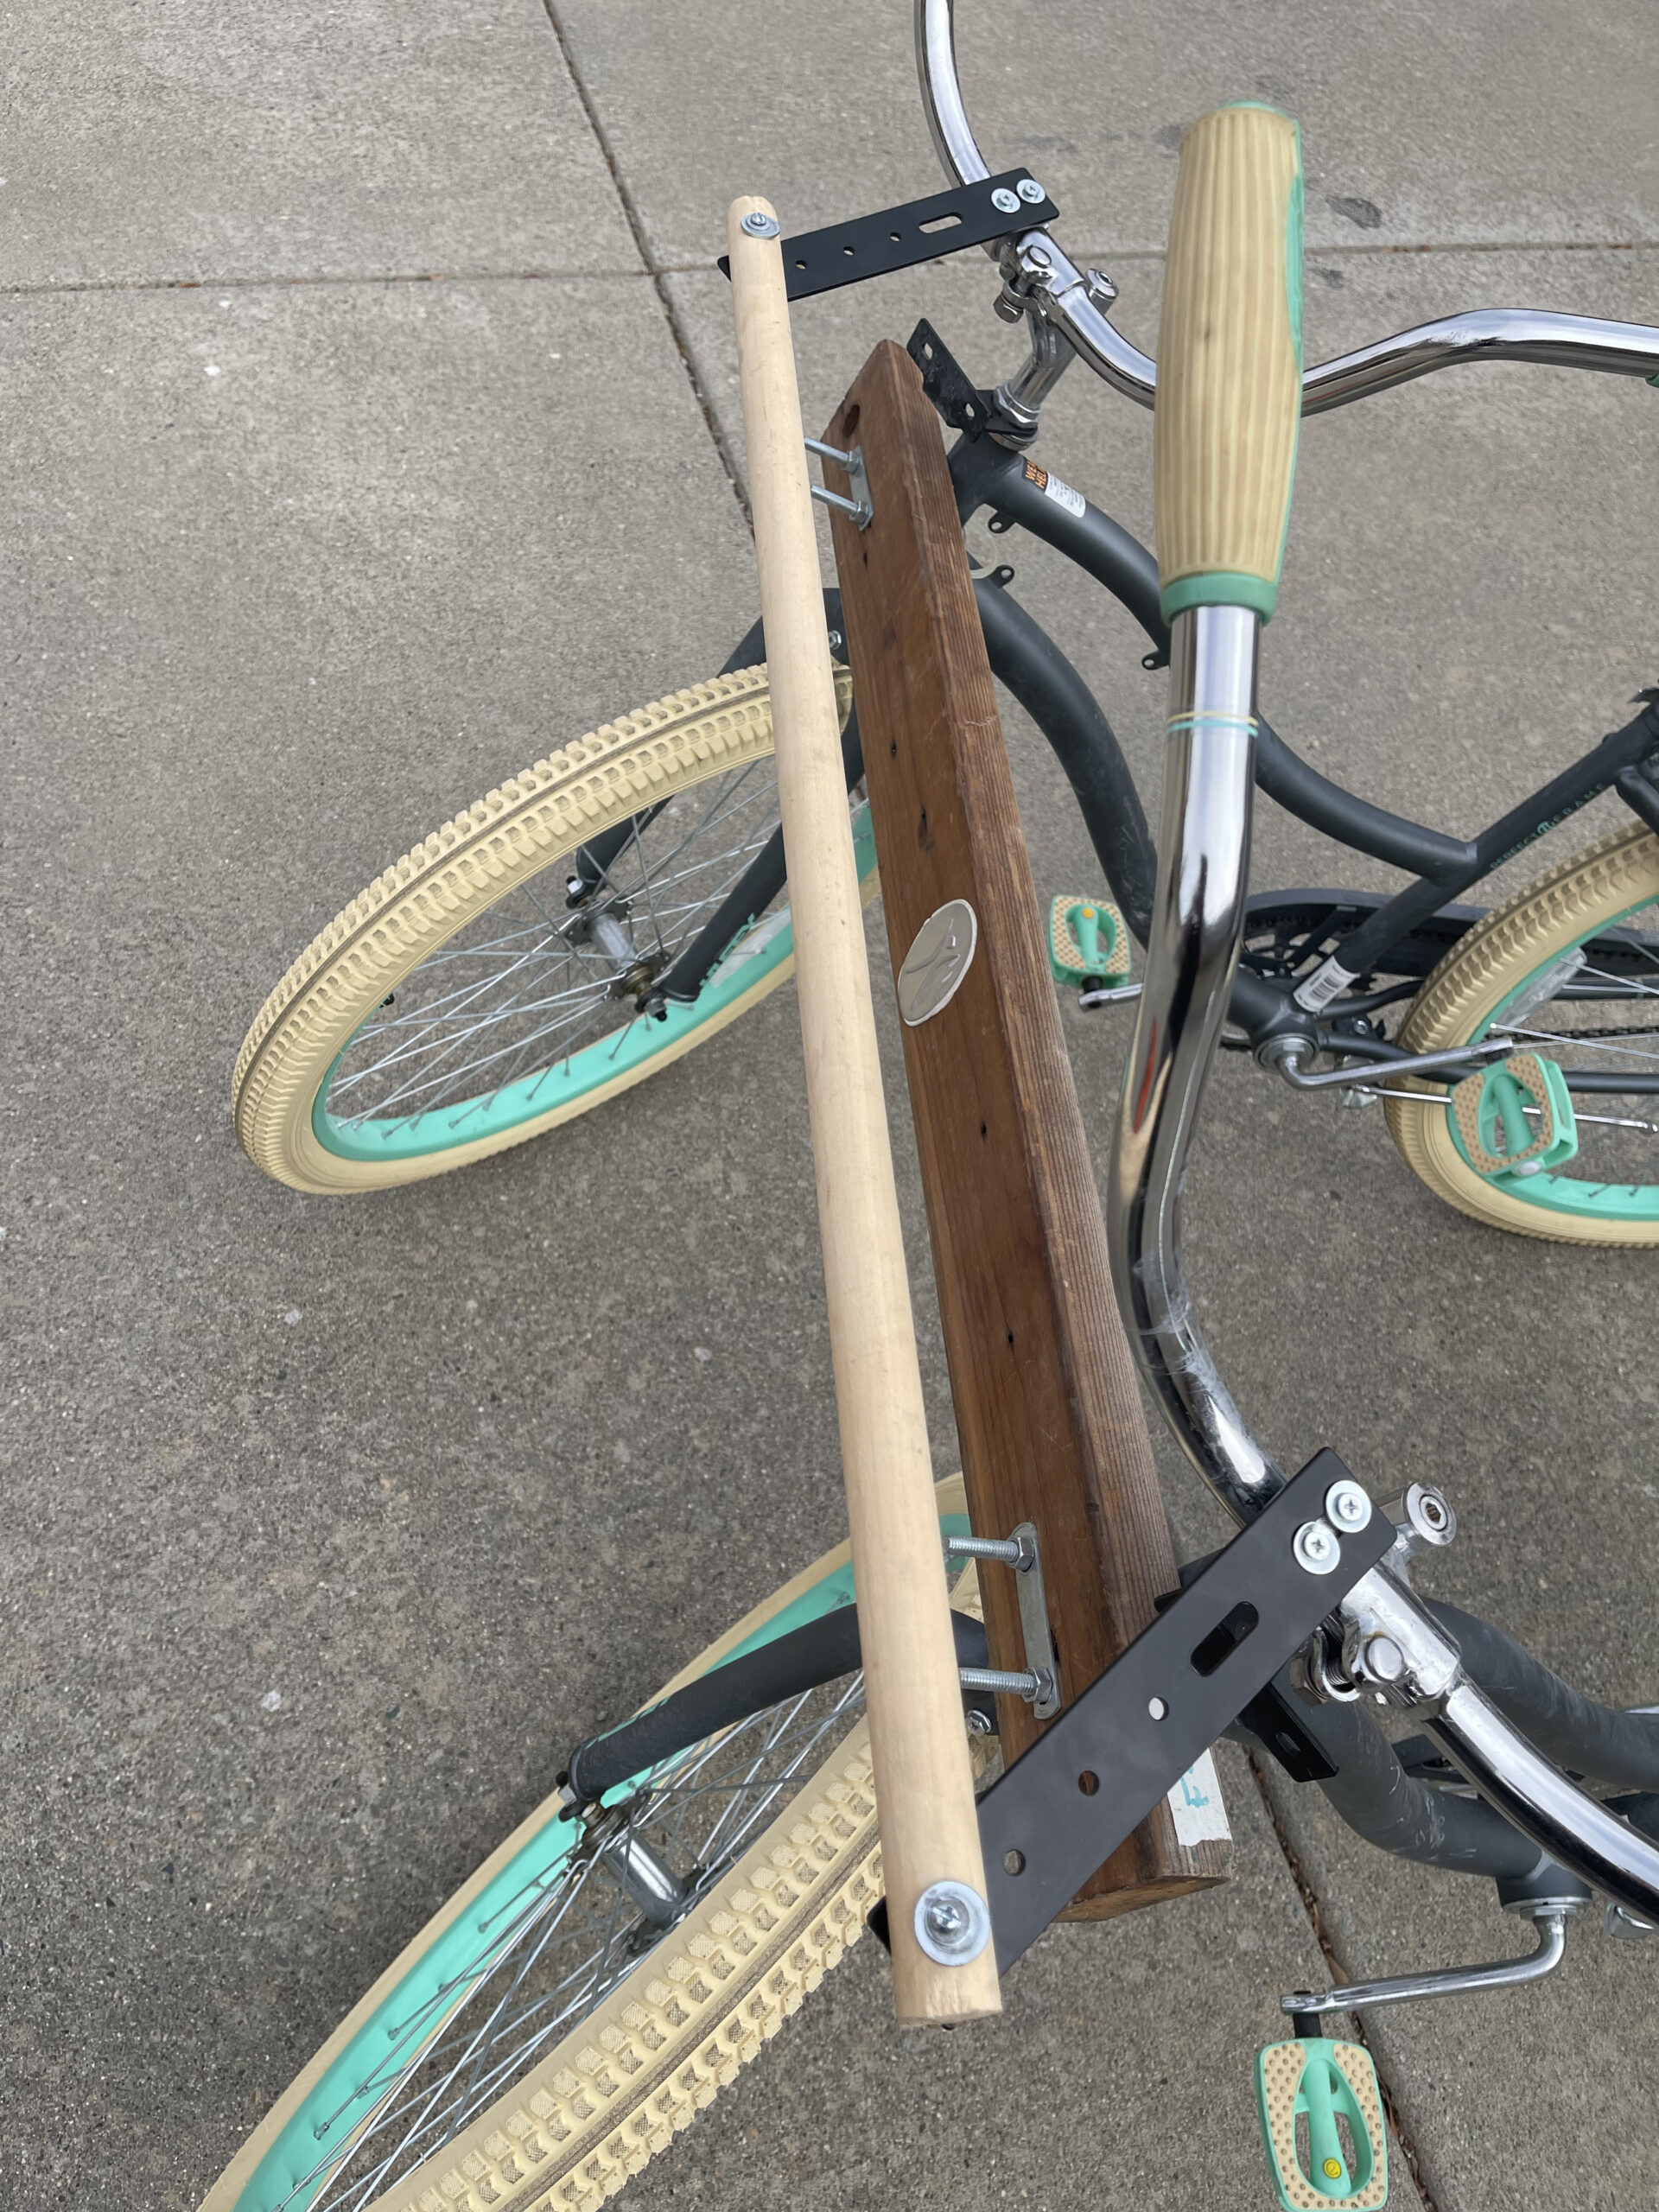
And with that, you’re done! Tighten things up and give it a safe test ride, and enjoy!


“The research highlights that AI automation affects two-thirds of U.S. occupations to varying degrees. A significant portion of these jobs could see substantial replacement due to automation. The researchers propose that jobs with 50% or more of their tasks automated are at risk, while those with 10-49% automation will see AI complement human efforts.”
“Historical evidence suggests that companies adopting new technologies tend to expand their workforce while others lag behind2. Firms investing in AI are poised for better performance, but the landscape will inevitably include both winners and losers. Moreover, widespread downward wage pressure is anticipated as workers become more efficient and the demand for human labour diminishes.”
Source and full read:
https://www.exponentialview.co/p/after-ai-where-will-the-jobs-come-from
